My Old Build Thread from Expedition Portal “Refreshing the TJ”, Truncated to critical posts and reattached photos which Photobucket ruined in their horrible transition.
Original Build Thread : https://forum.expeditionportal.com/threads/refreshing-the-tj-build-thread.62651/
This is a build thread for my ever evolving rig to keep myself motivated and to share thoughts and ideas related to this hobby.
I purchased this truck in 2007 as a stock 2000 TJ Sahara at around 60,000 miles and presently have around 135,000 miles on the ticker. Through needed maintenance I have begun upgrading the truck and ended up with a reliable vehicle that has taken me many places. Unfortunately, most of the suspension is factory and thousands of miles on fireroads and trails have taken its toll.
The plan is to replace and upgrade the entire suspension to ensure continued reliability, easy maintenance and address some weak points and downsides of the drivetrain while everything is torn apart. Clearly this list of modifications will not happen overnight, but I have built or am building most of the components out of the vehicle. I hope to keep this Jeep low and lightweight, yet have the capability to carry a comfortable load for extended trips for 2 people. Though it currently does that now, much needs to be addressed for what I picture as my ideal Overlanding TJ.
Note: I will do my best to reference locations purchased and part numbers of components I have picked up. If there are issues with these links or they are broken please let me know. I will also do my best to reference other builds and informational resources as I address them in the tread.
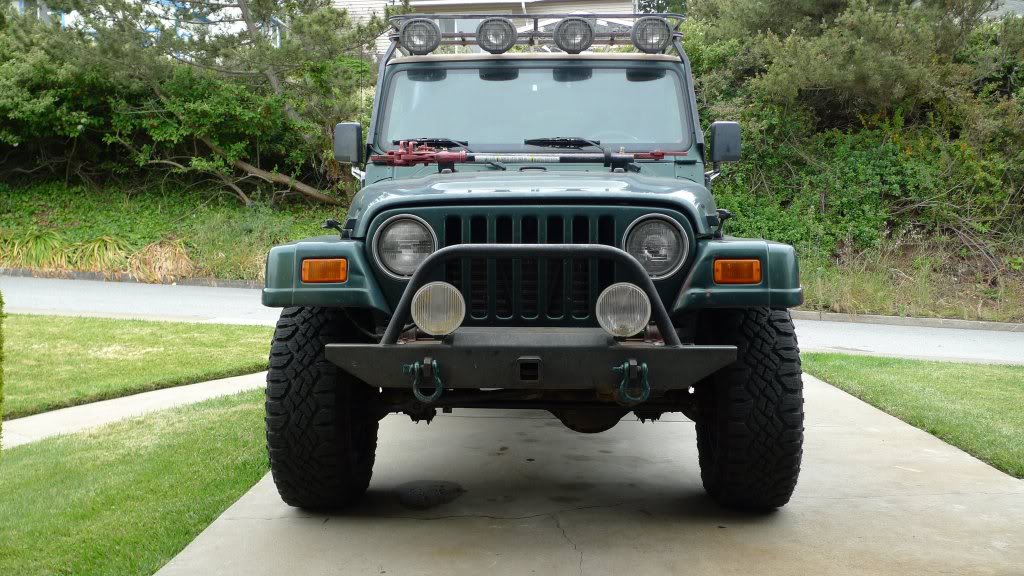
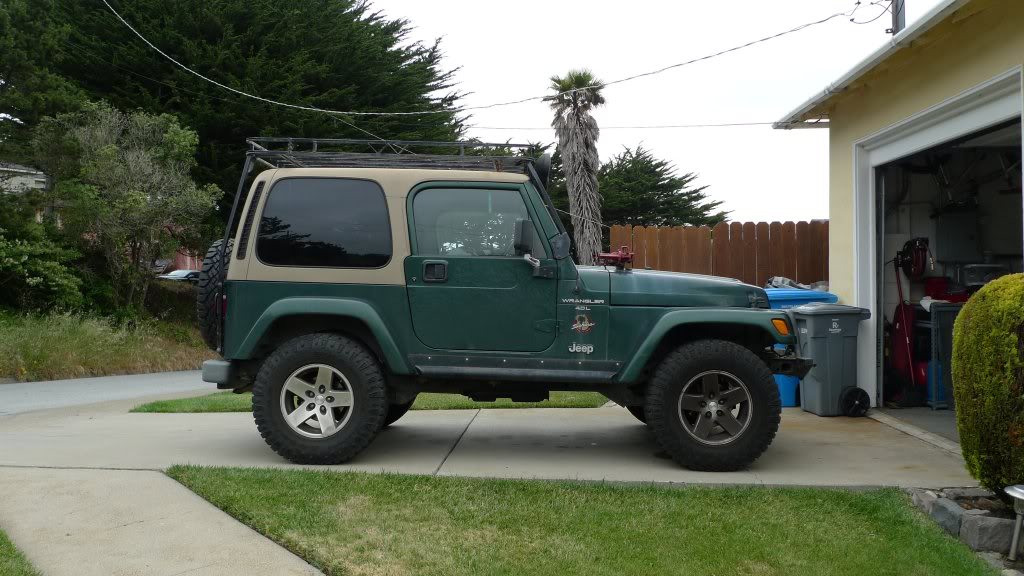
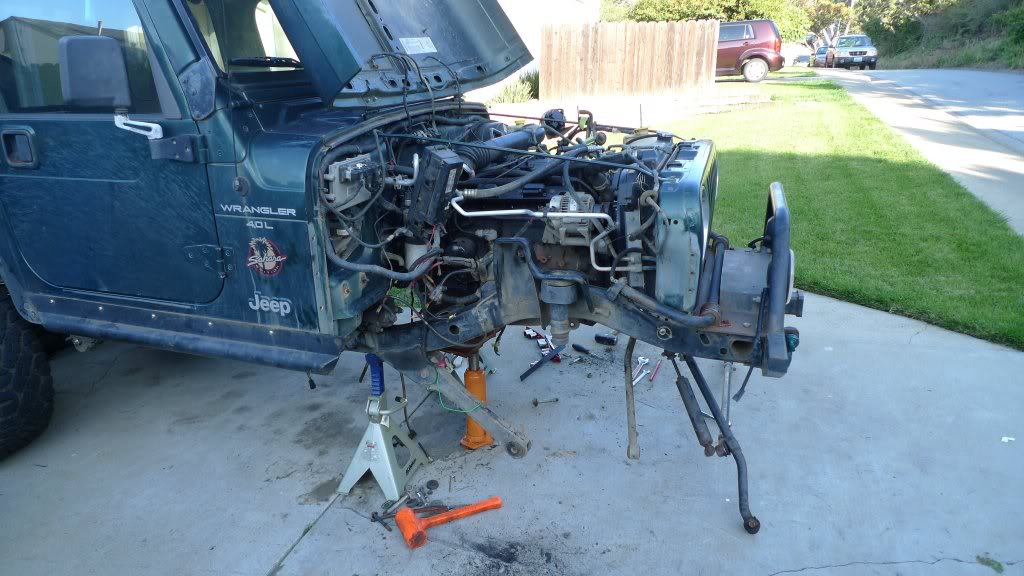
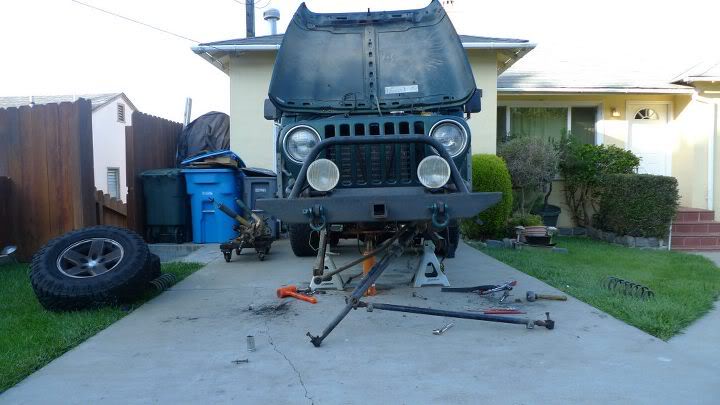
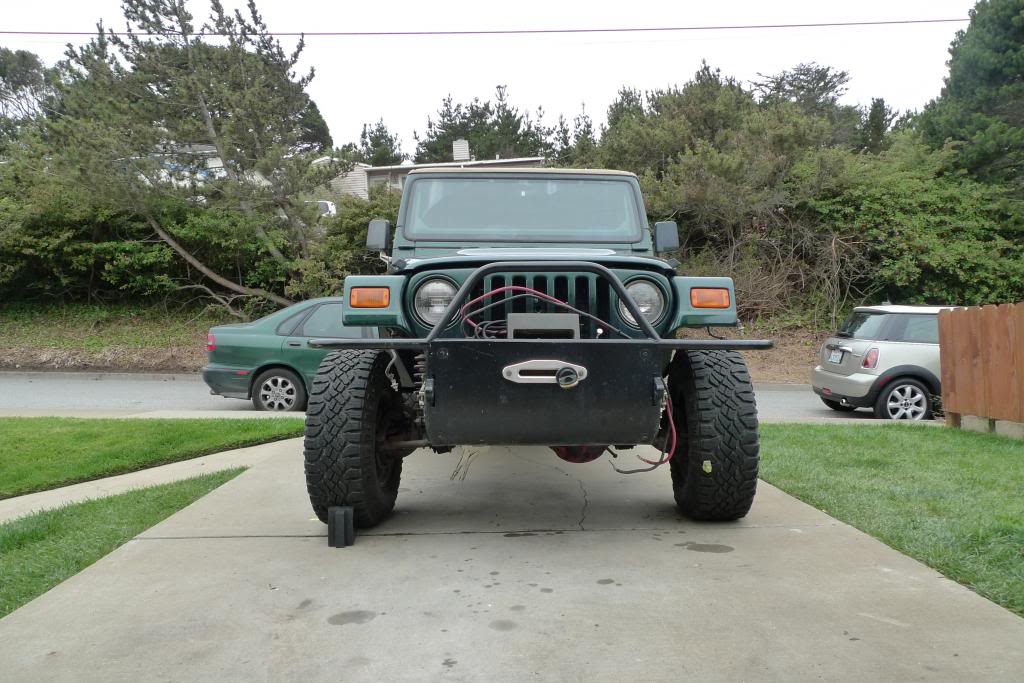
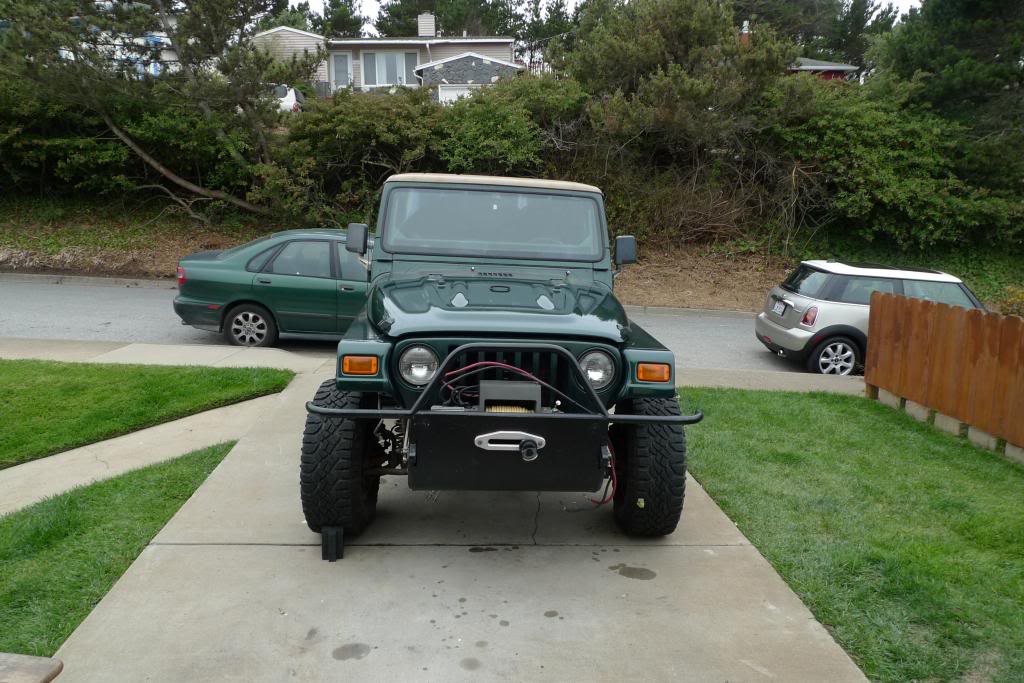
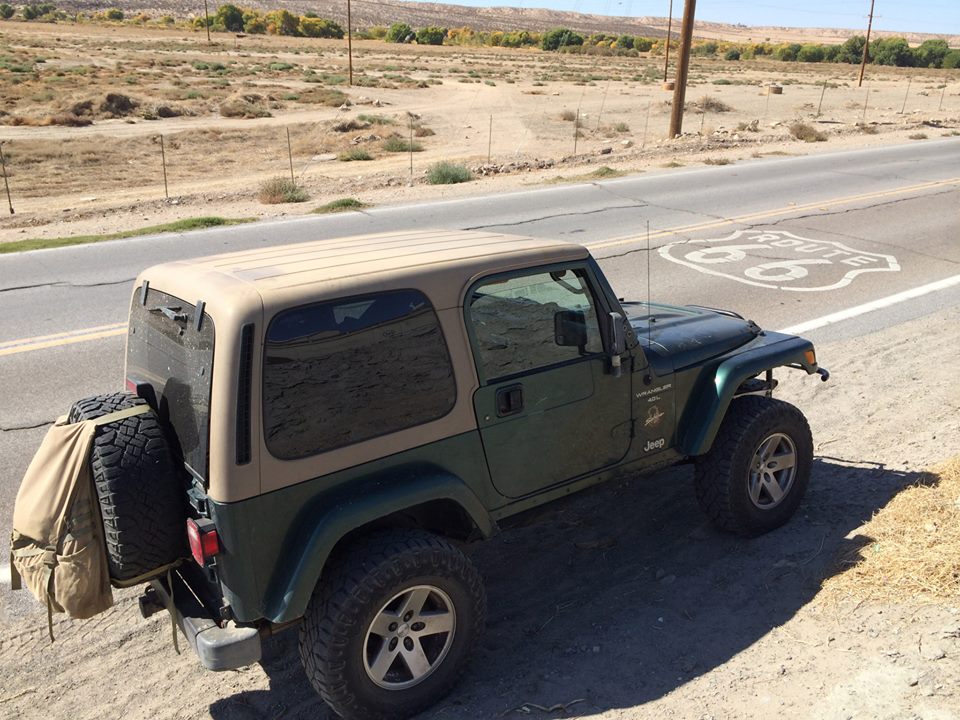
2000 Jeep Wrangler TJ – Before
Chassis
Frame / Chassis : Factory
Cage : None
Overall Wheel Base : 93.25”
Overall Length : Front Hitch to Tire ~160.00”, Front Hitch to Rear Hitch ~155.0”
Belly Pan Clearance : ~12.50 “ (lowest point of bottom skid)
Overall Height : ~79.00” (Highest point rear rack unloaded)
Wheel Track Width : ~59.25
Overall Weight : TBD
Front Shock Travel : 8.00″
Rear Shock Travel : 6.75″
Powertrain
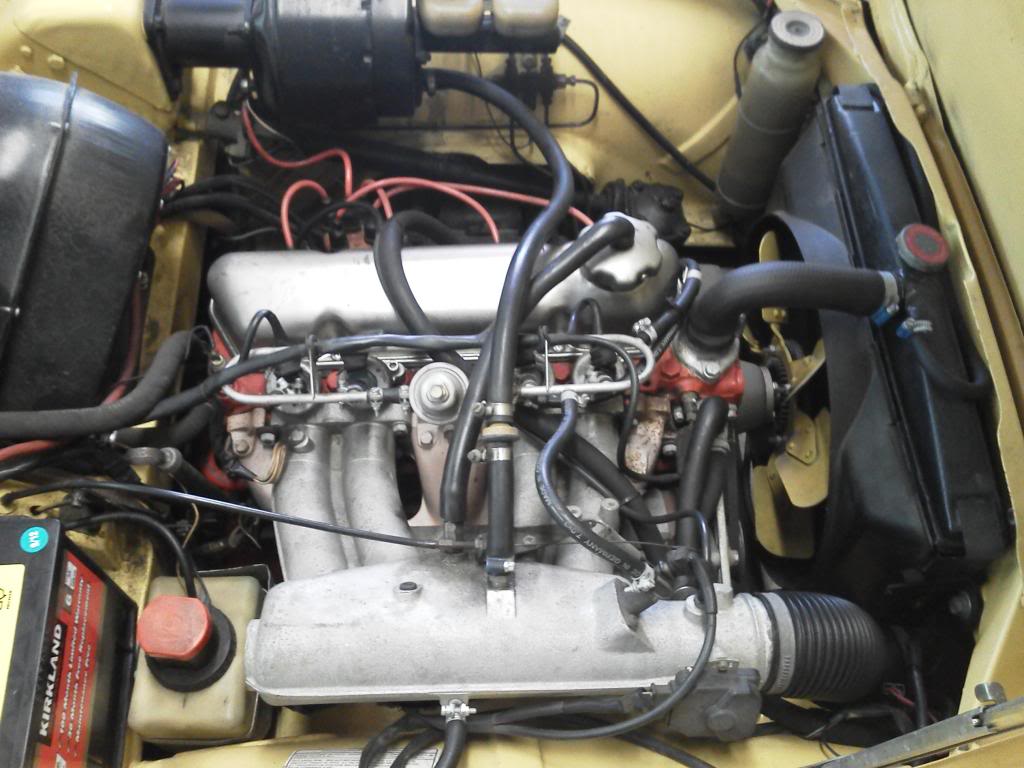
Engine : Factory 4.0 Liter, Precision Auto Injectors (99Jeep4Upgrade), Flow Cooler Water Pump (1750)
Batteries : Optima Red (Part Number is faded)
Radiator / Fans : Flex-a-lite Puller (485)
Air Intake : Factory Intake, K&N Filter (33-2114)
Exhaust : Factory
Muffler : Factory
Transmission :TF999 – 32RH
Torque Convertor : Factory
Transfer Case :NP 231 J
Transfer Case Shifter : Factory
Fuel Containment : Factory
Body / Interior
Body / Body Panels : Factory
Body Modifications : Dents & Scratches
Skid plate / Material : Factory
Hood / Grille : Factory
Top : Factory Hardtop
Armor : Factory
Dash / Gauges / Switches : Factory
Steering Column / Wheel : Factory Tilt
Pedal Assembly : Factory
Drivetrain
Front Suspension : Factory Coils, Teraflex 2” Spacer (1245200) – Purchased Used
Front Shocks : Bilstein (24-024426)
Front Sway Bar : Factory, JKS Quicker Disconnects (20301)
Front Bump Stops : Factory w/ Homemade Extensions
Front Axle Housing : Dana 30
Front Locker : None
Front Ring & Pinion : 3.07
Front Differential Cover : Factory
Front Axle Shafts : Factory
Front U-Joints : Factory
Front Brakes : Factory Components, Crown Industrial 5 Layer Hoses (12706.422), EBC Yellow Pads (EBCDP41255R), Centric Premium Front Disc (CE120.67045)
Front Steering Setup : Currie HD Tie Rod System (CE-9701)
Front Driveshaft : Factory
Rear Suspension : Factory Coils, Teraflex 2” Spacer (1245200)– Purchased Used
Rear Sway Bar : Factory
Rear Shocks : Bilstein (24-024433)
Rear Bump Stops : Factory w/ Homemade Extensions
Rear Axle Housing : Dana 35
Rear Locker : Factory LSD (rebuild after blowing up clutches)
Rear Ring & Pinion Ratio : 3.07
Rear Differential Cover : Factory
Rear Axle Shafts : Superior Dana Rear Axle (SAG-PA5947A, SAG-PA5947B)
Rear Brakes : ZJ Disk, Crown industrial 5 Layer (12706.422), EBC Green Truck Pads (E35DP61606),Wilwood Knob Proportioning Valve(260-10922)
Rear Drive Shaft : Factory
Tire Make / Size : Goodyear Wrangler Duratrac 265/75-16 Load Range E
Wheel Make / Size / Bolt Pattern : Factory – Rubicon 16×10 – 5 x 4.5
Body / Interior
Seats / Harnesses : Factory
Electronics : Center Dash Mount Acer Aspire One, Garmin GPS Puck
Lights Interior : Factory
Lights Exterior : 4 x Off-Road Truck Light (3029)
Safety – Fire Extinguisher : None
Winches – Front / Rear : None
Exterior Rack : Garvin Wilderness Rack (34098)
Before Front :
Before Side :
2000 Jeep Wrangler TJ -Current (4/4/2012 Update)
Chassis
Frame / Chassis : Factory
Cage : Synergy Suspension TJ Cage Kit – Proposed
Overall Wheel Base : 93.5”
Overall Length : Front Hitch to Tire ~160.00”, Front Hitch to Rear Hitch ~155.0”
[Belly Pan Clearance : 13.75” – Evaluating skid options
Overall Height : ~80.25” (Highest point rear rack unloaded)
Wheel Track Width : ~61” Front , 60.5” Rear
Overall Weight : TBD
Front Shock Travel : 11.50”
Rear Shock Travel : 10.75”
Powertrain
Engine : Factory 4.0 Liter, Precision Auto Injectors (99Jeep4Upgrade), Flow Cooler Water Pump (1750), Currie 1″ Motor Mounts (CE-9200)
Batteries : Optima Red (Part number is faded)
Radiator / Fans : Flex-a-lite Puller (485)
Air Intake : Spectre CAI (9943) (Shock towers now block factory location)
Exhaust : Magnaflow Performance Catalytic Converter (50209)
Muffler : Dynomax Super Turbo (19391)
Transmission : AW4 (Modified Valve Body & Accumulators), RAD Designs Baja II Shifter – TransGo Shift Kit (T97165A)
Torque Convertor : Factory
Transfer Case :NP 231 J w/ Currie Tail Shaft Conversion Kit (CE-9069T)
Transfer Case Shifter : Advanced Adapters Cable Shifter (715543)
Fuel Containment : Factory
Body / Interior
Body / Body Panels : Factory
Body Modifications : Factory
Skid plate / Material : Factory
Hood / Grille : Factory
Top : Factory Hardtop
Front Bumper : Under Construction
Rear Bumper : Planning
Armor : Evaluating make vs buy skid options
Dash / Gauges / Switches :Compressor, Locker & Transmission Control Switch – In Progress
Steering Column / Wheel : Factory Tilt
Pedal Assembly : Factory
Drivetrain
Front Suspension : OME 2.0” (2933), Currie Johnny Joint Control Arm Set (9100), Currie Johnny Joint Track Bar (CE-9120TJS)
Front Shocks : FOA 2.0 12″ Reservoir Shock – Medium Compression & Light/Medium Rebound (FOA-12), Extending Shock Mounts – TBD
Front Sway Bar : Factory, JKS Quicker Disconnects (2030)
Front Bump Stops : TBD
Front Axle Housing : Dana 30, Superior Front Axle Tube Seals (EV70FSL)
Front Locker : ARB Air Locker ARB (RD100), ARB High Output Compressor (CKMA12)
Front Ring & Pinion : 4.56
Front Differential Cover : ARB Differential Cover (0750002)
Front Axle Shafts : Factory
Front U-Joints : Factory
Master Cylinder: Factory
Front Brakes : Factory Components, Crown industrial 5 Layer (12706.422), EBC Yellow Pads (EBCDP41255R), Centric Premium Front Disc (CE120.67045)
Front Steering Setup : Currie HD Tie Rod System (CE-9701)
Front Driveshaft : Factory
Rear Suspension : OME 2.0” (2942), Currie Johnny Joint Control Arm Set (9100), Currie Johnny Joint Track Bar (CE-9120R)
Rear Sway Bar : Factory
Rear Shocks : FOA 2.0 12″ Reservoir Shocks – Medium Compression & Medium Rebound (FOA-12), Synergy Suspension Coilover Bracket (PPM-5001)– TBD
Rear Bump Stops : TBD
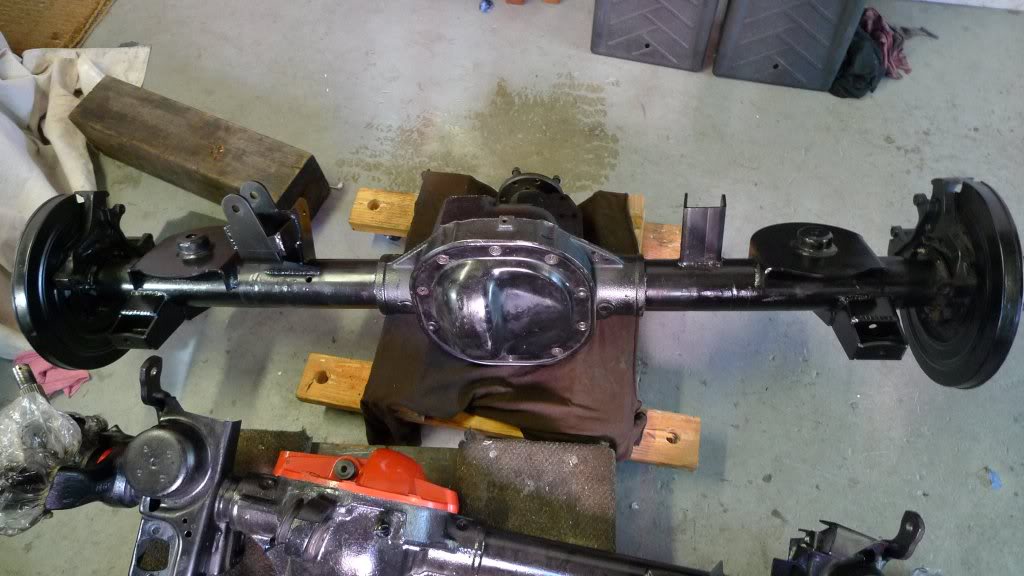
Rear Axle Housing : Ford 8.8
Rear Locker : Factory LSD
Rear Ring & Pinion Ratio : 4.56
Rear Differential Cover :TBD
Rear Axle Shafts : Factory
Rear Brakes : Ford 8.8 Explorer Disk, Crown industrial 5 Layer (12706.422), Wilwood Knob Proportioning Valve (260-10922)
Rear Drive Shaft : TBD
Tire Make / Size : Goodyear Wrangler Duratrac 265/75-16 Load Range E
Wheel Make / Size / Bolt Pattern : Factory – Rubicon 16×10 – 5 x 4.5
Body / Interior
Seats / Harnesses : Factory
Electronics : Center Dash Mount Acer Aspire One, Garmin GPS Puck, Yaesu (FT-1802M/E)
Lights Interior : Factory
Lights Exterior : TBD
Safety – Fire Extinguisher : None
Winches – Front / Rear : Warn HS9500i w/ Expedition Portal Edition Viking Line
Exterior Rack : Garvin Wilderness Rack (34098) – Possible Change
Parts Laid Out Before Starting (Few Months Ago):
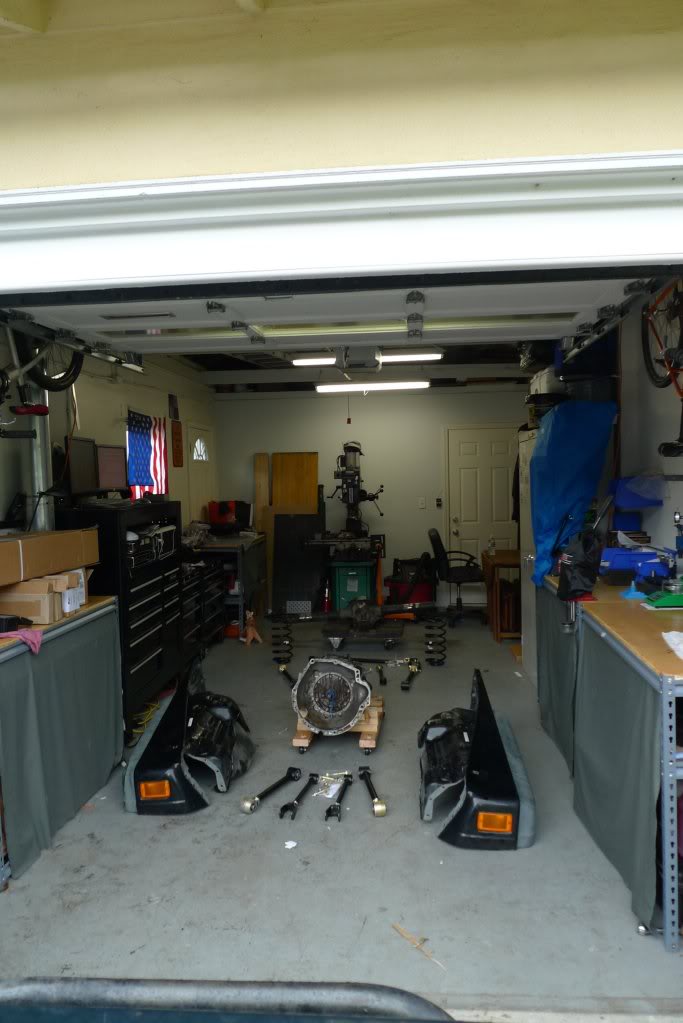
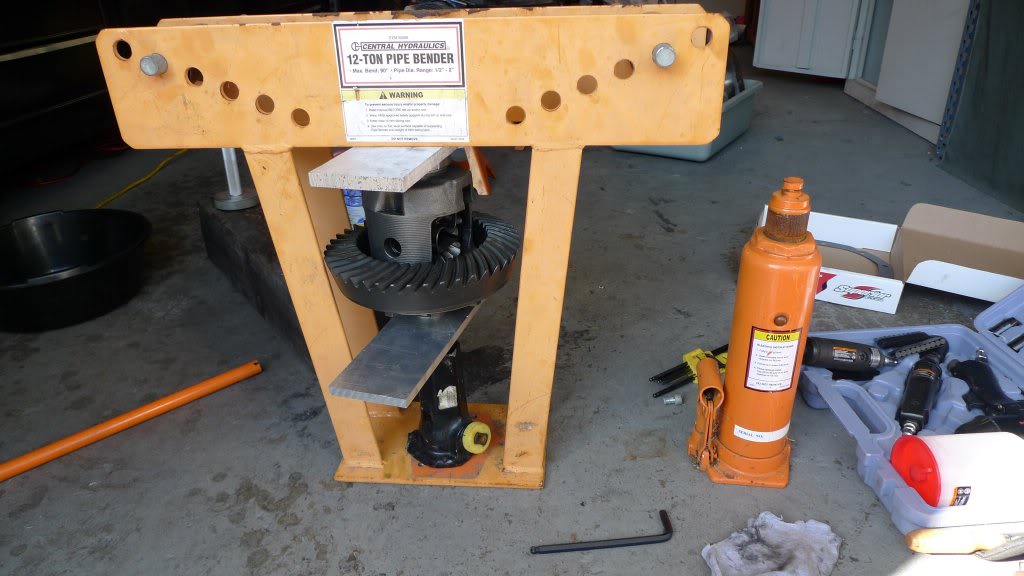
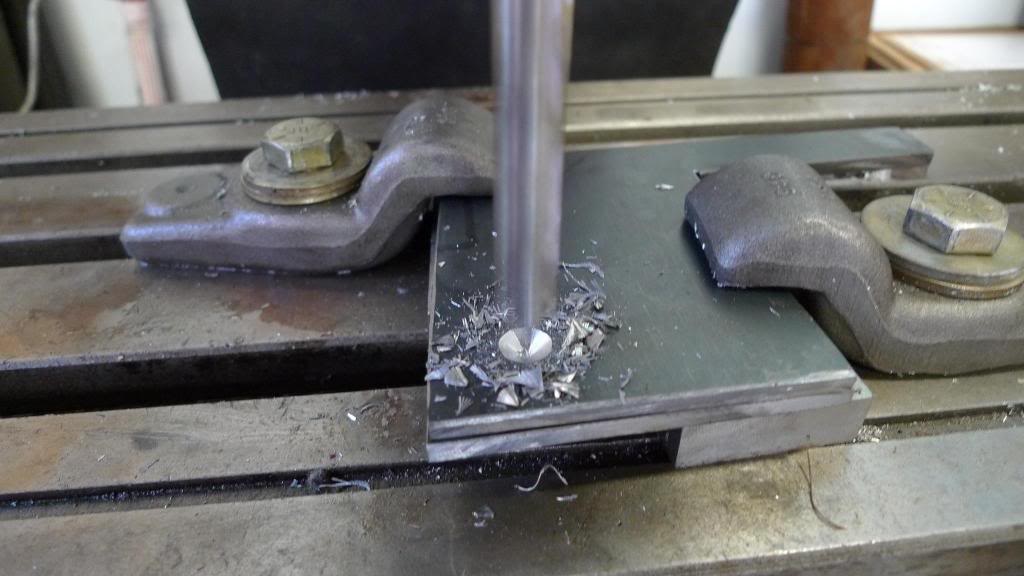
Ford 8.8 Build – Will add details as it progresses
Ford 8.8 31 Spline, Disk Brake, 3.73 w/ LSD – As pulled from junk yard.

Brackets Starting to go on:

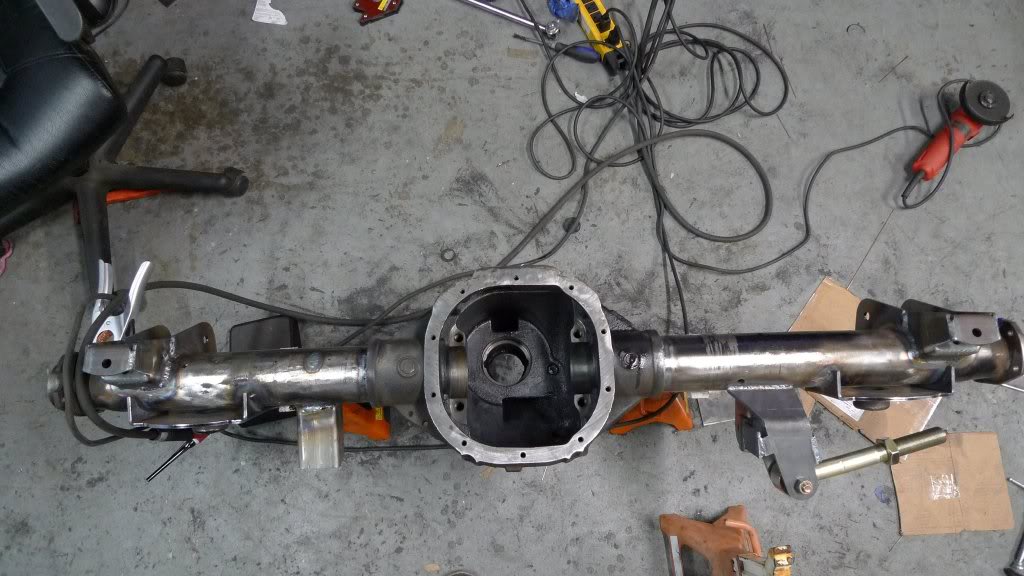

Not the greatest welds, but they’ll keep the tube from spinning

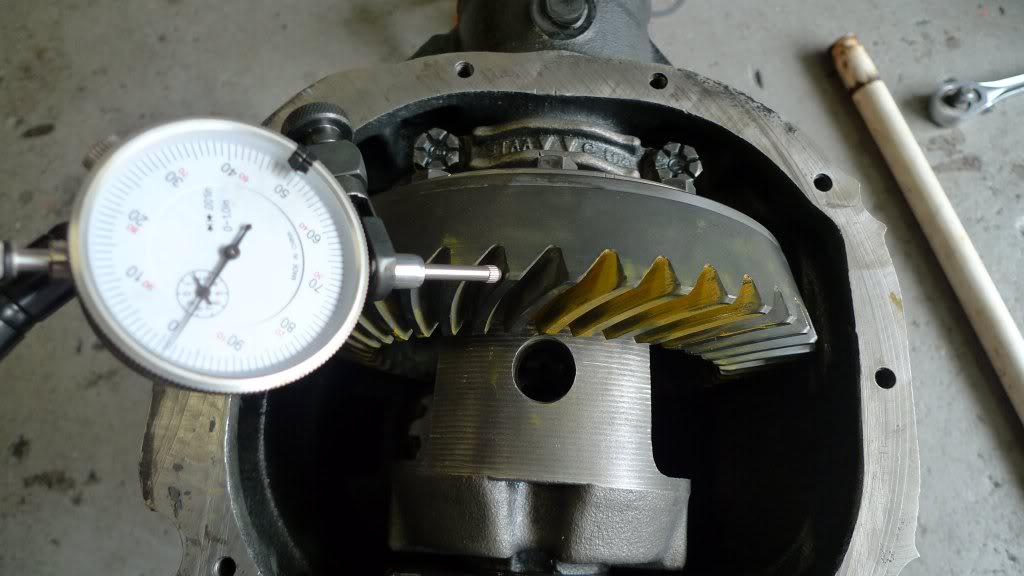
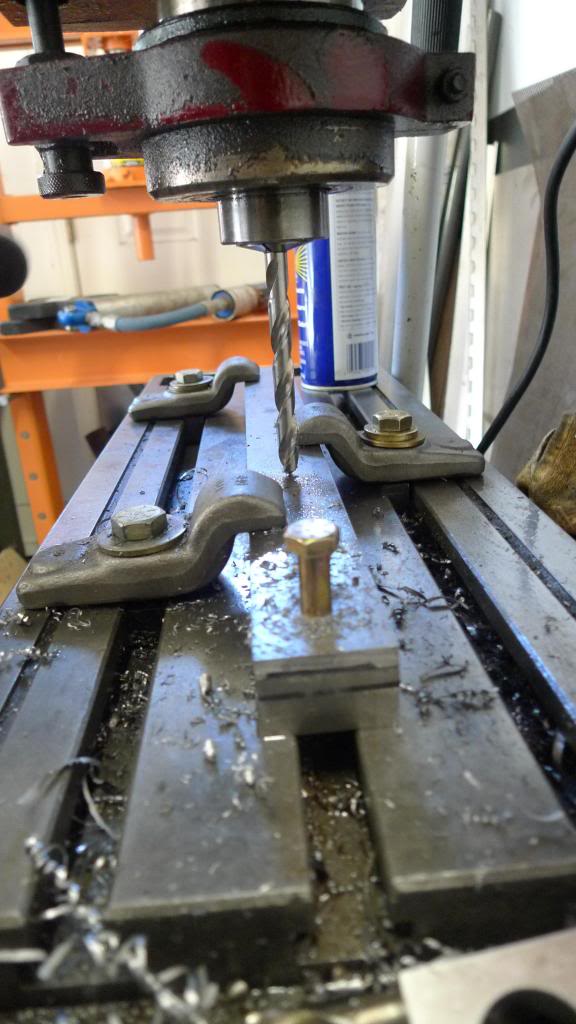
Setting up the Ring and Pinion

Bolting the Carrier to my mill table because I couldn’t get enough torque on the bolts.

Makeshift Bearing Press w/ a HarborFreight Tubing bender and my factory jack
Checking Backlash (had to pull the pinion and back it out one more time after this photo)
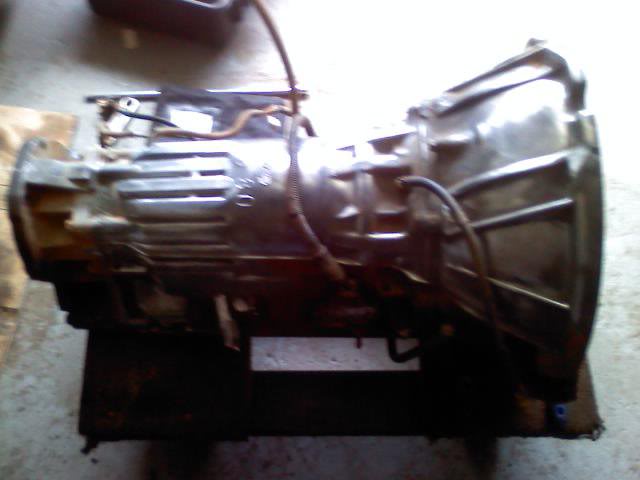
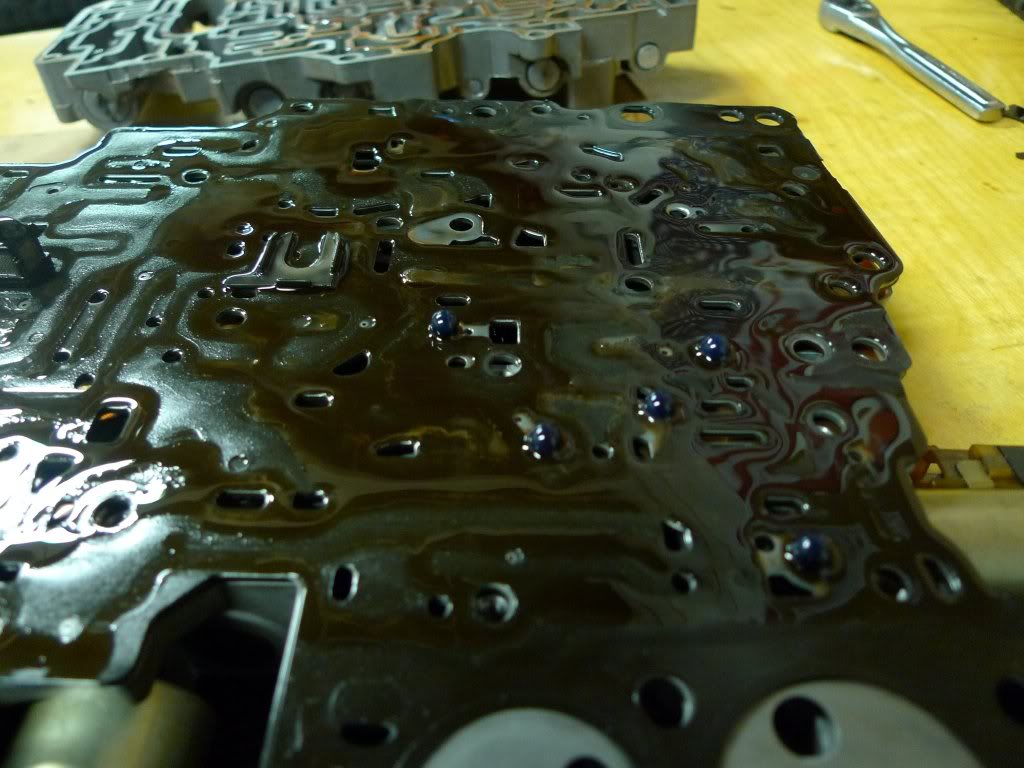
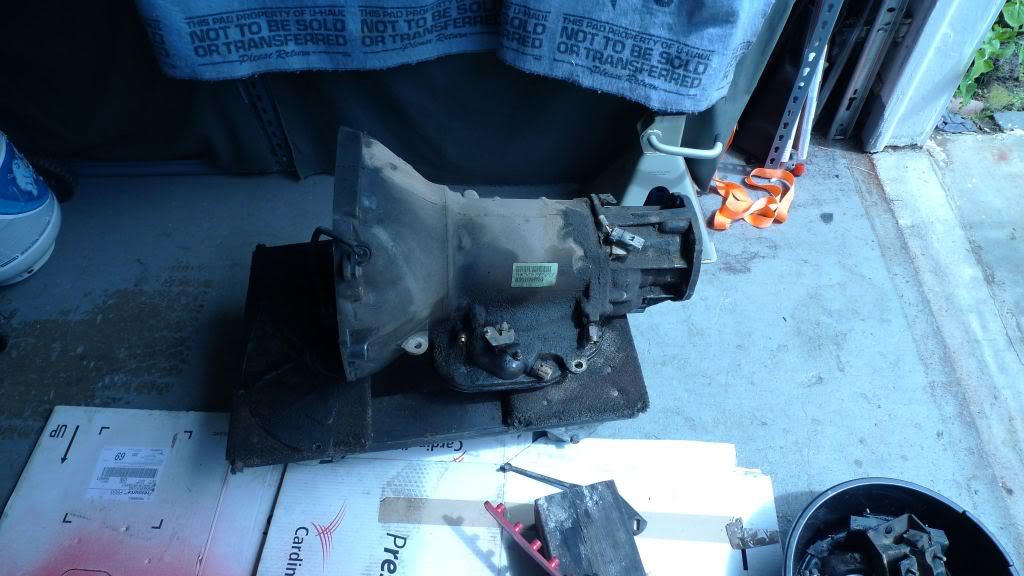
AW4 Rebuild – Valve Body Mods
AW4 – When I brought it home
Being Pulled Apart

Bolt Reference Image
Making sure I know where each bolt goes back

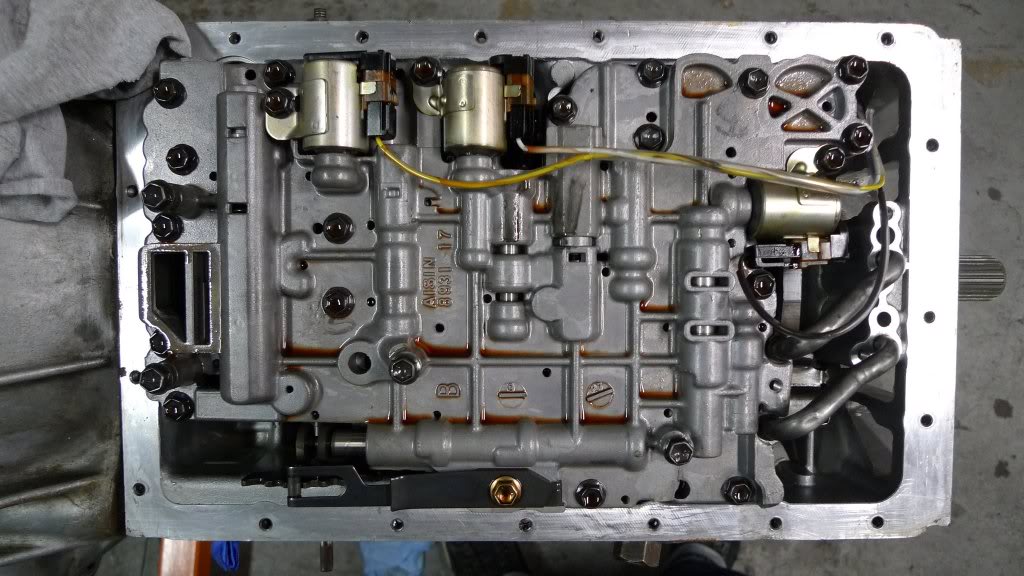
Valve Body Pulled


")
Accumulator Control Reference Image
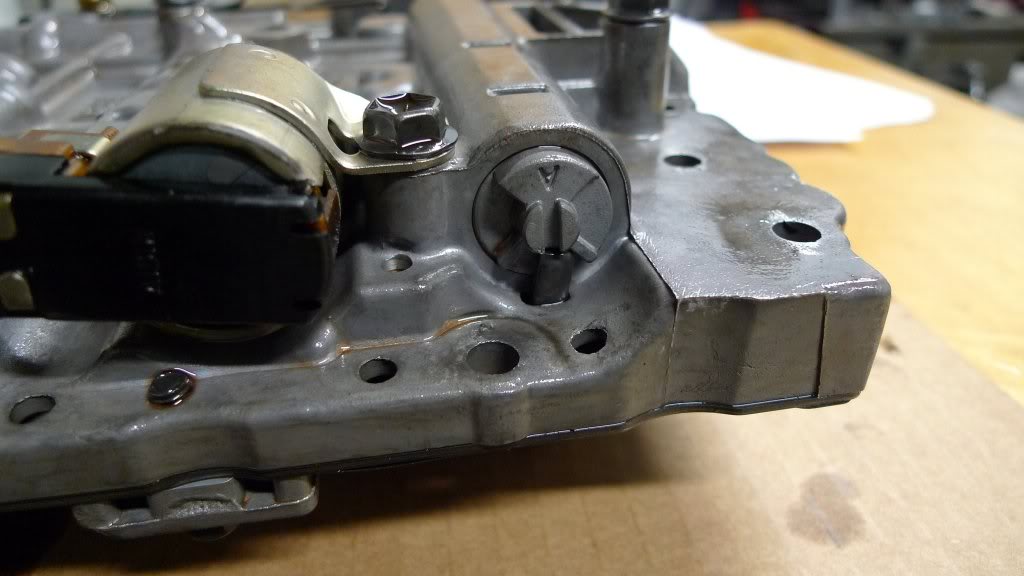
Accumulator reference Image

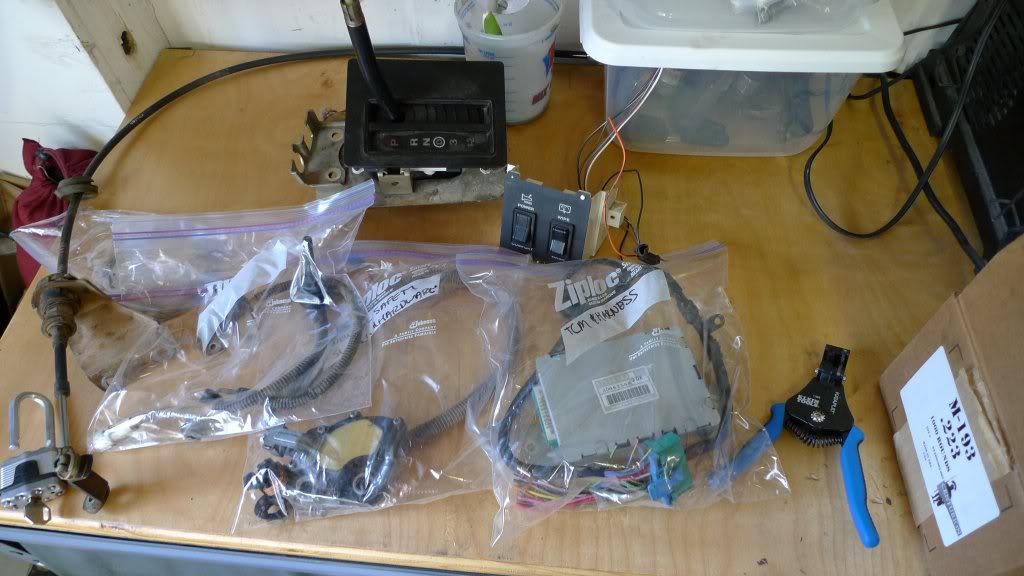
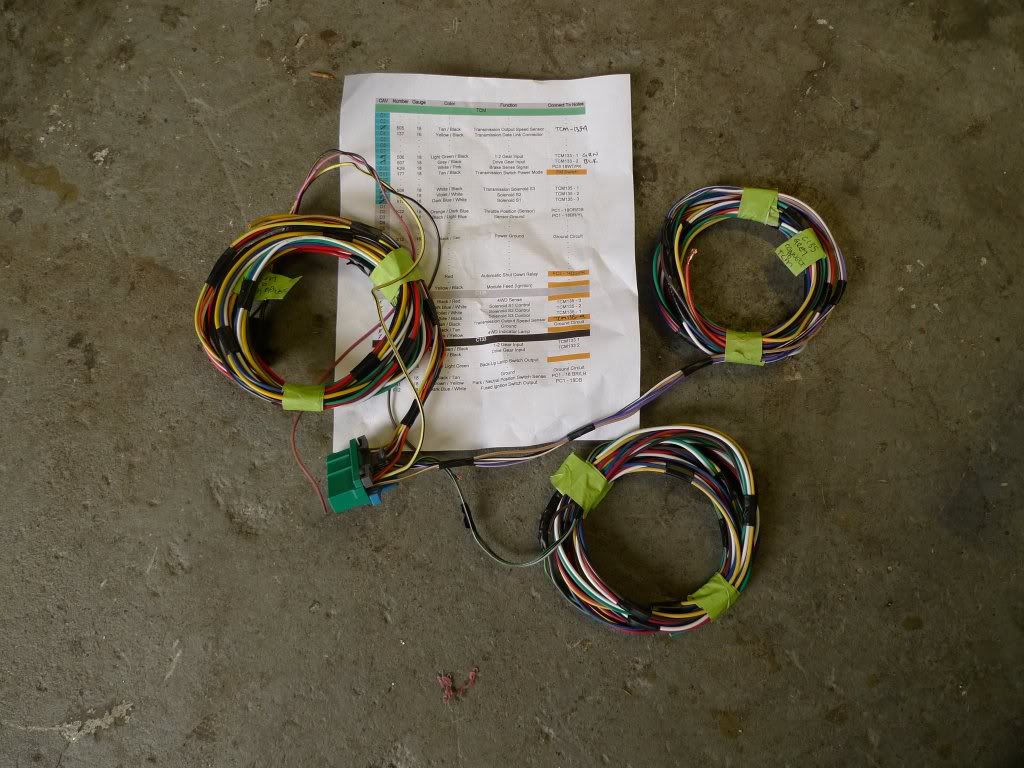
AW4 Wiring taken out of the storage box for harness planning.
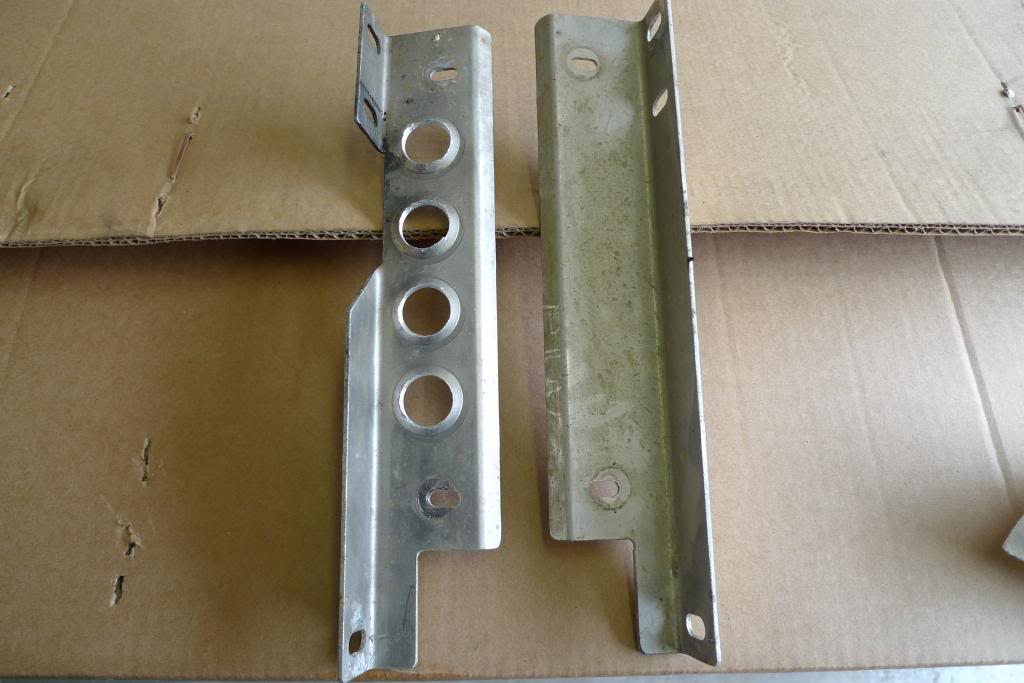
Dana 30 cleaned up and ready to swap knuckles from my current axle.
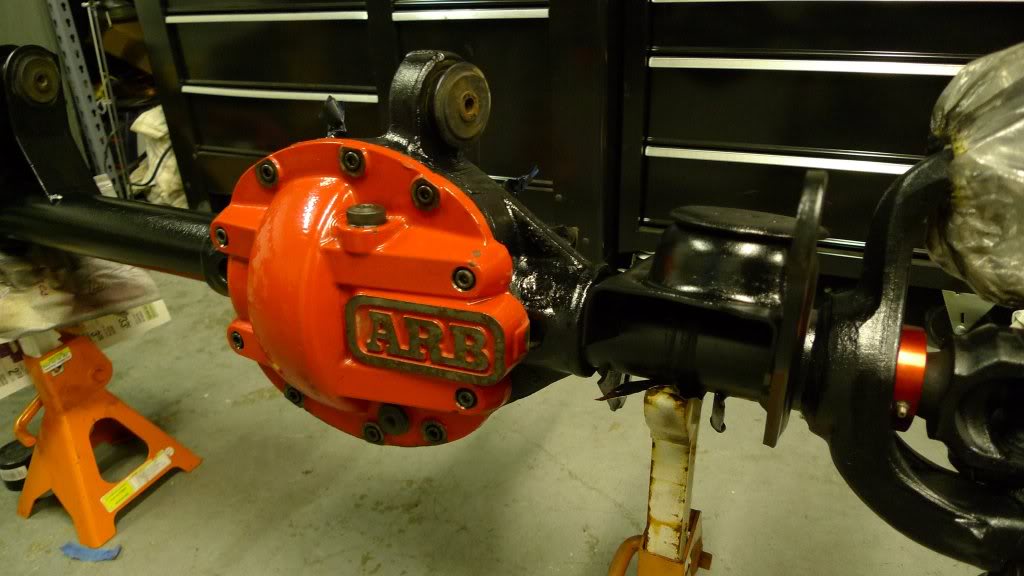

8.8 Painted w/ brake brackets on (Reversed for shock clearance). Waiting to swap brakeline over from the D35. Sure wish ARB made a cover for this. Does anyone have any suggestions for a durable diff cover with drain hole and dipstick?
Today my plan was to put the new valve body gasket & shift kit into the AW4. Unfortunately both parts ordered were wrong. Time to deal with returns and hope I get the right part the next time.
In lieu of transmission work, I started making some real progress today. Just pulled the D35 out of the back. Time to mock up the 8.8 out-boarded Shock Brackets and attach brake lines.
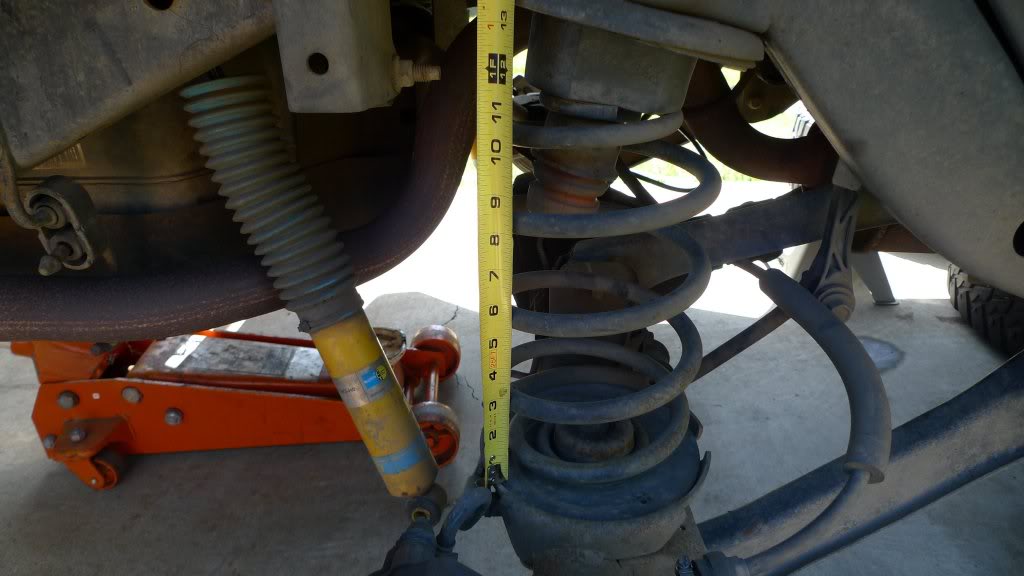
Measurement of old set up D35 at full droop – Shocks attached
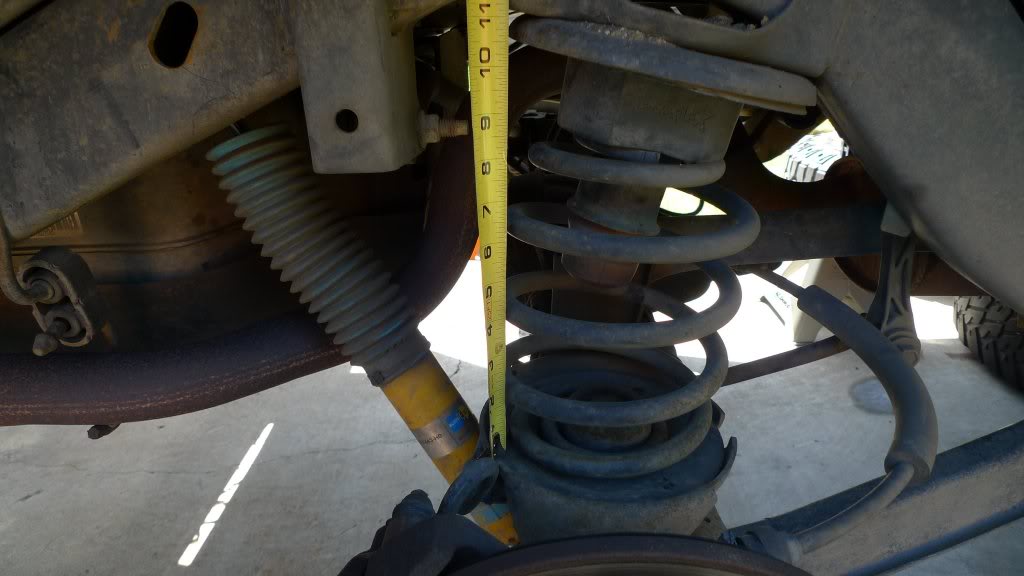
Measurement of old set up D35 at full droop – Shocks removed
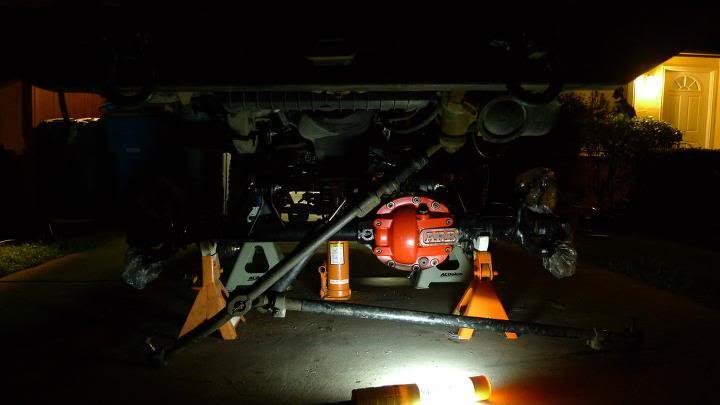
Axle Out

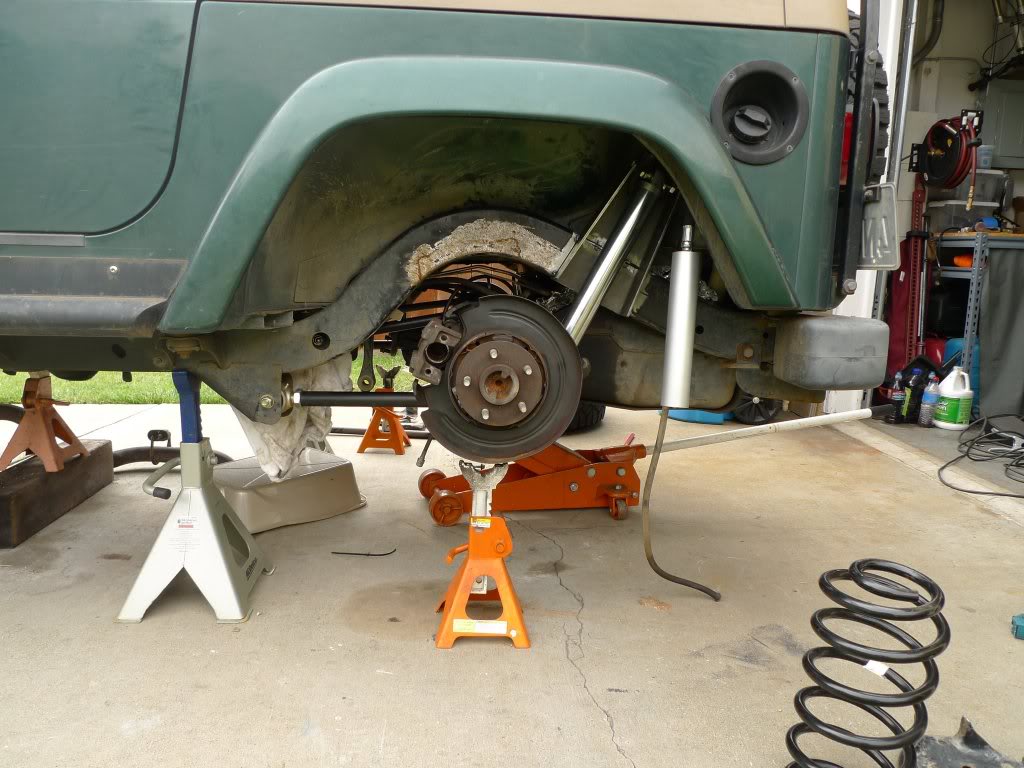
Was able to install the 8.8, Currie short arms/rear track bar and removed the factory coil spring upper mount. The brackets will be reused and relocated a few inches to the rear correcting the coil spring contour under compression… I then took all of my compressed, extended and ride height measurements and will be ordering shocks this week for the final out boarding process steps. I also need to run brake lines to the calipers.
You can see that the brackets on the 8.8 have the calipers to the front. This is reversed from factory to clear the shocks in the rear. I am able to run the extended braided cable (listed in the first post) to the 8.8 in the rear with the TJ mounting hardware, however, it is installed backwards and the crimp/hose connection to the distribution block seems a bit exposed from rear rock damage oriented this way. Searching for plumbing alternatives…

After work today I decided to get a head start on a long weekend of brake plumbing, pulling the transfer case and tranny and whatever other projects I can do while I wait for shocks and a few other parts.
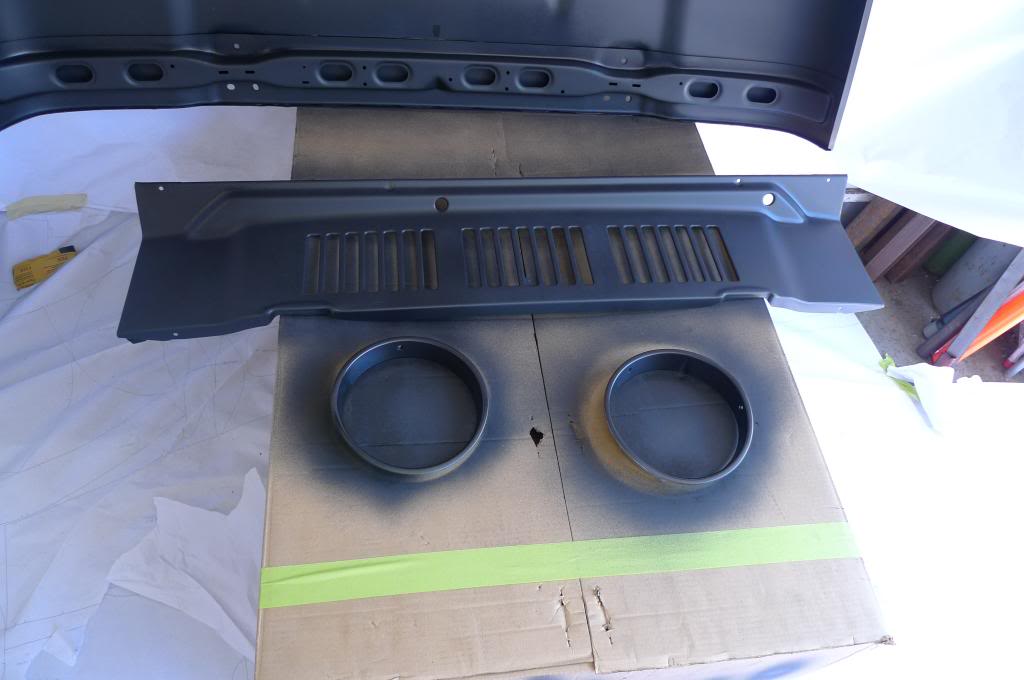
I decided to pull the fenders so that I could gain access to the front shock towers for modification and so that I can replace my bent fenders and start on my homemade highline fenders. I also hope when this is apart to relocate some critical electronics (Computer & Fuse box) in a waterproof case elsewhere under the hood. (Thoughts/Recommendations welcome)
DS Fender Pulled

PS Fender Pulled (Getting Dark)
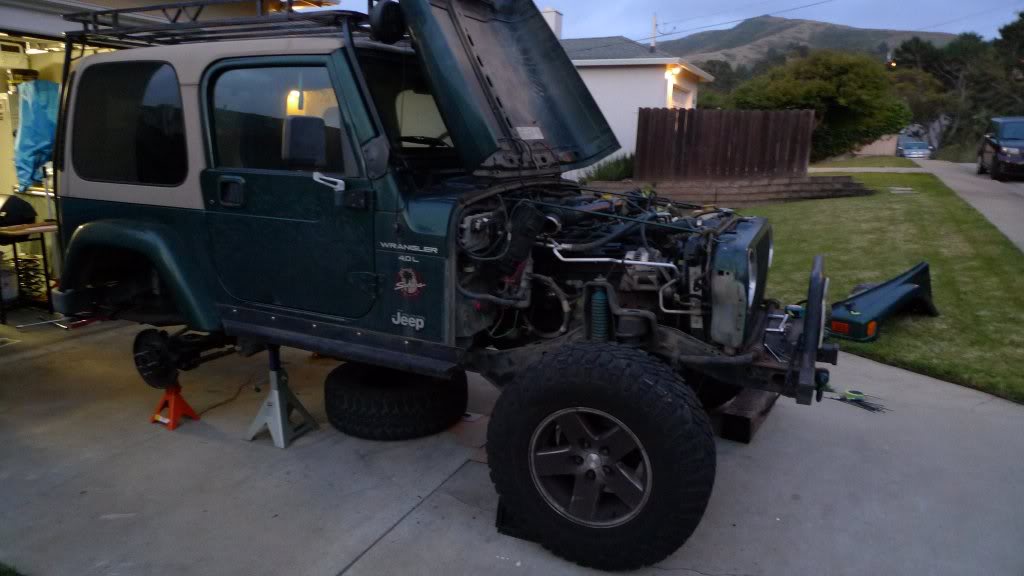
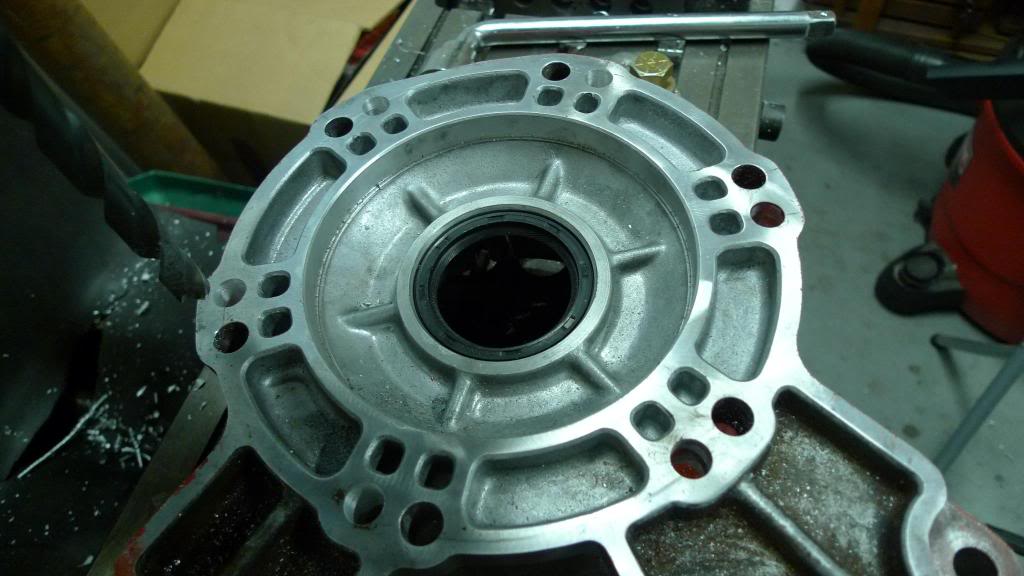
Pulled the transfer case this morning and began tearing it down to install the SYE

Stuck at this stage until I fix my compressor which for some reason won’t turn on.
June 18, 2011
Nice build so far and you can’t go wrong with the Currie parts. I plan on starting my 98 TJ soon. Why did you decide to use the OME 2″ springs instead of using the Currie springs? Is it becasue the the additional 2 inches? Looking forward to watching this one.
Granted I have yet to drive on most of my Currie parts; I am incredibly pleased with the products they offer and the reputation they have built for themselves as users under abuse. Buy once philosophy.
I didn’t end up with Currie springs because I know the OME 2″ (Heavy Duty) will give me more like a 2.5-3″ lift. I have been running 2″ Spacers w/ sway bar disconnects for years and they have gotten me everywhere I need to go. When I decided to tackle this build, OME’s were the first to come to mind because of their solid reputation for ride and quality. I also don’t need more than a 2.5″ lift to clear my 32″ tires. The suspension travel I hope to net with my set up should be around 10 – 12″, and I’d rather lift fenders to clear tires than raise the Jeep up any higher.
Well, the progress during the last week has been fairly slow. Too busy with work during the week, and this past weekend I was in Mammoth Lakes fly fishing and spending time with friends at their cabin. Fortunately some required pieces came yesterday so I was able to install the shift kit and put new gaskets on the valve body.
Transmission Work Left: Clocking the transfer case and making the wiring harness
Rear Suspension Work Left: Install the rear buckets and coil pads and finalize the 8.8 suspension this weekend so I can start focusing on the front.
If I can finish those this weekend I should be in a good spot!
Pictures and more information to follow.
Jafe: Nice looking rig!
Answers to comments below:
I think that with flat fenders up front you’re gonna end up with TONS of room for 32’s. 32’s and a 2.5″ OME kit clear no problem with stock fenders

I will be modifying factory fenders to be high-line fenders. My current ones are already bent and dented so I picked up a set a few months back to replace them. Yes I may have room without modification, but with the 1.5″-2″ engine lift, running factory or less bump stops, the 32″s will be close and if I upgrade to 33’s it will be closer. I might as well address the rubber/metal collision issue while the truck is torn apart!
Are you planning on adding a swingout tire carrier or mounting the spare to the stock location?
Is one planned for the future? Yes. Currently I am running the 265/75-16 in the OEM location….barely…. I’m focusing on suspension and drive train critical components now. Accessories come later!
Also, be prepared to run a CV/SYE kit as you’re likely to experience rear driveline vibrations. Yes, you can drop the transfer case with washers but in my experience with running the OME 2.5″ kit washers weren’t enough to iron out the vibes. I got the CV/SYE and problem solved. I was even fortunate enough to be able use the same CV/SYE kit when I bumped up to my current 3.5″ Rubicon Express coils.
Already planned. Transfer case is in pieces on my bench at home right now for the SYE install. Goal is to have a 1.5″ to 2″ Engine Lift and flat bottom skid. With the AW4 swap I need to readdress the tranny mount anyway. Once I swap the tranny and transfer case back in, I can figure out the extended and collapsed for ordering. I set the pinion on the 8.8 at 15 Degrees.
Last week I rebuilt the valve body on the AW4 and installed the shift kit.
A few pics:
Another bolt orientation diagram.

Lower Body

Check Ball Locations
Transfer case coming apart for the SYE

And today the project will be finishing the rear and outboarding the shocks that just came in.
Driver side frame cut and bucket placed. Time to go to the passenger side.
I put tinfoil in the gap on the tank so that no grinding sparks were trapped near the plastic.
Well the rear buckets are tacked and shock limiting droop and compression were taken…
Cancel this thought: I think I should’ve gone for 10″ shocks in the back. Not sure where my head was at taking the measurements, but I think going from a 18.3″ (12″ Current) Collapsed to 16.3″ (10″ Proposed) collapsed shock may be worth the 20% restocking fee. Thoughts? I forgot I added a factor for the collapsed coil size.
Bucket tacked in.

Future upper coil mount location.

Side Full Compression (Shock Bottomed)
Side Full Droop (Shock Extended)

Posting more photos during my breaks between projects. It’s nice to have a computer in the garage.
Upper coil brackets tacked, shocks installed and tires on. I definitely need to get some spacers for the wheels. With the narrower 8.8 and the new coil buckets and shocks I think I will need a 1.25″ spacer to clear comfortably. I hate wheel spacers, but in this situation I am left with no choice.
Coils will be retained top and bottom. In this photo they are just about to unseat, giving me ~10.5″ of travel at the moment. Time to figure out how I will be re-mounting the track bar…

Been pretty busy with work and other hobbies lately but everything is slowly moving along. This coming weekend is going to be another one of those 16 hours on Sat and 16 hours on Sunday type weekends. I’m tired just thinking about it.
Tomorrow I hope to clock the transfer case and get it back together and painted.
A few things I have gotten done :
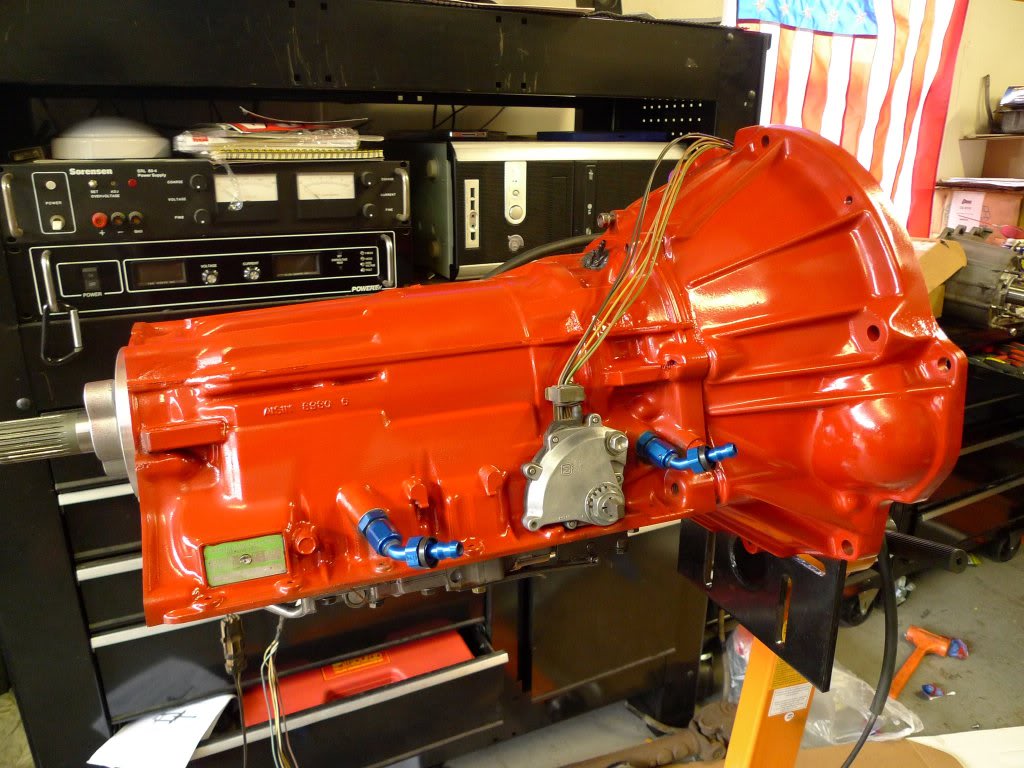
AW4 cleaned up and painted Chrysler Red, Neutral Safety Switch Rebuilt and new plumbing started. Photo makes the transmission look a bit oranger than it is. It is a nearly identical match to the ARB diff cover.
Jul 23, 2011
Changed gears today and welded the relocated coil buckets in so that I could plan the track bar mount.

Some updated progress:
Rear Track bar bracket mocked up

Template for AW4 Tailhousing clocked 11° for transfer case.

Drilling

Completed
32RH Dropped
Torque Converter still attached.

Now it’s time to replace the rear main seal.
Does it end?
Changed my mind mid day again. I was to tired to pay attention to the details of installing a rear main seal so I pulled the old D30 out instead.

On hour 9 in the garage today… so I’m going to go pull the arms off, clean up, make myself some food and have a beer. It’s exhausting doing all of this solo.
Hopefully I’ll have have more build and less tear down photos shortly!
Beautiful night, so the D30 went in. Still have to paint the old knuckles, install them, and drill out the stock TB mount for the Currie track bar 5/8″ bolt.
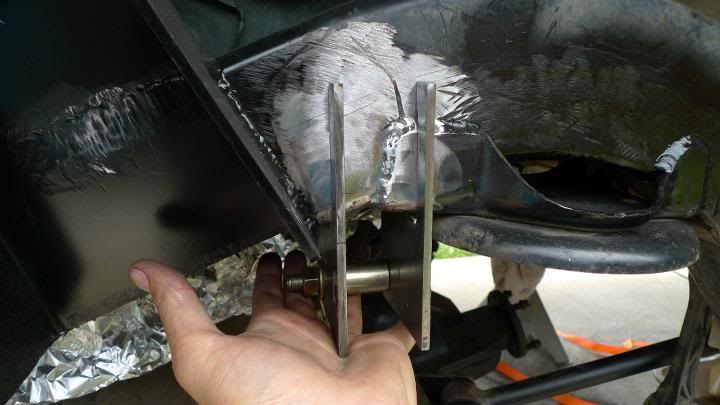
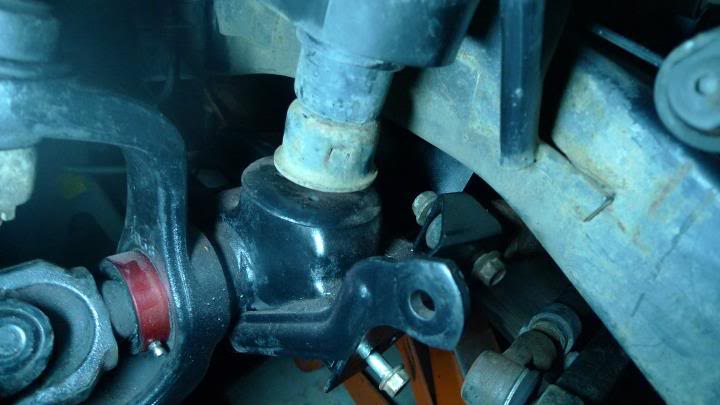
Been solving front steering and suspension issues for the past 2 nights and finalizing them today.
Lets just say the combination of heavy duty components with less than a 3 inch lift and the want to retain factory bump stops causes issues.
ARB and Currie Track Bar Collision with ~4.5 ” to bump stop. Time to grind away and clearance it.

Factory Diff Cover. Whats strange about a few of these collisions is the factory bumpstop doesn’t protect from them…
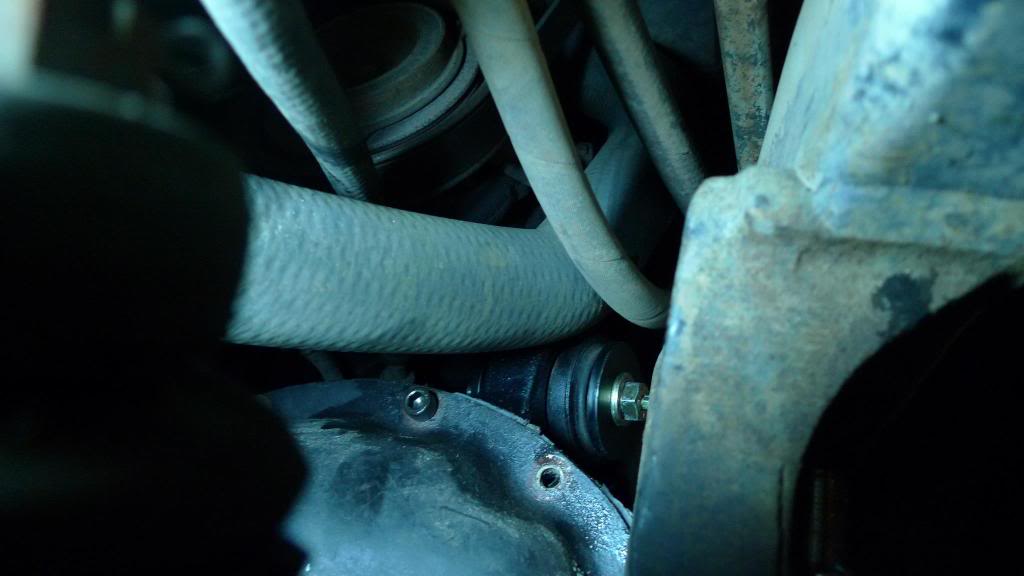
Upper Control arm vs Lower Radiator Hose. I think I am going to cut another hose open and double wrap this section to protect it.
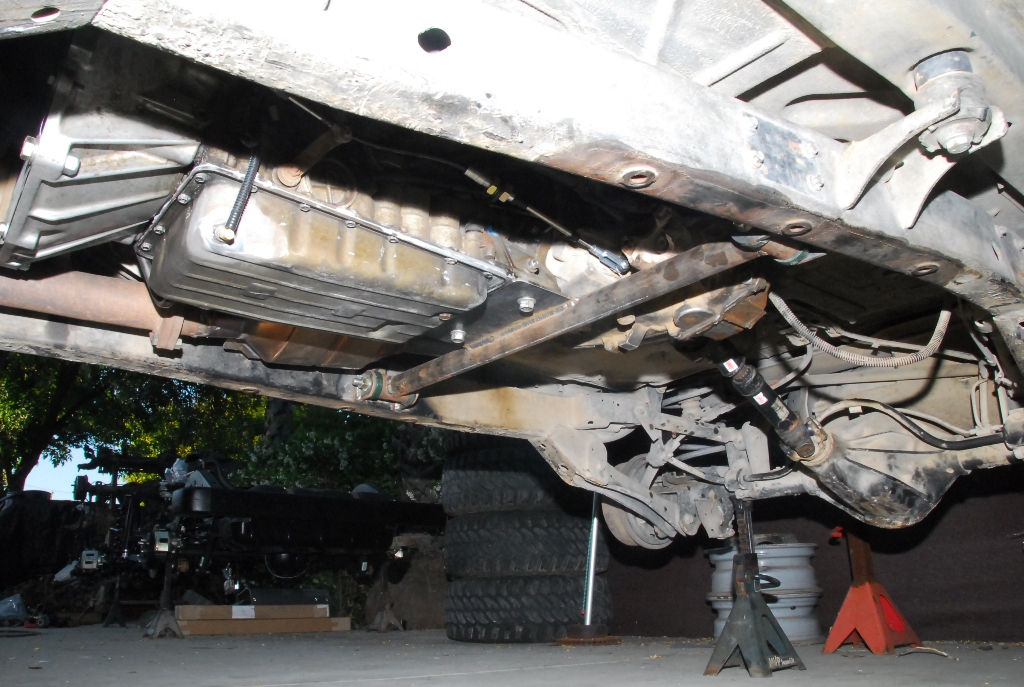
Axle Tube and Housing vs Oil Pan

Currie HD Steering & Currie Tie Rod – Drag Link, Tie Rod, Track Bar all touching at full bump. Minor tweaking was done and everything clears now.

Passenger Side Bump
Driver Side Bump – No wonder my oil pan is dented. Axle hits the pan before the bumpstop. My engine lift will solve this.
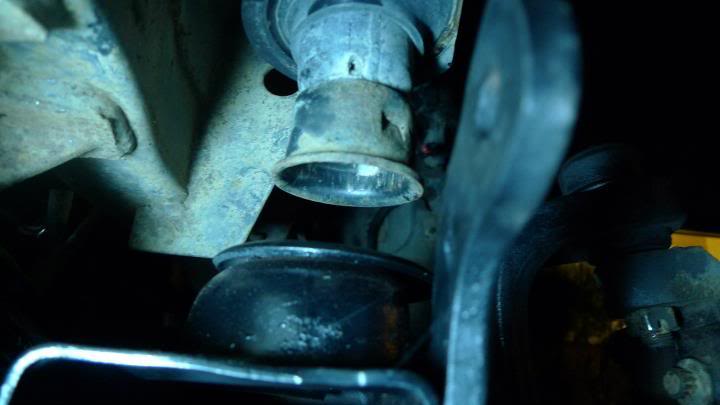
How I ground the ARB Cover. I have a bit more clean up to do and then I’ll pant it. With this ground I am able to fully stuff both side of the axle at the same time as well as clear during full articulation. I’ll post up final images when the cover is painted and everything is in.
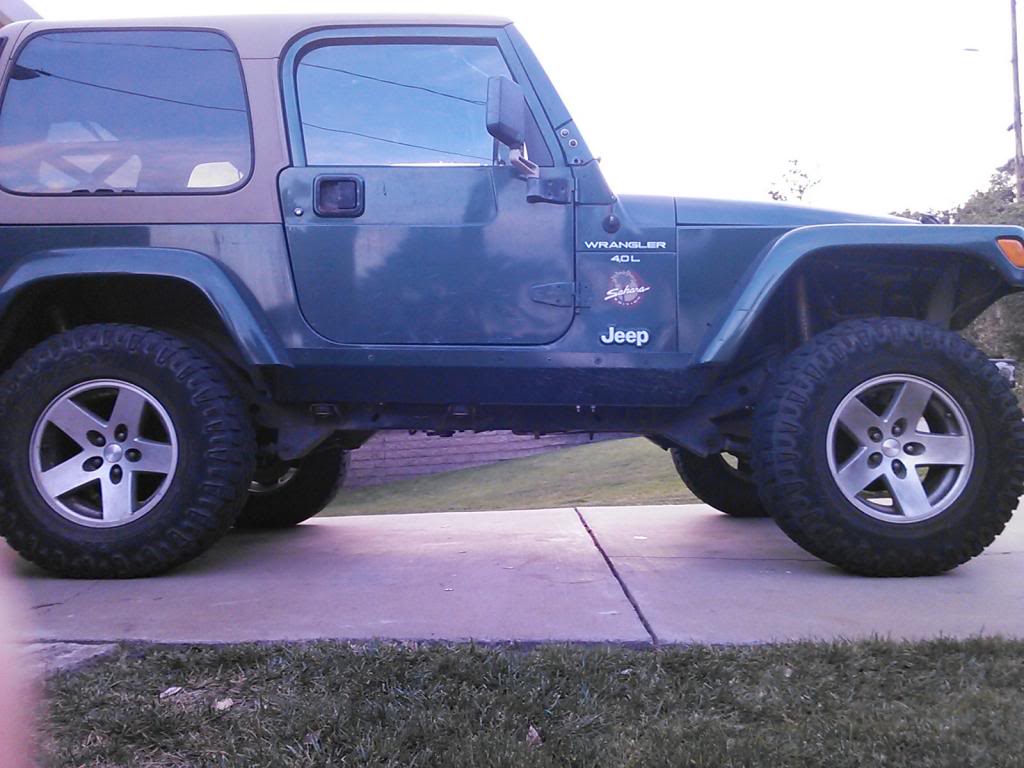
Profile


Diff cover painted and installed after final grinding and clean up:
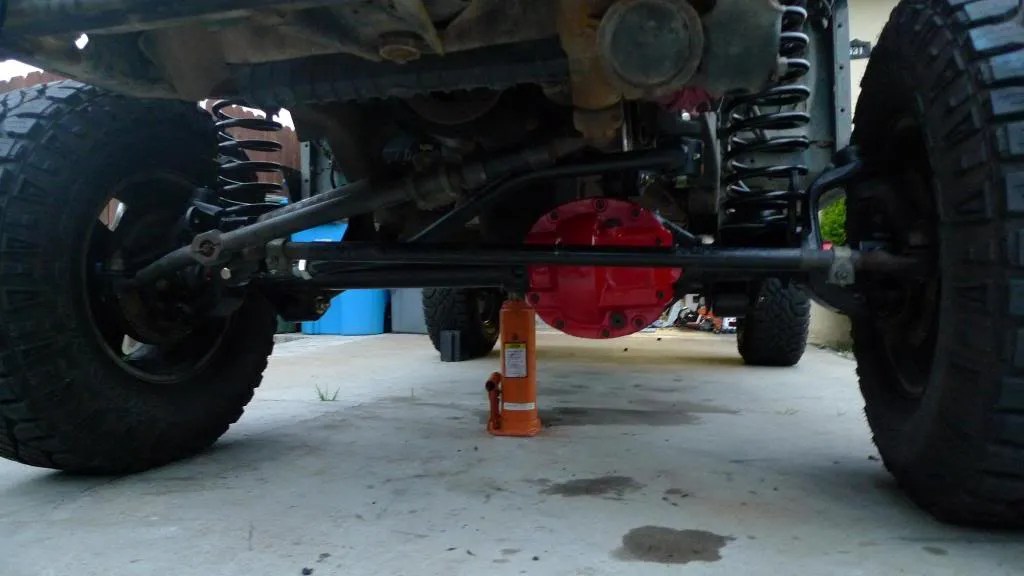
New front stance

New stance profile
New ride height with OME 2.5″ Springs.
Front: 6.5″ up travel, 4.5-5″ down travel
Rear: 5″ up travel, 5″ down travel
Clearance to belly : 19″

On the rear I need to finish bending the passenger side brake line and hook up the e-brakes. Other than that it is done.
On the front, I need to start building the front shock towers so that I can run 12″ shocks.
Biggest part of this build left is getting the transmission and transfer case back in and having drive shafts made. Everything else is cosmetic and can happen after the vehicle is running again.
Anyone in the bay area have a transmission jack I can borrow? I think i’m going to need to pick one up this week because the motorcycle jack I used wasn’t ideal for pulling the tranny out. I would never be able to get the splines aligned well enough during reinstalling.
***Sorry about the pictures sizes jumping back and forth. I have no idea why they are doing that after uploading.
Well guys, it’s been a while since I posted.
The past month and a half has been crazy busy with 2 work trips, a 10 Day hunting trip, sisters engagement party and this last weekend’s Overland Rally. Weekends are my get everything done days…running grinders, air tools and welders during weeknights doesn’t lead to happy neighbors.
The next week or two is the final stretch of this project’s drivetrain phase, and I have a lot of catching up to do on this thread about what I’ve done.
Stay Tuned and thanks for all the support so far!
Very meticulous work you got going on here. I could only wish that my mechanical knowledge was up to par with yours. Keep up the good work and I look forward to seeing the finished project!
Thank you! I’ve only gotten better over years by buying the tools to do it myself. It hasn’t always been easier or cheaper, but the knowledge has been worth it.
To keep pictures flowing…last night I mounted the rear reservoirs. I debated mounting them inside the fender well, but thought it was too high profile for tampering. I decided to cut a hole in the tub and run them inside under the lip. You can see in the photo I have 2 rubber stoppers there temporarily. I’m probably going to pick up some firewall grommets from the junk yard or push in style grommets from McMaster : http://www.mcmaster.com/#push-in-grommets/=epd2lm.
Before I drive I’ll split a hose and run them over the hydraulic line.


Some other updates:
Drive shafts : Will be here Monday.
Exhaust : My down pipe, 3 catalytic converters & muffler were stolen from side yard. They must’ve been sticking over fence or the wind blew the tarp off the top making it visible. I just realized this a few days ago when I went to grab them to re-install. Frustrating & Expensive. Haven’t decided which route to go. California emissions doesn’t leave me with many options.
I’ll update the parts list at the beginning of the thread later tonight; the weather is beautiful and there are lots of small things to do before I can start the Jeep up again next week!
Bumpstops squeezed into the rear coils. Use dish soap!

Rear Bumps fully installed. By the looks of the picture I have about another inch or so before full droop. I went a different way than some of the Jeep Speed guys do with their bumps by mounting them instead of leaving them loose.

Front end is dirty! Using a bolt to slowly adjust and check all clearances before welding new extensions so that the prothane bumps can be used and my shocks are properly protected.

Here you can see one of my tierod bolts is hitting. These need to be no further than 45 degrees back to prevent this contact. This view also shows the max articulation on the currie JJ track bar & the clearance i’m leaving under full bump between the track bar and linkage. Yes I forgot the washer on the top of the track bar bolt. I will be installing it before driving.

Looking up from under the car. Here you can see how much I carved out of the ARB diff cover to comfortably clear the JJ track bar. The drips on the bottom of the cover are water not poor painting!

Absolute max articulation on the JJ.

Full bump clearance between the Axle and Engine. This is with a 1″ Currie motor mount. I certainly wont be hitting my oil pan with the axle anymore.

Driver Side fully stuffed. Looks like I need run highline fenders with 32″ tires.

PS full droop (jack replicating limit)

DS full bump.

Rear Driveshaft from Coast installed. Coast put the Currie adaptor flange on one end, the 8.8 adaptor on the other. The finished unit came out great.

Front driveshaft loosely installed for length check. Clearly I received the wrong driveshaft and it is about 2″ too short. Bill at Coast Driveline and Gear already sent me the label to return this one and has one being made before the first is returned. Great customer service! I can’t say enough about how easy they were to deal with.

Side of AW4 for tub clearance and mockup.

Dark photo, but shows the full drivetrain assembled under the car. Still have wiring and hydraulics left.

Well it’s driving! Been taking the past few weeks to tinker during the re-gearing 500 mile break in.
There are still a lot of things to straighten for me to feel complete with the Power/Drive train upgrades; Exhaust, ARB Compressor, AW4 TCM Wiring, however it drives freaking great!
On road the Jeep is more stable, more responsive and incredibly predictable. I think this has a lot to do with the 3″ widened stance in the front, 1″ widened stance in the rear, shocks being outboarded, and coils corrected to vertical travel. It is a bit stiff on the road without any load, however once I put a couple gas cans and tools in the back, the coils and shock valving soak everything up and keep it stable. Couldn’t be happier. Obviously there is still tuning required, but for a first try I’m ecstatic.
A few things I’ve done to get the jeep a Daily Driver again:
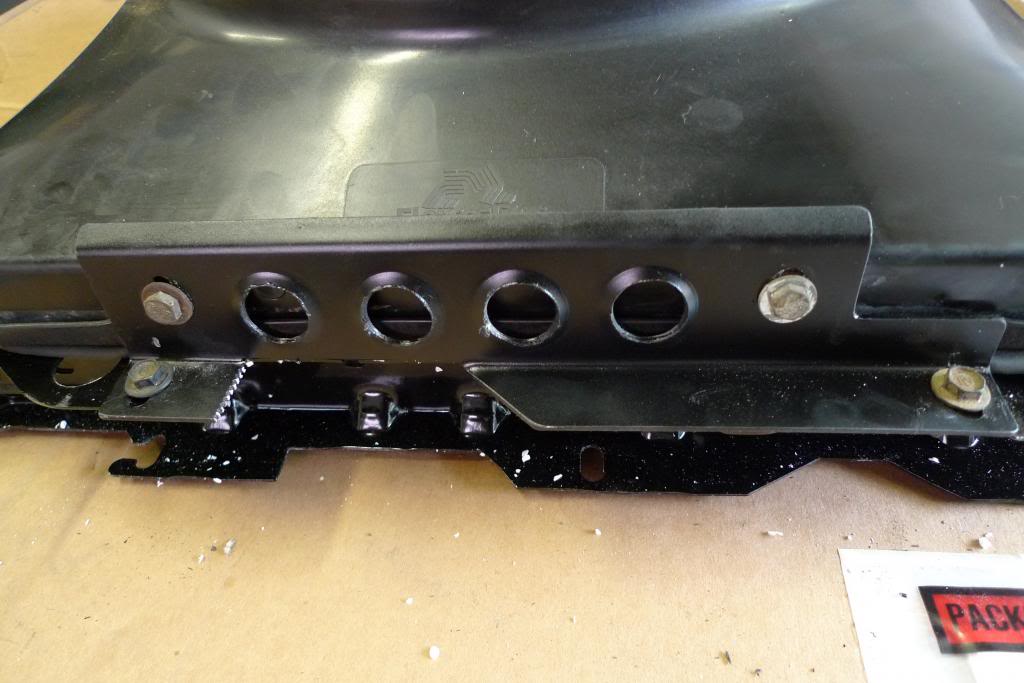
Cutting template to modify the factory skid plate to bolt to the AW4:

Cut and welded in the new location:

First front shock tower tacked:

Both Towers tacked:

Fitting over cut factory shock tower:

New Stance:

Some Articulation Testing:


Still a few inches of fender to tuck


10.5/11.5″ of front travel

Zip ties are only to reinforce the hard mounts.


Clearly have been busy the past 4 months, but have been doing small projects here and there; mainly tuning and tweaking all the changes.
Some of the bigger ones which I will update later:
- Installed a rear catalytic converter
- Wired the AW4 into the TJ computer
- Wired the TJ computer to think it has the factory transmission behind it to prevent CEL Codes.
- Passed SMOG after modifications above.
- LCA Bracket re-welded after cracking and almost tearing off completely on a recent trip to the mountains. Currie LCA Brackets are waiting for a weekend to pull the axle and weld in. Debating trussing the D30 while I am at it.
- Installed Spectre intake through the cowl, as the shock towers now block the factory location. Working on routing a pre-filter before it, possibly a snorkel….
- Building the GotTrikes.com tubing bender to make my bumpers. I have to admit, the Milwaukee Dry HD Dry Cut saw is one of my favorite tools. It cuts cleanly, accurately, and most importantly makes easy work of 2.5″ x .75″ steel bar!


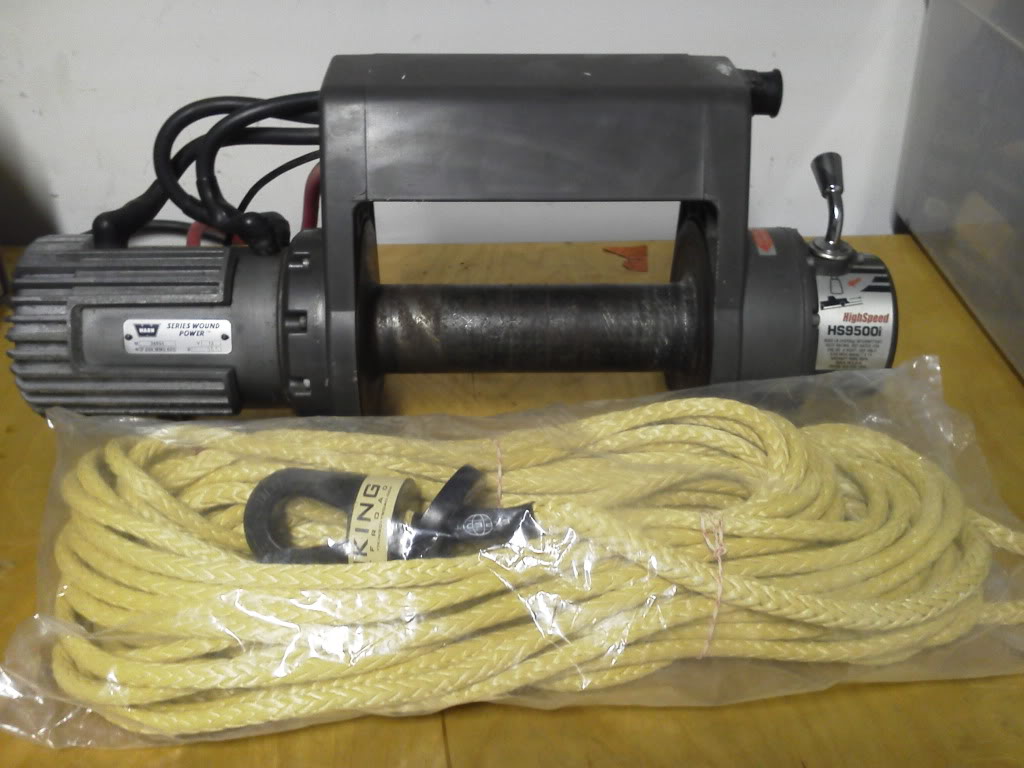
Bumper/Winch – Acquired a Warn HS9500i and picked up the Expedition Portal Edition Winchline. Currently working on a bumper for the front.
An Early Mock Up: Excuse the duct taped cross bar and lack of level…It was quicker than tacking and just for visual purposes!
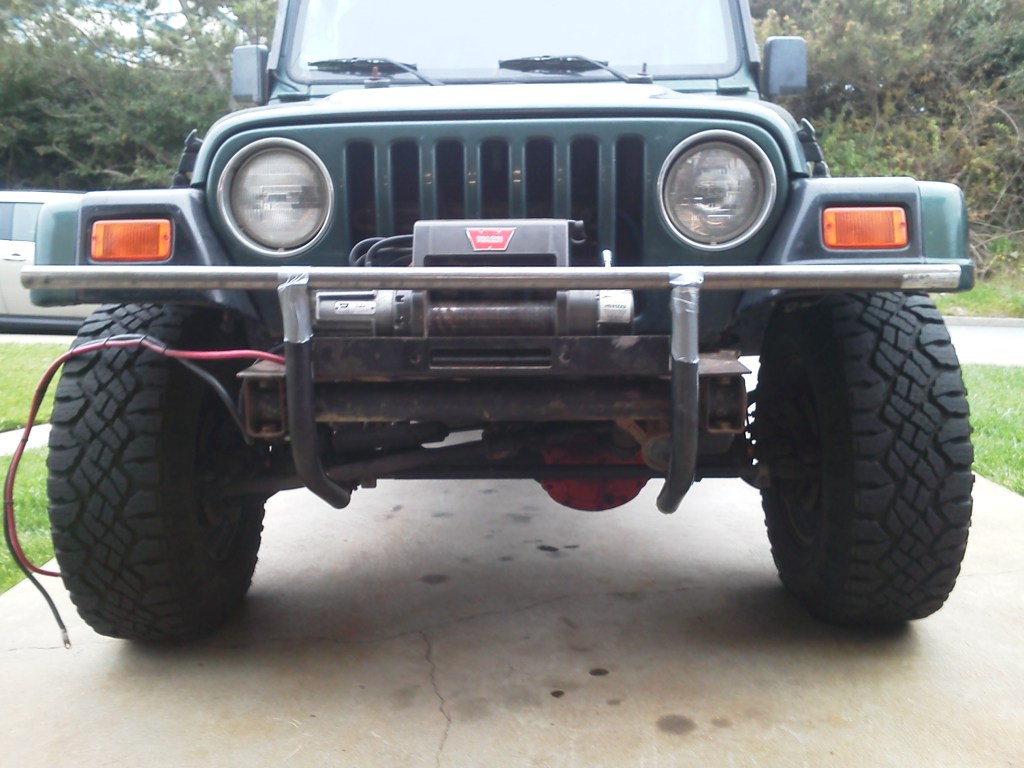
Current Mock Up will be this design but the lower aluminum skid supports will be wider to match the frame rails:

Winch somewhat cleaned up. I need to re-paint the motor fins and check all the electrical connections.
I hope to be active in this thread again shortly!
My 1″ and 7/8″ drill bits are in the mail keeping me from the next stages of the tubing bender so I played around in Solidworks planning a Dana 30 Truss instead.
Given that I need to pull the axle and install Currie LCA Mounts after tearing one, I might as well beef it up while it is out. I am planning on cutting one wall off of a 2″x2″x.120″ and cutting groves for the mounts…but this design defiantly needs some more adjusting and thinking. Do I really need a truss? Likely not…but while I have everything apart…AGAIN…I feel like it is the next step. I have the tubing laying around as well.
Note: The truss will be underneath the tubes on both sides. (the other side was hidden while I saved this image)
Decisions….decisions…
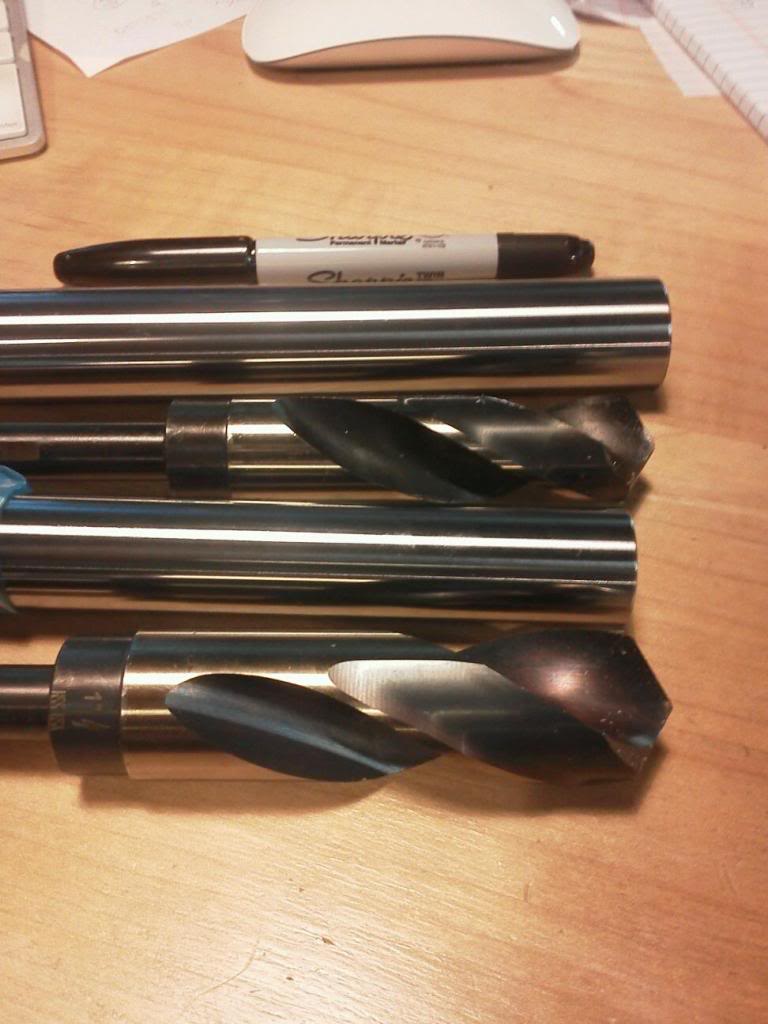
The 1.000″ and .875″ bits and shafts came in today…these things are giant! Looks like I will be trying to finish the tubing bender this weekend. I am following the Got Trikes Bender Plansbut will be making some slight modifications which will be posted later.
Drill bits and cross shafts with Sharpie for size reference:
I also received a linear flange bearing and shaft for my integrated shifter project. You may recall a few pages back, I was running a RAD Designs shifter with no TCM. To pass smog, I had to wire the TCM into the factory computer and during this process I removed the manual shifter. The linear bearing and shaft are part of a design that will incorporate both the mechanical and electronic shift capabilities of the AW4 and bolt into the stock location. The TJ is small enough inside as is, having to add another shifter to my center console once my interior is back together seems a bit cluttered.
Pictures of course as it progress….need to find more time….
What hours I’ve had out of work and life over the past week have been focused on the tubing bender. Some pictures….
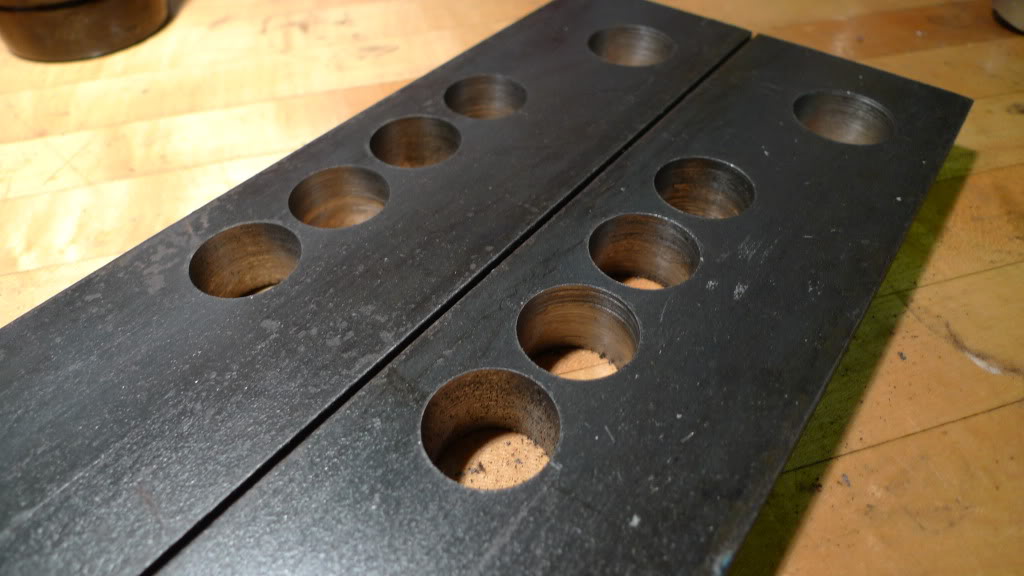
Match drilling the swing arm holes. Tried with and without cutting fluid, couldn’t seem to get clean holes. The 2″x2″x.250″ wall seemed like sheet metal to drill through after the stacked .75″ steel arms.

I hopefully will finish it this weekend so I can get to building my bumper and install my winch. I had planned on working for another 2-3 hours last night but had a little scare. It was raining outside while I was welding so I only had the garage cracked for airflow. Well it started really pouring then hailing, so I let off the pedal and looked toward the door through my welding helmet (Auto Darkening). Well suddenly lightning flashed and my mask darkened. Scared the ******t out of me. I quickly unplugged the welder and called it a night. Talk about asking for a strike on the house!
Bender as it stands last night. You can see the die on my incredibly messy bench in the rear. I have to say there is a lot more work going into this bender than I anticipated…….
A few updates over the past week.
Installed the ARB High Output Onboard Air Compressor (CKMA12) after it has been sitting in a box for the past 4 months. Its awesome to finally have the front ARB locker working and a way to fill up tires. Not sure why it wasn’t done sooner; quick and easy install.
The bender is almost finished! I have about 40 inches of weld left and final clean up and paint. Can’t wait to get this thing working! I had planned on finishing it this past weekend, but given that I only had Saturday to work on the Jeep, the decision to use the time for something a bit more important on the vehicle…my lower control arm brackets, was made. Not to mention my 90 lb of argon is almost out, and I couldn’t risk running out on a weekend building the bender, when I had the axle out of the jeep.
Friday night I pulled the axle in 56 minutes solo. My new personal record. I think I’ve done it enough times in this past year setting up the suspension that it is mindless. Anyway, here is how the control arm brackets looked.
Passenger Side after I had hammered it back and re-welded it a few months back. I think these cam bolt channels are a bit tired. They had a good 140,000 mile run.

Driver Side not in the greatest condition either but still better than PS


Somehow I forgot to take pictures of the new Currie Lower Control Arm brackets but will post some up next week.
Heading up to Mammoth lakes tomorrow for some fly fishing and relaxation. I’ll get some photos of the jeep out there!
The essentials for the mountains waiting to be packed up tonight!

Had a great time in the mountains with the jeep the other weekend. I finally installed my ARB compressor, and having a front locker to play around with was a blast! The suspension felt great but the 9,000 foot altitude really kills the powerband! My only complaint with the truck up there was my lack of manual transmission control. Following my re-wiring to pass smog, I removed the manual shifter, and have to say that the transmission deciding to shift at 2700 every time really kills the fun of fast corners where you need to be at 2900-3200 to maintain momentum. The torque convertor also turns on when combined with a 2-3 shift causing some issues. I think I am going to temporarily mount the shifter again until I finish my integrated one.
Still waiting to download a high res photos from the camera, but here are a few from the better half’s instagram.
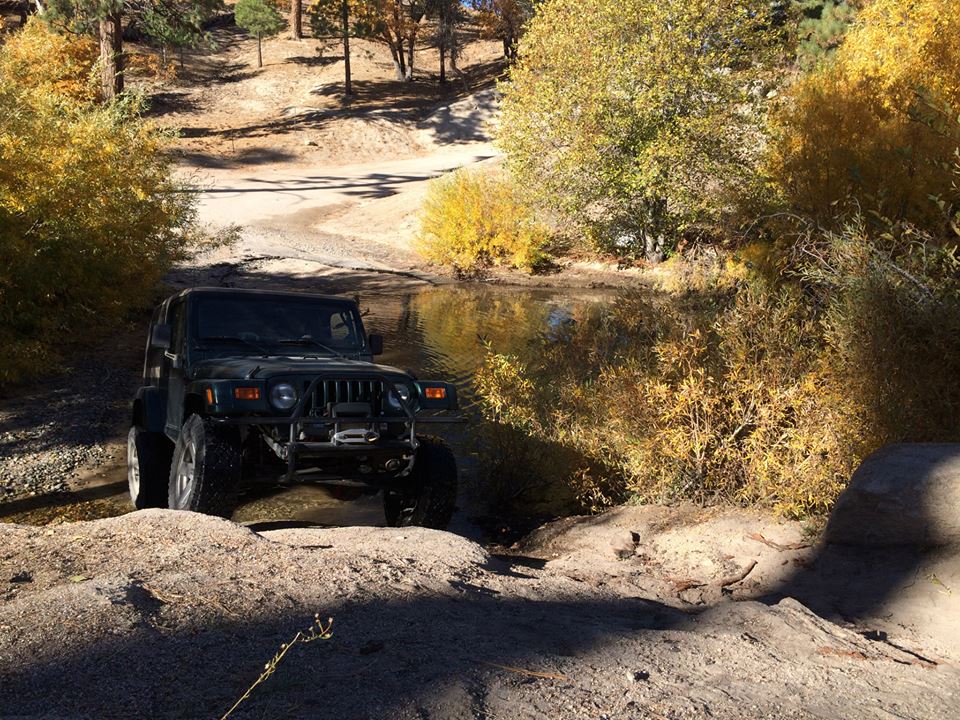
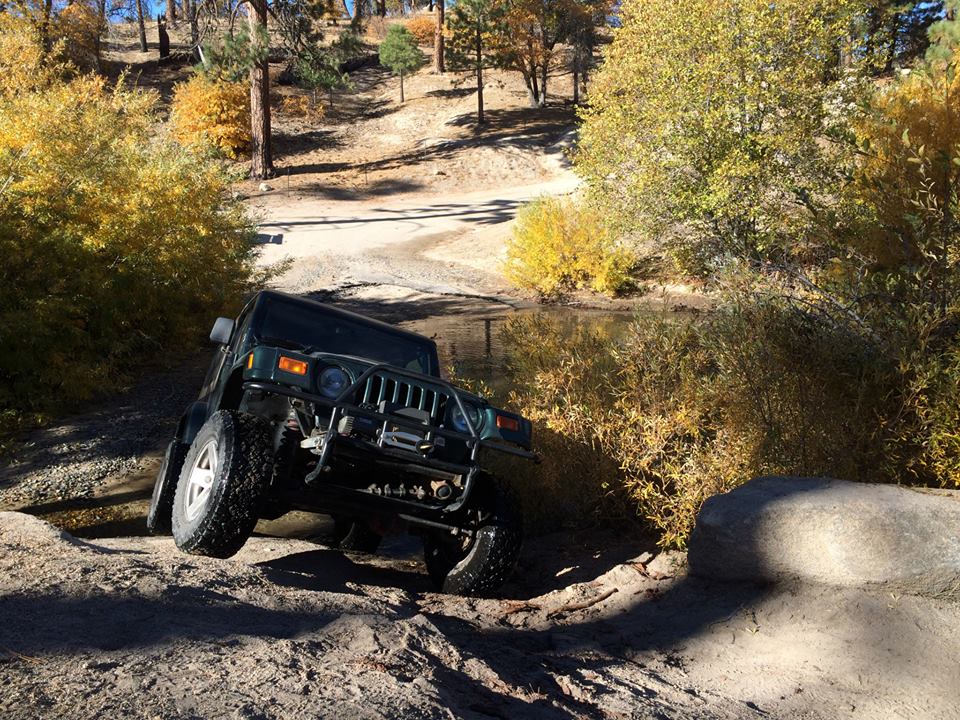
Taking a trail up behind Convict Lake for some scenic lunch views:

Meanwhile on the build….The bender is at the point where it is bending, though it still needs a lot of finish work. Base needs to be built, and I have about 15 inches of weld still to do. In the interest of time and trying to get this bumper done before Overland Expo, I switched to focusing on the bumper.
First bend off of the bender; 180º No Kink Bend on 1.50″ x .120″ wall.

A slow video of the bender working and my compressor working even harder!

Grinder had its final day, though Home Depot pro desk replaced it without questions and without receipt.

Where the bumper is at. Cross bar is placed on the vertical supports and the 90º corners will be horizontal to the ground and cut to match the fenderline. I need to work on the fairlead mount next, the lower skid cross bar and start attaching the trick tabs for the aluminum skid. The rest of my tubing should be here tomorrow so that I can do the upper radiator support. Sure wish I had a full cage to tie it into. Not sure if I am going to get this done before leaving for the Expo next week between work and what I need to finish on the TJ.

The bumper I’m using for inspiration, though I’m taking some liberties in adjusting it for my less cool vehicle.
The garage is a mess right now! Tonight I think it needs a re-organization so that I have the space and sanity to finish all of these projects before next week. I did a bit more mock up on the bumper last night. Set up the lower cross bar, two vertical fairlead supports, trimmed the upper cross bar, set up the skid for cutting…
Tonight I will drill the fairlead holes, and cut out and prep the skid. Hoping to get one more mock up on the front end and start welding, but there is still a lot of little finish work to do before I go to throwing beads.

More bumper….
Mock up of the pieces; hoop material hasn’t arrived yet.


Welded up, sitting on a beat up work bench I found at a garage sale last weekend for $5. I bought it just for this project. Completely worth it. My welding sucked that night. Kinda disappointing.
Adjusting the mill to notch the hoop bar. I realized after I took the photo the head was 10 Degrees too far.

Hoop set on cross bar for mock up. Not sure how I like it. Trying to decide. Any thoughts?


Testing the clearances of steering components and bumpers.
Side view

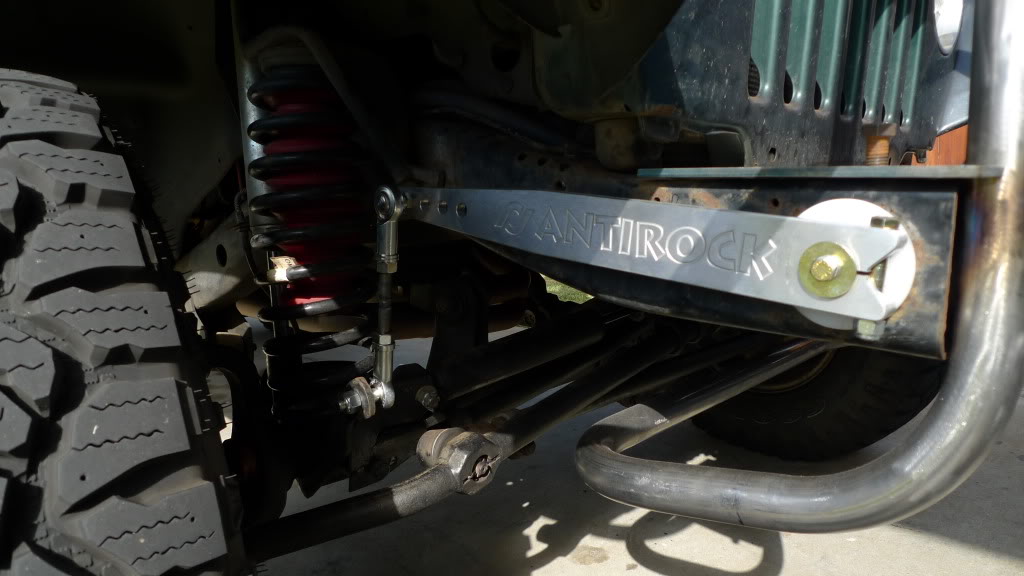
Currie Anti-Rock Install
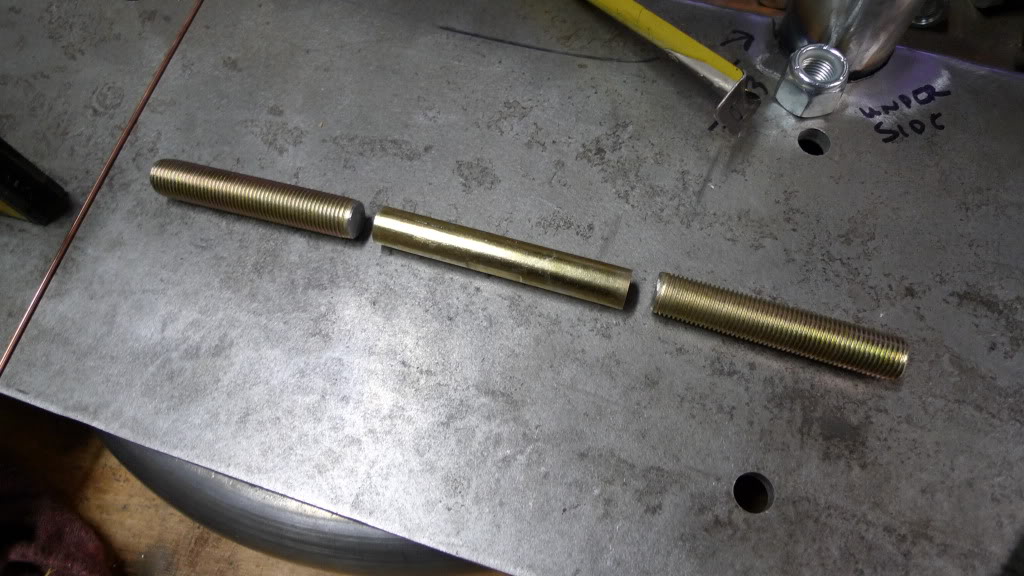
Cut Link for my measurements & re-welded. Currie provides links set up for a 4″ Lift. Major material removal needed for a 2.5″

Anti-Rock installed.
Well between my last minute push of building before Overland Expo, the week on the road for OEX, coming home for 2 days, spending the weekend on the lost coast and then finally coming back to a few hundred too many e-mails, I finally have time to post up some shots from the trip. I hope to have more ‘build’ information soon to get this thread and my Jeep back on track!
These select shots are courtesy of Marc Fiorito, Creative Director of Gamma Nine Photography. They were taken on Broken Arrow Trail, various back roads of Sedona and along the Mojave Preserve/Kelso Dunes.


Hey Guys!
Thank you for the interest in this build! A lot has happend since June, however it has mostly been maintenance and discovering the weak links in the build last year. The better half and I have been drawing up what we need out of an adventure vehicle lately so the next stages are not far off!
I had an article published in the October/November JP Freek Magazine if you would like to read up on my latest adventure.
Pictures of the Jeep are on the cover, title page and article in Page 18.
I hope to have more up lately; thank you again for the support!
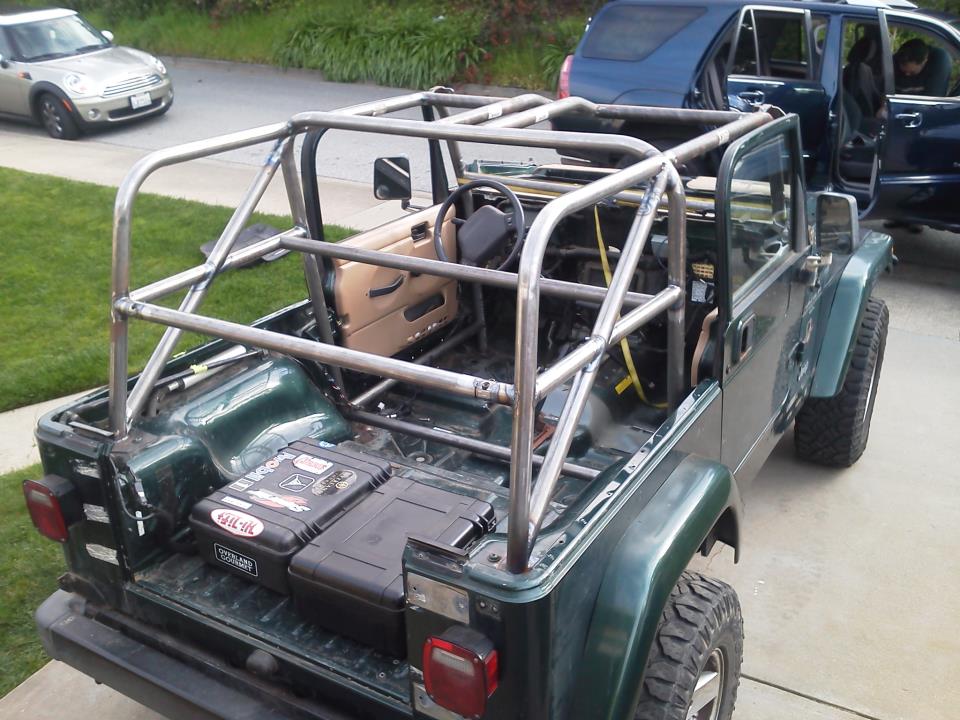
Well. Stage 2 has officially begun:
Garvin Wilderness Rack has been removed. Gas mileage increase ~1-1.5 MPG @ 75 MPH on a recent trip.
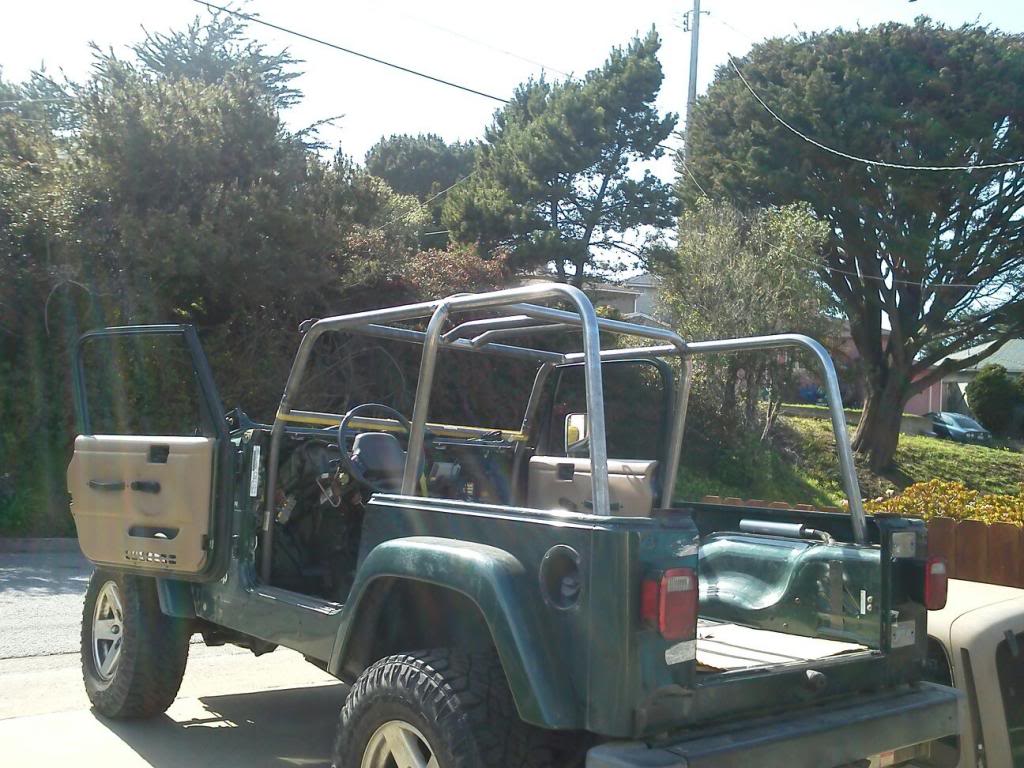
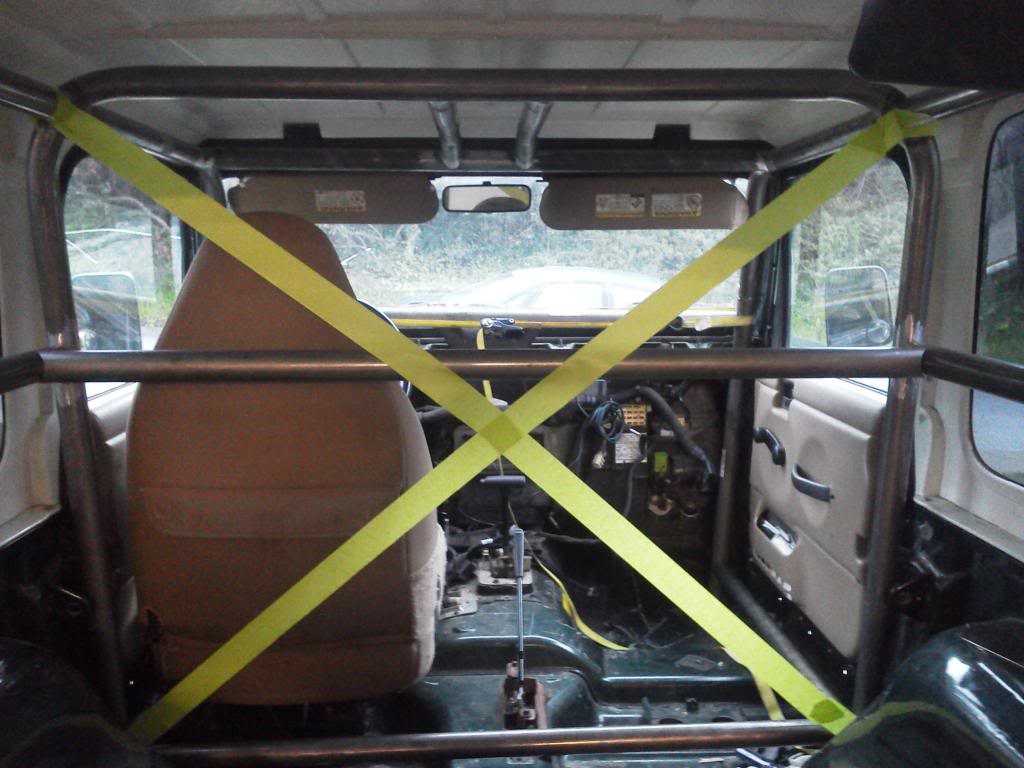
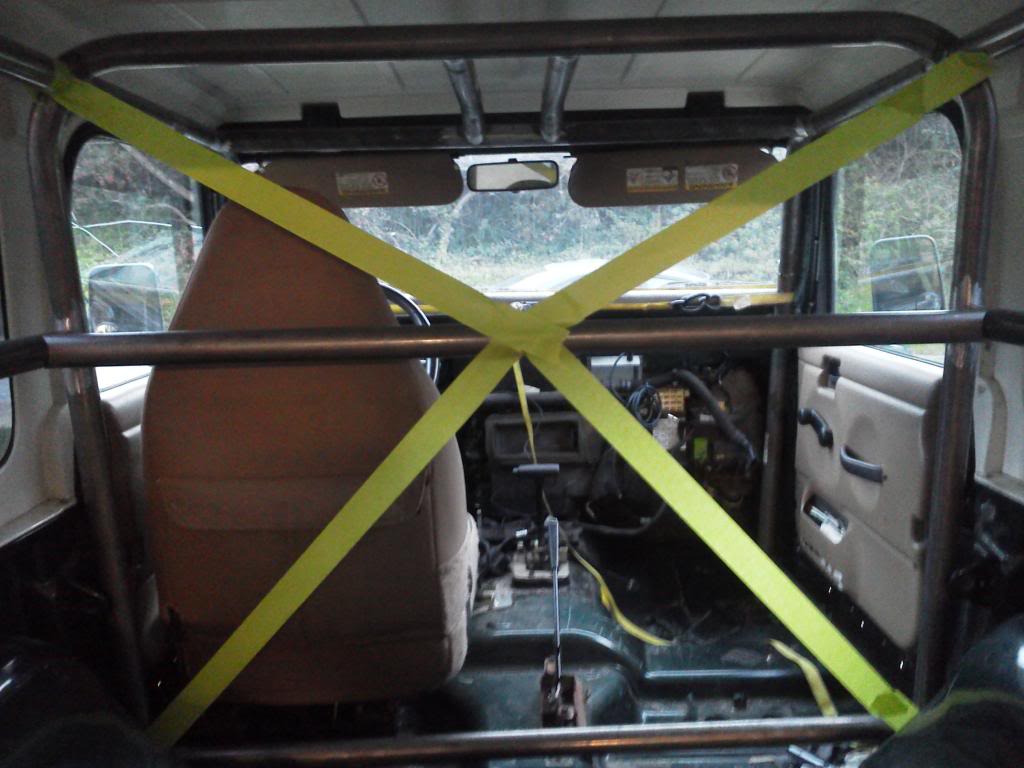
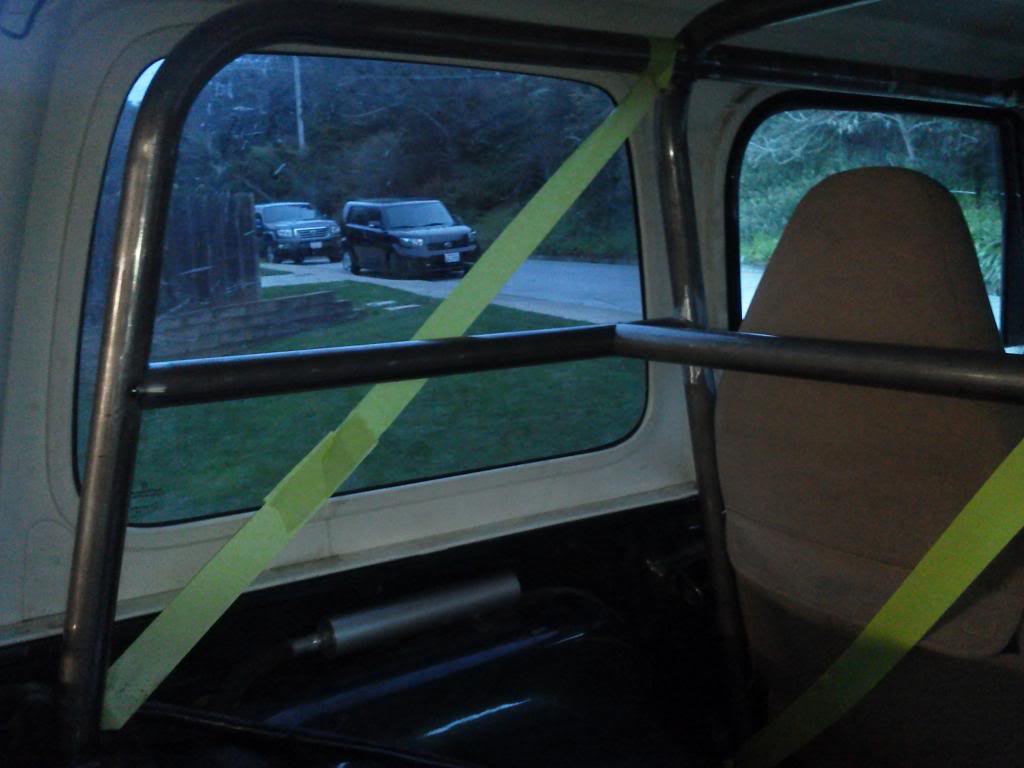
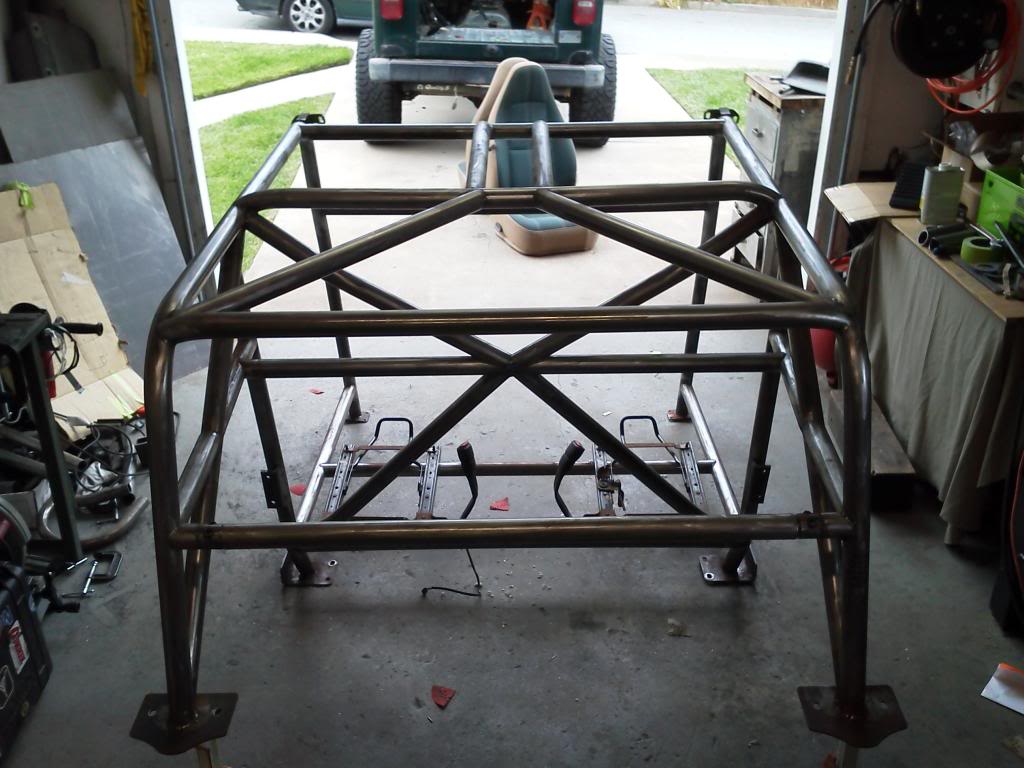
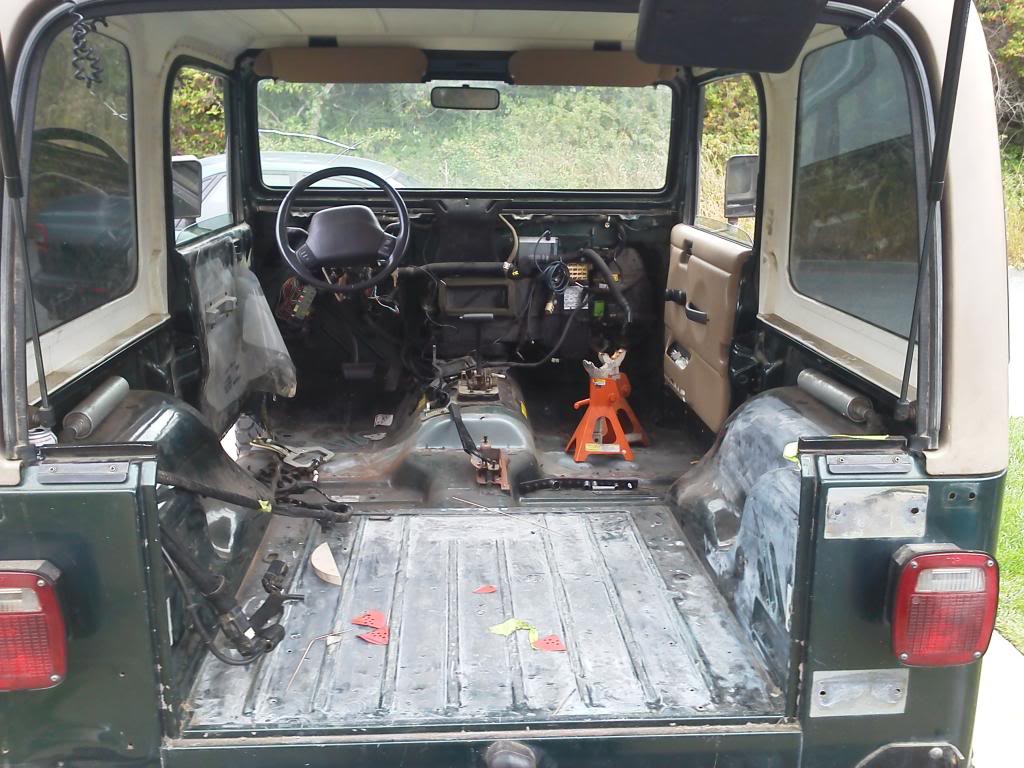
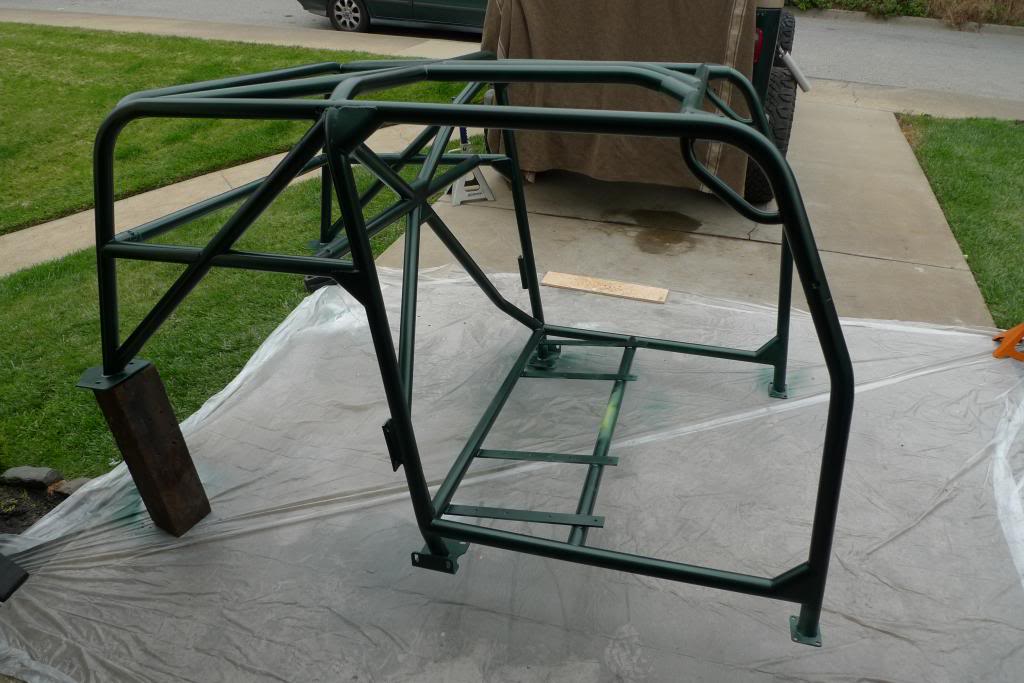
Interior has been torn out to make way for a roll cage.

It will be part Synergy Suspension Cage (PPM-5203) part custom fabrication. In addition I will be using Synergy’s A-Pillar Cage Tie in (PPM-5205) and Harness Bar (PPM-5200). For the B & C pillars I will be using SWAG Offroad’s Roll Cage Tie in. My hopes are to also pull a tube from the A Pillars through the firewall and attach them to the front frame near the coil buckets.
New Tools for the project :
Pro Tools 105 Die (1.75″ x 6″ CLR x 90º)
JD Squared Notchmaster
Swag Offroad Reach Around
Once the cage is in place, I will design the rear drawer system and storage solutions.
Cage Build Goals:
Provide the most amount of passenger security.
Keep entry and exit into the vehicle comfortable.
Increasing storage compartmentalization and organization.
More details to follow.
…4 Hours later…
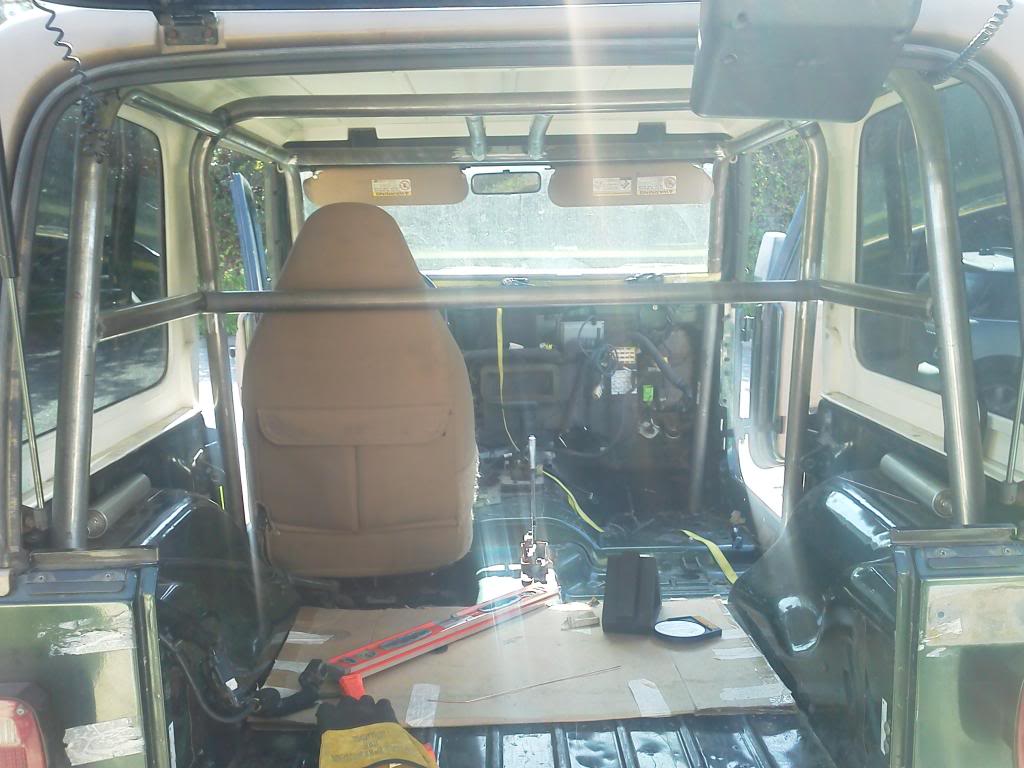
the factory roll bar, if you can call it that, is out. I had originally planned on integrating the front roll cage into the factory bar and reinforcing where I saw fit. After removing all the padding and lifting the cage out of the jeep without issue, I am glad I didn’t. Flimsy piece of metal.
A few tips if you find yourself diving in this far.
The B-Pillar base is covered in a foamy glue.
Use a cold chisel and follow the outline of the bolts and washers and base plates.

Use a dental tool or awl to pick what you can out of the torx hole. Then gently hammer the torx bit into the bolt. I used a 1.5″ foot piece of tubing as a breaker bar to knock these guy loose. One of the vertical tub side bolts stripped on me, so I had to drill out and cold chisel the head off then used a bolt extractor to get the thread from the tub.

There is a large security torx upright on the B Pillar. If you don’t have the bit use a large vicegrip.
Now with all bolts out, drive the cold chisel under the B-Pillar plate. The glue you have removed around the plate is also below sandwiched between the floorboard. A few 5lb sledge whacks and it should break loose.
Now lift the cage out and you’ll be here:

Now to grind away all glue on the interior and move on to mocking up the A-B Hoops.
EDIT: 30 Minutes in, I fried the replacement Milwaukee grinder from a few months ago. Only Milwaukee I’ve ever had problems with is this model grinder. Frustrating. We’ll see how the 2nd replacement grinder does.
Nice update, G. Wondering why you’re removing all of the foam/glue… is it because your roll cage setup needs to mount flush to the floor, or because you’d rather not roll the bed liner on top of it? I know that crap is all over the interior of my TJ and I was planning to roll my liner right over the stuff because I’m sure it’d take forever to get it all ‘outta there.
Removing it in the corners where the new plates from SWAG are going to go. You are correct in that I want the most flush mounting surface.. (Image Below)

I haven’t heard of anyone having problems rolling liner over the glue/foam stuff, but I would never attempt to get into those corners around the B-Pillar if the cage was still installed. With a wire cup brush and no cage it, it is a cake walk, though my grinder did just fry again. UGH.
Well….
Last Sunday, I had a seemingly embarrassing, very scary, freak accident occur in the garage. While tapping a bolt through a bracket, a 4mm shard of metal shot through my contacts and cornea, embedding itself into my Iris. I ended up in surgery a few hours later with the shard removed and 7 stitches in my eye.
Normally, I am overly paranoid about safety glasses in the garage, but unfortunately I had them on my forehead this time. Needless to say, they didn’t really help. Given the frequency that I use a welder, mill, belt sander, grinder, tubing bender, and other ‘dangerous’ tools in my garage, the simple task of tapping a bolt in a hole nearly blinded me.
A week later, I am very lucky to be recovering beyond doctors’ expectations. I will have stitches in my eye for the next 3-6 months and will wear safety glasses in lieu of an eye patch. Fortunately, after all of this, I will likely have correctable vision similar to what it was before. Given that the shard was about 1mm from deflating my eye like a flat tire, and I’ll come back from this with only minor vision and cosmetic issues, let this be a lesson to everyone messing with tools: SAFETY GLASSES AT ALL TIMES.

Needless to say, during my recovery over the next few weeks, I will not be able to make progress on the cage. Hopefully I can get some smaller projects done though.
Progress. Finally. Almost 2 weeks after the accident, my eye has a decent bill of health as long as I don’t get anything in it or bump it in any way.
Started replacing the factory cage the past couple nights.
B-C Pillar Constructed
B- Pillars Constructed
Now I just need to get another pair of hands to mock all of this up inside the jeep so I can start on the rest.

More updates coming up soon. Next is to get the upper B and C spreader bent and notched one of these nights. Once that is completed I can ratchet strap everything in and start tacking and mocking up the other pieces.
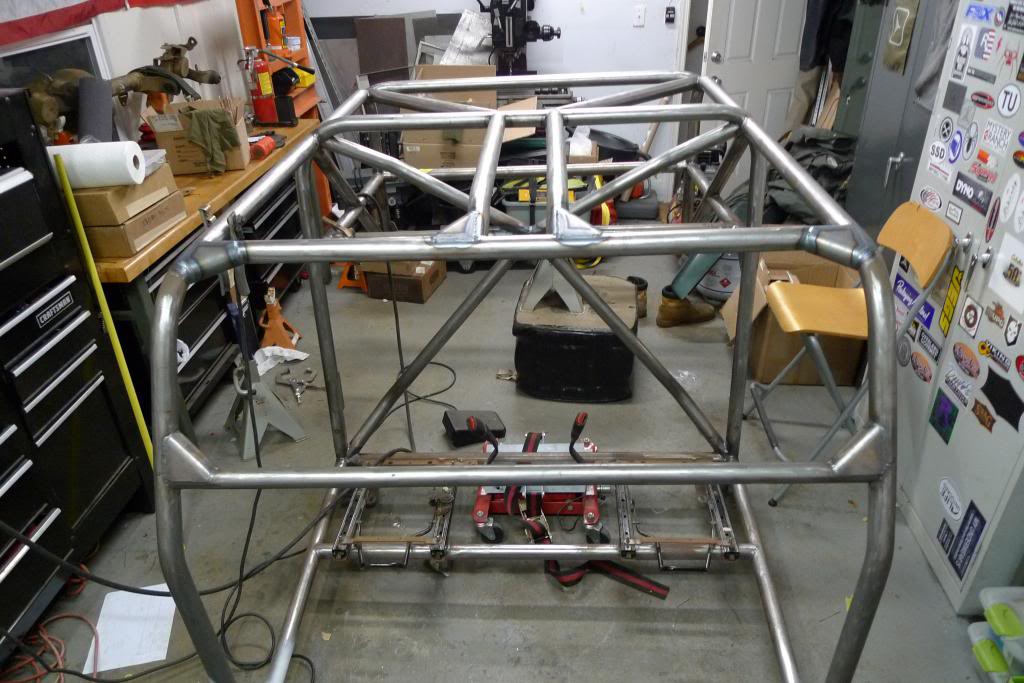
Made a bit more progress over the past two weekends. The A-B-C are tacked in!
Next are the visor bar, overheads, B Pilar X, seat brackets and rear triangulation. It’s great to see progress. Over the next two weekends I hope to get everything but paint done.
Big thanks to C for helping over the weekend with the two man moving jobs!

Still healing. Had 2 of the 7 stitches pulled last week and it is getting more comfortable on a daily basis. Vision is about 80-90 percent of what it was, but until the stitches come out in another month or so I won’t start knowing what kind of adjustments are needed. Doctors say it can take up to a year for the eye to settle before taking corrective action. Looking forward to getting the stitches pulled out of my eye!
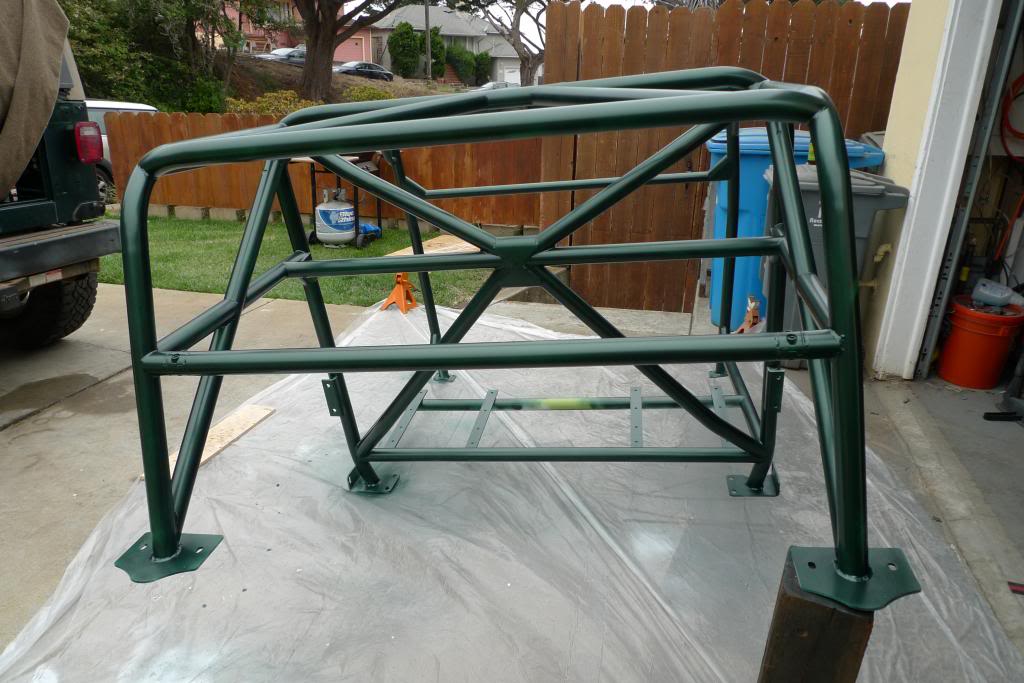
This past weekend was a busy one! Though it may not look like it, I moved from tacking all the pieces, squaring them up to fully welding most of the cage structure. Please excuse the cell phone pictures. I have been horrible at using a camera in the garage lately.
Currently I am working on all the support bars and triangulation which has moved much quicker than building the main structure. The B-C Pilar horizontals, harness bar, A-B Pilar horizontals and then the B-B/A-A Seat bracket horizontal bars were all cut and tacked in place waiting for final measurements and some tweaking with tie down straps.
The harness bar is a tricky one with a lot on the line. Granted I am still running factory seats and seat belts with hopes to upgrade to suspension seats and harnesses in the future, if I am building a cage to this level I want to be sure it can support those features. Harness bar height is the complication, and one I’ve seen far too many builds online do incorrectly, which could result in serious injury. I have been using this image as the bible for proper installation:

And this is where I ended up:
Measurements for the bar were taken with both myself and my better half in the driver seat. I used a level off of the top of the shoulder laid to a line on the harness bar to get the height. At 6’2″ and 5’4″ it gives about 0º for her and -10º for me, however I fear the level is too high when moving to a suspension style seat, so I will be using tube tabs from behind the seats in double shear to allow the ability for the belts to be dropped 2 ” from the current location if needed.
I’m waiting on these to arrive after ordering them this weekend, so more pictures of this detail to follow.
The other issue with the vertical height of this feature is the below bar height of 26″ from the cargo deck. This allows fridge / stove mounting on the right, much like Adventure trailer’s Combo slide and provides plenty of room for a two drawer system on the left for tool, kitchen and hard good storage.
The horizontal bars will be the platform for an aluminum shelf to store softgoods on without having to unpack them to access tools, fridges and other features below the deck.
For the rear C-C cross member I picked up these Tube Couplers. They will allow a structural bar in the rear of the cage, but still allow me to remove it if needed for larger storage and future installations.
On another note, I added a few new tools to the garage fleet in the past few weeks:
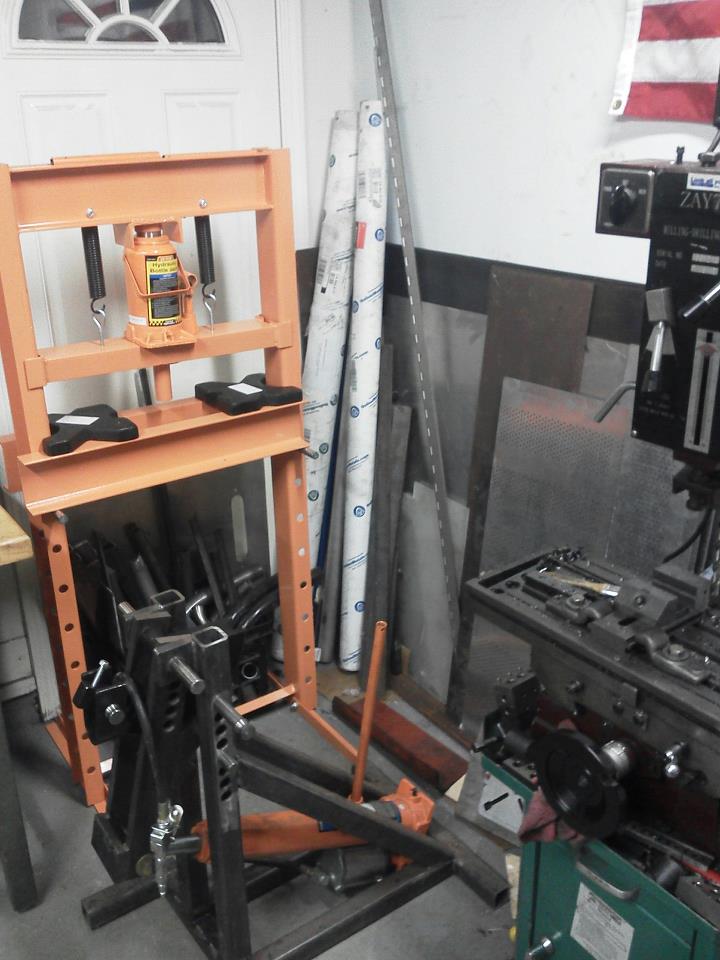
Harbor Freight 20 Ton Press:
BillyBob (Pirate4x4) Dimple Dies: (You can also see the tube couplers in this image)
What are your plans with the engine?
Engine is going to remain ‘stock’ at the moment. Currently all that has been changed are 4 port injectors and the intake system. At 150,000 ish miles, it still has a lot of life in it, but the pipe dream of the Golen 4.6 always looms! 270 HP and 320 ft/lbs of torque sure sound nice!
I just can’t justify the money on something like that until this engine as seen the end of it’s life. Plus 91 Octane isn’t cheap these days. Maybe someone has tuned it for regular/plus by now?
The next big performance upgrade is one of these two guys. I will be rebuilding and reinforcing the extra Dana 30 I have in my garage and plan on doing the front brakes as well. There is a lot of info on the Vanco Big Brakes, and they are my top choice, but Wilwood just came out with the YJ-TJ Conversation at the beginning of the year which is tempting to say the least. I have yet to hear anyone running them…
http://shop.savvyoffroad.com/product.sc?productId=80&categoryId=15
or
http://www.wilwood.com/BrakeKits/BrakeKitsProdFront.aspx?itemno=140-12576
Mocked up some of the rear triangulation today while there was a little light out. Due to the harness bar height I had to rethink the perfectly centered B-Pillar X. After bugging some buddies for their opinion, it is hard to decide on which will be ‘stronger’ in a serious incident, so Option 2 is most likely. Less notches and measurements sounds good to me too.
Option 1
Option 2
Rear window triangulation
To say I have more than a few gussets and brackets left is an understatement….
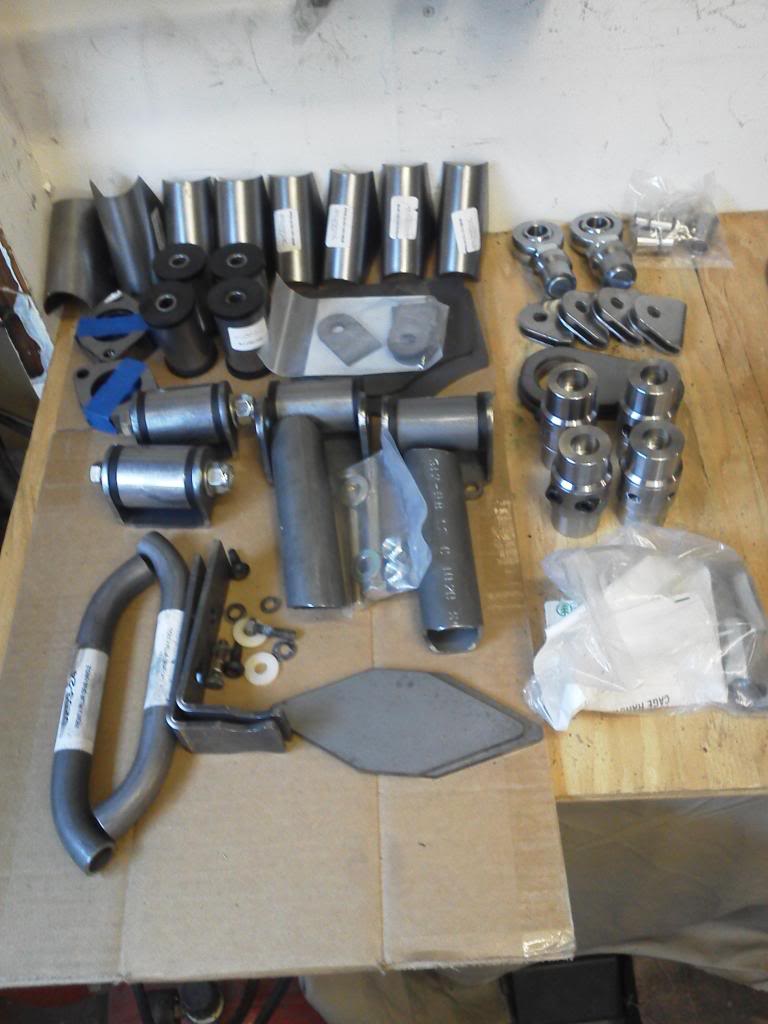
For anyone curious what they are and where they are from see list below. It always bothers me when this is excluded from builds!
From top left across rows:
Row 1:
Taco Gussets 1.75″ – Poly Performance
Taco Gussets 1.5″ – Poly Performance
3/4×3/4″ Heim w/ 1.25″ Tube Insert @ Jam Nut – Ruff Stuff
Wide Misalignment spacers – Ruff Stuff
Row 2:
1.75 Tube Flange – Ruff Stuff
1.75″ Poly Bushings – Poly Performance
1/2″ Bolt Tabs – Ruff Stuff
C – Pillar Frame Tie in Plates – Swag Offroad
Seat Belt/Limit Strap Brackets – Ruff Stuff
Row 3:
2″ Poly Bushings w/ Bracket for Frame Tie in – Ruff Stuff
Cage Tie in Kit (Bracket/Bushing/Tube) – Poly Performance
1.75″ Tube Tab – Ruff Stuff
1.75″ Double Lock Tube Coupling – Ruff Stuff
Row 4:
Cage Handles – Poly Performance
Seat Belt Bracket – Swag Offroad
Frame/Tube Landing Plate – Poly Performance
More progress over the weekend.
Rear B-C Windows and Cross Bars completed.
Below bar height of 26″ set for drawer systems and fridge/stove slide set up. Above the fender wells will be a perfect for something like the Artec Quart Crates . I have been eyeing them for a while to organize and store all the fluids in one location. Prior it was using a pelican box that just couldn’t hold everything I needed. As I move to a drawer based rear cargo system with soft storage above the horizontal bars, I think it will be the best way to organize bottles.
Has anyone else used these?
I’ve been chipping away a bit more over the past couple weeks, and managed to score a couple of new parts.
- In the front, I installed the seat cross bars and cut out the factory tub reinforcement so I can get a 3″ drawer underneath.
- In the rear, I installed the upper C-Pillar crossmember.
- Ordered Dave’s Customs Boat Tail Rockers
- Managed to find slightly used AEV Highlines!
This weekends projects with my buddy in town:
- Finish the B-Pillar Cross
- Finish the Upper B-C Pillar Triangles
- Mock up and tack all the taco gussets.
Really excited to get all of the parts installed so I can wrap up the cage tie in mounts and get back on the trails.
Spent a few hours in the garage this weekend.
Built the upper B pillar V. This took 6 hours to mock up before we could finally tack it in. Granted I’m new at this so I expect some frustration, but man are 5 tube junctions a pain. Add onto that a 15º bend and clocking the bottom notch correctly to the harness bar tube, and you have about 4 hours of just mocking up and fitting.

Now to build the lower V and finish the roof B-C V before I can pull the cage out and finish welding it all.
Built and drilled simple seat brackets out of 1.5″ x .250″ cold roll. Using the factory brackets we transfered the pattern with a center punch then used the mill to drill through all 4 brackets at one time. These four 18″ pieces will span the cage floor bars and secure the factory sliders. This will allow me to use factory seats or any aftermarket seat with a TJ adapter.
My friend checking center on the next hole.

Friday Night I installed Poly Urethane Body mounts (Energy Suspension 2.4107G) so that the cage frame tie ins and body flex at the same rates.
I did not take photos of this process but it was a quick install completed under an hour and a half. The trickiest part of the install were hammering the body mounts straight and putting in the front grill bumpers. If you ever have to do this, grease the rubber bumper posts first!
Bent body mounts were due to a slight misjudgment at the dunes. This incident 6 years ago resulted in a bent fender as well. Fortunately that was all. At least I have a picture of it.
Younger and dumber self behind the wheel. Don’t listen to friends with cameras.

Bent Mounts required hammering and filing to get the metal sleeve to pass through and seat correctly.

On Sunday I also started on my boat side rockers and tacked my seat brackets in. The drivers seat still needs a bit of adjustment. No pictures of seat brackets yet.

I was able to get the Lower B Cross bars in. The upper B-C Cross bars were made but not tacked in this image. A couple hours of tweaking left with it in the tub and I can pull it later this week/weekend for final welding and paint. I hope it can be lifted with just 3 guys. I’ll know after I calculate the weight later tonight.

PROGRESS! The notching and bending is over! Over 3 dozen different tubes went into this.
Next : Finish seat/seat belt brackets and pull it out of the tub for final welding and gusseting. Frame Tie ins. Boat sides. Truck Bed lining.

Completed all bars and brackets on Sunday and had 3 buddies come help me lift it out of the tub. Unfortunately I had to cut one of the tub brackets to remove the cage, but it can be easily reattached.
Next steps : Finish cutting for the boat sides, sand the interior for heat/sound deadening and roll on liner, finish welding and add the gussets. The stages of this project ended up a lot bigger than I expected… Garage is also a mess right now.


Some Updates:
AEV Highlines come tomorrow! Mixed feelings. Really excited to get them, not so excited to get brand new fenders and have to cut them for boat sides and shock towers.
Cage Welding – 90% Done. Only a few more taco gusset and trick tabs for consoles and attachment points before it’s ready for paint.
Current To-Do whiteboard list…

Finished mocking up the boatsides on Saturday. Filler panels on the tub sides are next before heat and noise reducer and Al’s liner install. Cutting the AEV highlines that just came in is going to be tough!

Looking forward to the finished product. The hood chop is the biggest pain of the highline job…unless you got the AEV hood too?
Thank you! I ended up with the AEV hood as well to save me the headache. I have enough of those on this build.
I just want to say, for the record, I hate you.
Born purely out of jealousy though.How much to give my 2000 TJ the same suspension set up?
Hah. Thanks! Would never have time to take on a project like that again. Barely finding the time to get this one together.
For the rear : http://www.synergymfg.com/Synergy-TJ-LJ-Rear-Coilover-Bracket-Kit-p-650.html
For the front : http://www.synergymfg.com/Synergy-Jeep-TJ-LJ-Wrangler-Front-Coilover-Bracket-Kit-p-375.html
Almost everything else on it is bolt on, just minor tweaking necessary. I’ll probably go back and re-evaluate the front bump stops in the near future, because I figured out a way to solve the track bar/tie rod collision. Stay tuned. I’ll take pictures of that process.
With a beautiful cage like that it almost seems wasteful not to roll it.
Thank you! Though I want to feel the same, unfortunately it is the only modification I hope to never have to use.
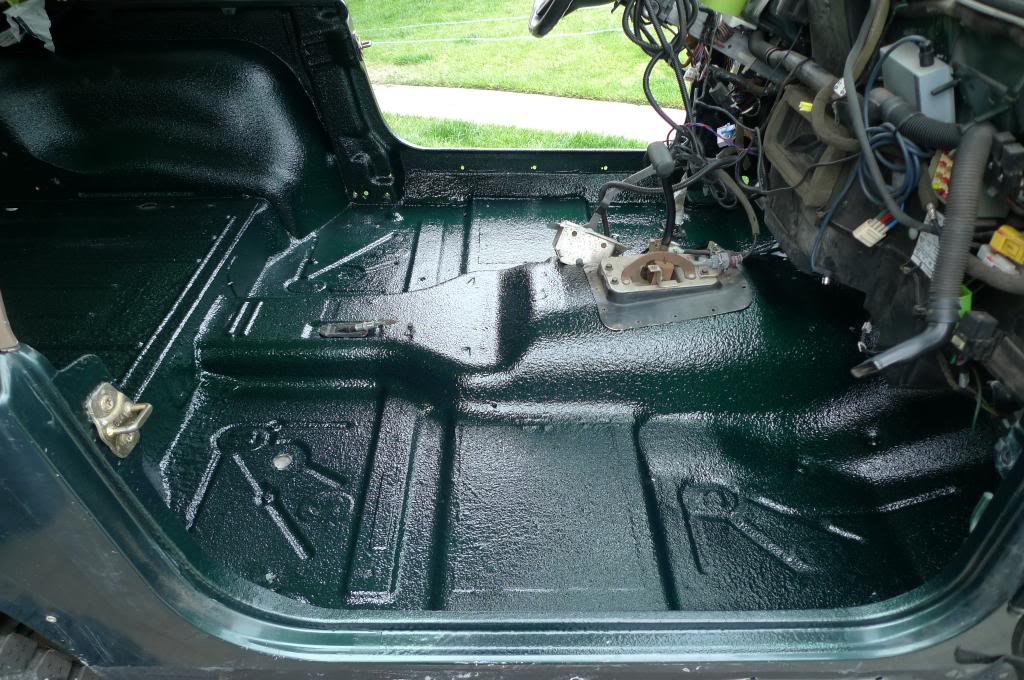
Spent a few hours today messing with filling the tub holes, what a pain in the a**. As you can see from the picture below, if the sheet metal wasn’t fighting me, TIG welding the sheet metal in weird angles was, and then there was the green tape that I left on too long and now have to spend an hour scraping off. UGH. Turned out decently though. On the interior I just ran some seam sealer where there were any gaps. I’ll be undercoating from the top of the tape residue line down, covering everything that is now exposed and cut.

Interior prepped for Al’s Heat and Noise Reducer and then color matched liner. In this image you can see the driver vs passenger side; with and without panel welded in.
You may also notice two holes on the driver side and a panel welded to the floor on the passenger. The holes were to reinforce the floorboard, located underneath the crossmember which was also cut out because the seats will now be mounted to the cage. This may seem like a lot of work, but in the end, it will allow me to have an approximately 3″x15″x16″ drawer underneath each of the seats, which in my opinion is worth it.

For comparison (Pulled from google search)

Full tub prepped:

Sunday I finished the other side of the tub patch panel and acid etch primed all exposed metal (etch prime not shown). It is now ready for Al’s Heat and Noise Reducer and then the truck bed liner to follow.

Tonight I assembled a Winters 607-1 Shifter with a RADesigns shift kit. This will eliminate the need for dual shifters to tiptronically shift 1-4. I will now have mechanical shifting for all gears. This also means I have a RADesigns Baja II Shifter for sale! Anyone interested?
RADesigns Winters Kit : http://www.radesignsproducts.com/Winters_Shifter_Kits.php

Winters 607-1 Shifter
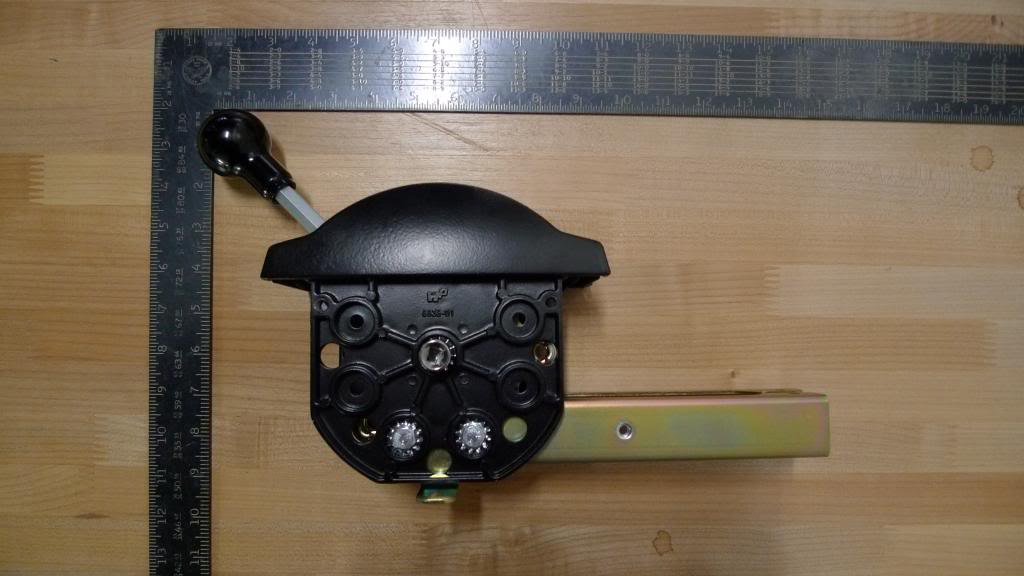
Assembled

More pictures and build along to follow…
Al’s Heat and Noise Reducer applied tonight. The roller kind of sucked for applying and I ended up using a chip brush more than anything to get into all the cracks. This is much thinner than I expected, so if you end up doing it, make sure all the tiny holes in the floor are covered because it WILL drip through them. I might do another quick coat tomorrow around the front floorboards depending on how it ends up drying. I used about a 1/2 gallon on this going very heavy in the front. With now a gallon and a 1/2 sitting in the garage, I think I’ll end up doing the interior of the roof as well.
are you going to do Al’s liner ontop of it? great thread by the way – keep it up
Thank you!
Yes, I am going to do Al’s Liner on top of the H&R in the tub.
I ordered all of my products from Gary at RE Paint Supply (Info below). This is far from a shameless plug as I paid for all of the products, but not only were they incredibly responsive, Gary even created a custom mixed Forest Green Pearl dye from my door panel codes for the liner ($12). As long as you have the code you want, they can mix it for adding to the liner for you. The service was so incredible I went back a week later and ordered all of the materials needed to paint the AEV Fenders as well. I was incredibly happy with their service and will shop with them in a heart beat again. Rare to find these days!
R & E Paint Supply
www.repaintsupply.com
1-800-316-6595
I’m not sure if you’ve already mentioned it, but what size tire are you gonna stuff under the AEV highlines ?
I’m running 265/75/16’s now, but I’ll be able to run 33’s to 34’s MAX due to factory length bump stops. With 4.56 gearing I’ll likely only stop at 33’s even if they look goofy. Anything above that is just overkill for how I drive and how the jeep is built.
Nice that should be a great setup for what your plans are and where you wheel…you can always go bigger right
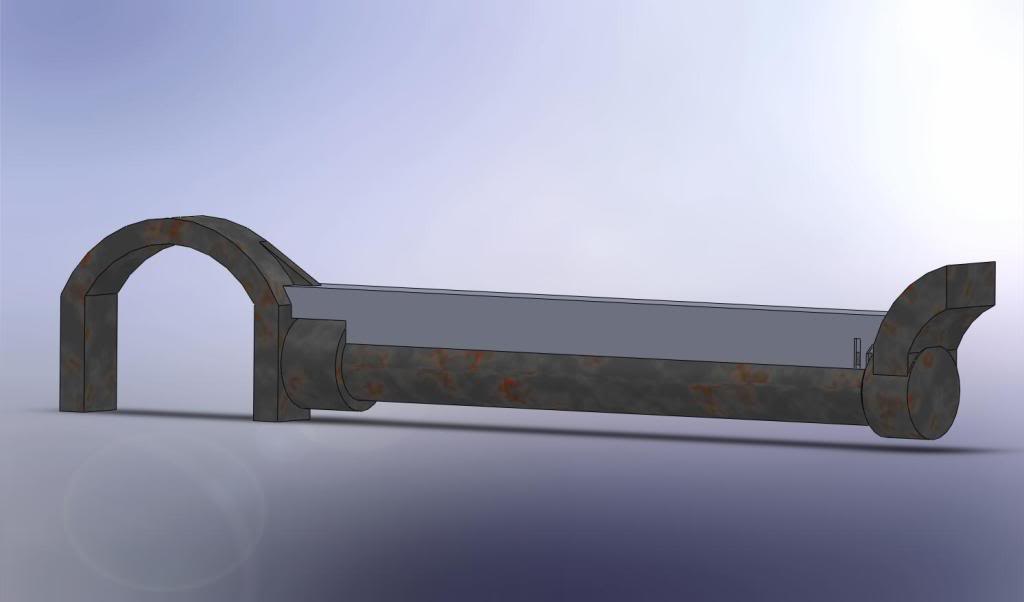
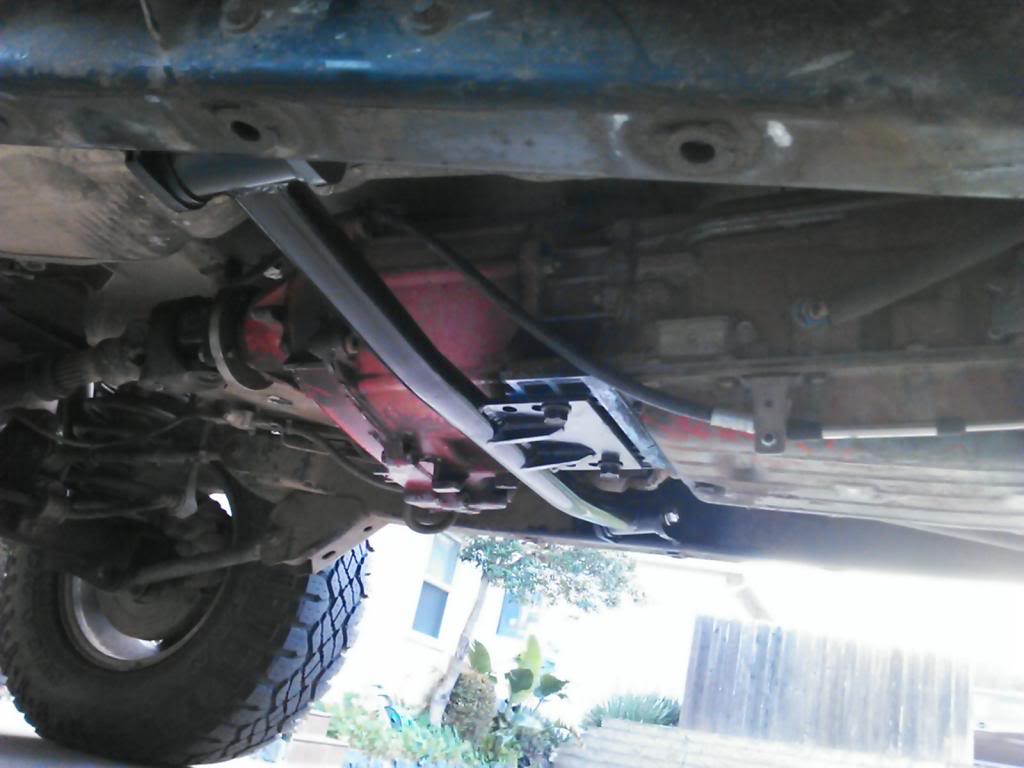
I run 35’s only because I enjoy the rocks…but sometimes they do seem a little to big when hauling a trailer. Any plans to go with a flat belly skid ? I ask because you have every element of ************ a low rider except that.
Yea, plan is go to flush with the frame rails, or as close to it as possible. I have had the tubing and crossmember kit from RuffStuff sitting in my garage for about a year now, just haven’t found the time. I think I’ll have two bushing mounts at the frame sides with a crossmember that mounts to the tranny (See First Image). Off of that I will do a hoop to wrap around the bottom of the oilpan and plate that section with aluminum. In the rear, a small hoop that will protect the transfer case and yoke (See second Image). I also have a giant piece a 1/4″ 7075 sitting in the garage, though I worry doing it that way will cause too much heat unless I do something like the image below off of a Bowler Wildcat. (See third image)
Wish I could credit the first two images, however, they have been sitting in a ‘cross member inspiration’ folder for too long for me to remember. Can’t wait to get to that part of this project! If I had 1300 to throw at this problem tomorrow I would buy the Savvy Skid in a heartbeat. Hard to justify that when I can make a lightweight tubular crossmember/skid system for under 200 though.

Sounds like a good plan. I think my UCF ultra high clearance skid hangs down 3/4 of an inch from my frame rail, the extra clearance underneath really helps out on trails and looks so clean. Keep up the good work.
Thanks! Can you send me a picture of the skid setup you have? I’ve been looking at the UCF as well, but have never talked to anyone running one. The issue I run into with all of these skids is that the transmission placement is off for the AW4.
Thanks! Can you send me a picture of the skid setup you have? I’ve been looking at the UCF as well, but have never talked to anyone running one. The issue I run into with all of these skids is that the transmission placement is off for the AW4.
The skid has taken a serious beating. Give them a call, I think his name is Matt and he’s super helpful. They’ve used a skid on about every type of drivetrain combo you could imagine on a TJ and have specific skids for specific years.
Here are some old photos…
Don’t mind the broken exhaust…
Jul 10, 2013
Liner Update
A couple weekends ago I started applying Al’s liner with very bad results. I mixed one quart and began hitting all the tight areas with a paint brush, then attempted to use a roller on the larger areas. The Dupicolor roller sucked for this and I ended up using a 4″ wide chip brush for the application. Frustrated with the first pass that was very streaky and inconsistent I, like an idiot, mixed another batch (after the first had dried) and repeated my mistake. The result was the same, crap. The working time window with this stuff is about 10-15 minutes at 70º, and very difficult to lay on consistently with a brush or roller during the quick change of viscosity.
With a 1/2 gallon left, and repetition of the results with my previous method guaranteed, I ordered Al’s Liner Spray gun which showed up yesterday. Problem solved. I mixed another quart last night, threw it in the spray gun and had professional looking results in 5 minutes. Incredibly even and consistent spray and layout, I could not be happier. Now to mix up another quart some time this week or weekend and finish the tub. I’ll post pictures when it is light out.
I guess that’s what you get for being cheap and trying to half *** a job. Glad the Al’s Spray Gun solved the issues, that looming frustration of a poorly done job was starting to get to me.
Finished Spray Results.
Did another two quarts of spray at ~43 psi with a very short throw on the gun. I’m very pleased with the results, granted there were hiccups over the past couple weeks and a few today.
Incase someone questions weither a DIY spray on liner can color match :
Passenger Side :
The liner is still setting so the color came out a bit light in the photos. In this shot you can see the driver side is a bit ‘yellower’ than the passenger side on the floor board. Until the fog rolled in, the passenger side had direct sun causing it to cure faster and set the color.

On the few minor spots where you can see faint hints of the H&R peeking through the green, mainly where the clunky spray gun couldn’t reach, Dupicolor Perfect Match rattlecan solved the problem.
On Saturday I was letting the jeep run like I do every couple weekends while it sit in the driveway and…. following a large POP and cloud of white smoke this is what my driveway looks like…
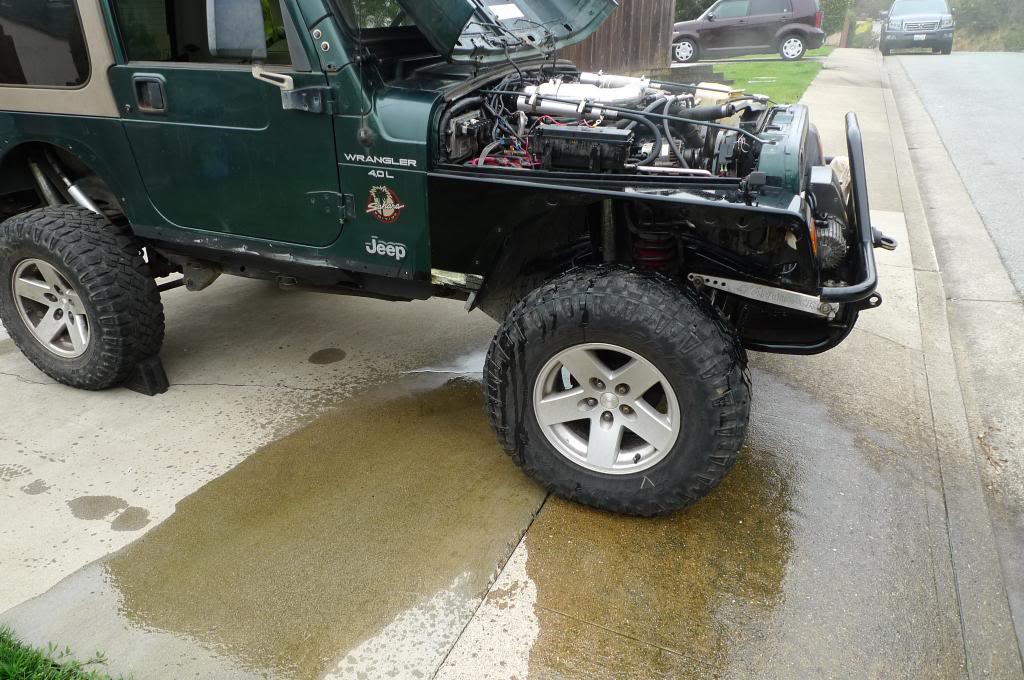
… and the culprit …

I don’t know what the hell happened. Apparently when I bought the Jeep it had a new radiator at 55k, but this is pretty intense. Either the tank has been cracked for a while and I just haven’t noticed, or one of the other components (thermostat/cap) failed and built up pressure causing it blow. Picking up the parts this week and will tear it apart and find the problem when I pull the fenders for the AEV install. I guess I can be glad it happened in my driveway.
Meanwhile on the productive side, I finished the final tube welding on the cage tonight before running out of argon. One more night of welding taco gussets in and the cage is ready for paint and to be dropped back into the jeep. This picture clearly illustrates the limitations of having a 1 car garage and too many piles of parts taking up space (mainly AEV fenders). I guess you made do with what you have.

Goals for the week/weekend :
Finish welding taco gussets
Make Winters shifters/transfercase shifter bracket
Prime and paint cage
Put cage in Jeep
Cut AEV fenders for boat sides
Replace Radiator
Replace Thermostat/Housing & Radiator Cap
Prep garage for painting the fenders over the next week…etc…
Really ready to drive this thing.
Big bummer on the radiator…but like you said better in your driveway than out in the desert.
New CSF all metal radiator will be here tomorrow. Guess I have another project for the weekend.
Some cage progress…TACOS!
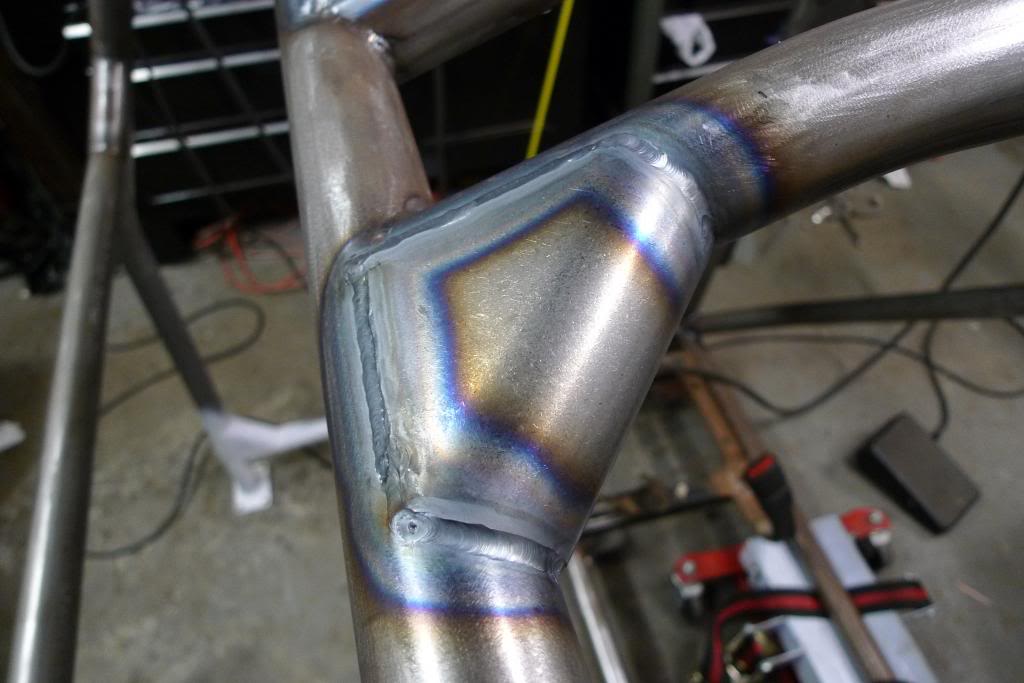
I have 2 more to weld in, and need to fabricate a new bracket for the Winters shifter. Then cage paint! Excuse the garage mess.
TIG welding all of these angles and facets is kicking my ***. Wish I could keep it more consistent, but my skill is the limiting factor…
Another note, these gussets are the .090″ ones from AA Manufacturing which stuck up a bit above the tube line causing very scalloped welds. I guess I could’ve used more filler road, but I think they’ll do. Heat affected zone is pretty big with my welding, lets consider my skills a work in progress…
Welding Finished!
Primer Finished!
Paint…well…almost finished! Currently on 6 cans of 8oz Dupicolor Perfect Match. Likely need another two to cover all the primer peaking out. Who knew the cage was going to take this much paint?
It’s amazing how much closer you feel to something being done once it’s painted. I feel like I’m done once I’m finished painting, but still have the frame tie ins, shifter mount and install, painting fenders and boatsides; at least for this stage.
Primer

Primer (Midway through, still some bare spots)


Not sure if this was covered earlier in the thread but any reason you chose to go with Al’s liner as opposed to Monstaliner or anything else out there on the market? Monstaliner is relatively local to me and I’ve been looking hard at their stuff.
Having never seen Monstaliner in person, It is hard for me to compare. I made my decision based on buddies at shops who have used both. Every one of the recommended Al’s Liner hands down. After spraying it with the gun, I could not be happier with the product and the pricepoint.
Final coats of clear in high wear areas, pulled the fenders and the radiator out. Kinda made a mess after I thought the radiator was drained. High pressure hose to the rescue.
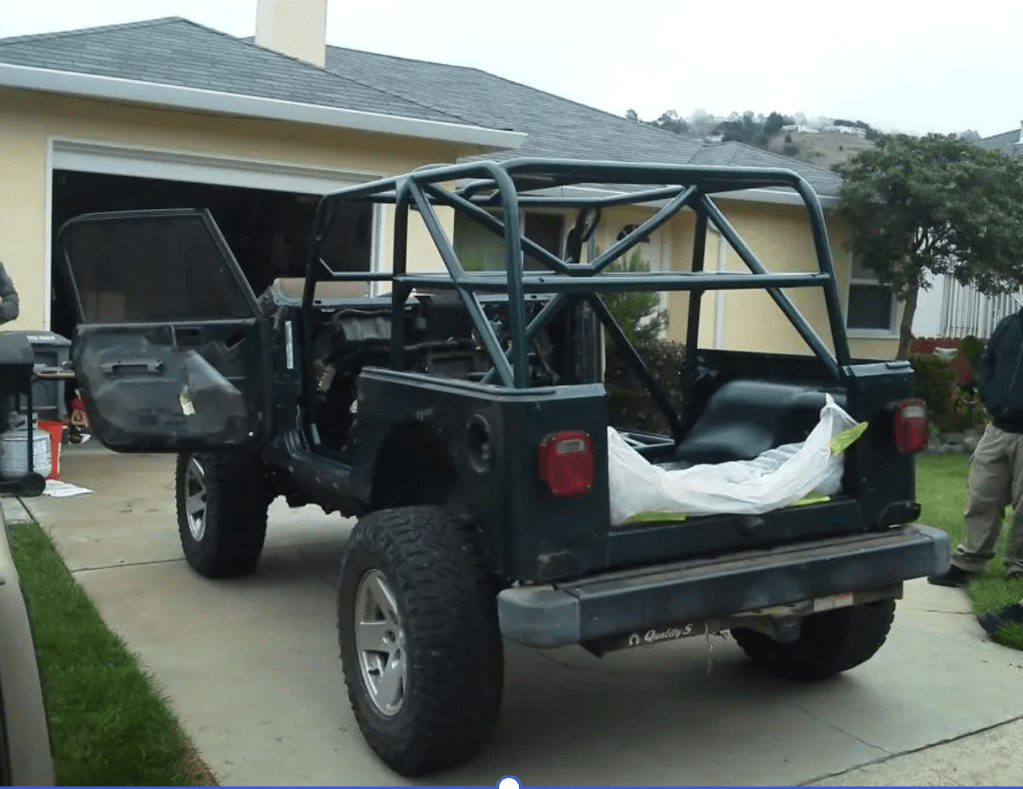
Stole some guys from work today and lifted the cage into the Jeep. It is not bolted in yet and sitting on some wood blocks so I can put the floor spacers in before I tie into the frame.


Then to warm up on some tools I decided to dimple die my electric fan brackets. I guess I was looking for an excuse to dimple die something.
Dimpled > Before
Both Done

Painted and installed on the new radiator.
Just wrapped up the AEV Highline mock-up. I had to cut the inner fenders for the shock towers and the outside lower portion for the boatsides.
After looking at both options, I modified my stock fender flares for the AEV fenders. The 6″ wide flares just look too large for the 265/75/16 and will likely do the same on 33’s when I need new tires.
Passenger side:

Yet another weekend in the garage. Projects are starting to get tied up!
As I am bored as hell between drying coats I figured I would post some progress…
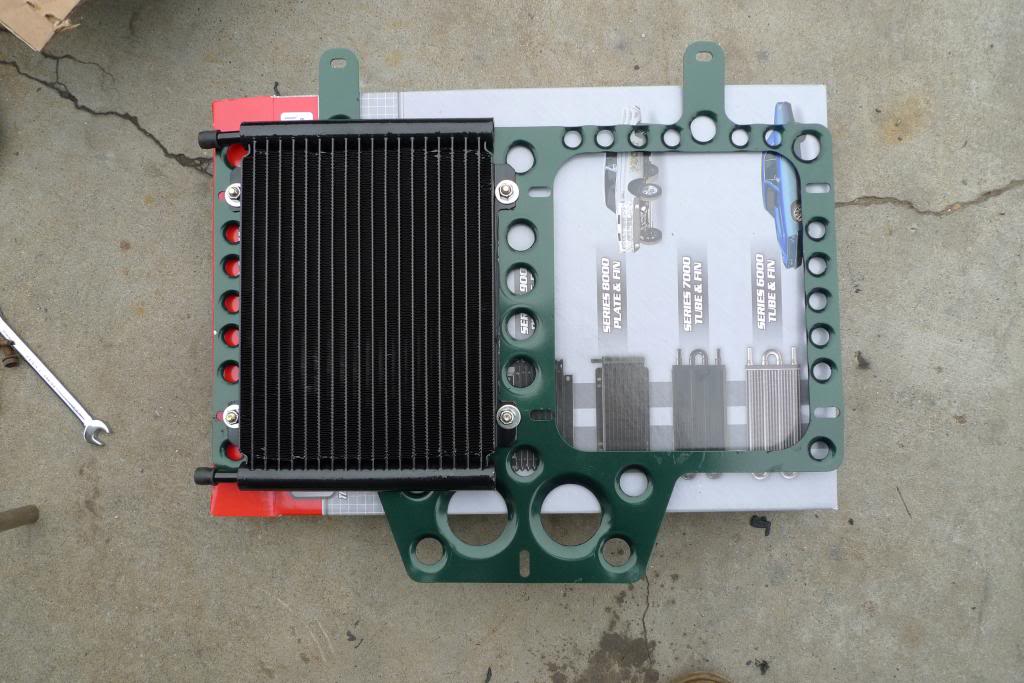
Cooling System Update:
As I have to replace the radiator anyway, I figured now was a good chance with the front end already apart to fix the zip tie mounted transmission cooler which has haunted me since I installed it. Downgraded the size of the cooler, but with a much more reliable mounting, the PSC Cooler bracket with transmission cooler. I’ll eventually add another cooler in there for the PS or Oil.
The thing that bugged me most about the bracket was the lack of flow it provided between the brackets…so I did some drilling and dimpling to the bracket and went a bit overboard. The cooler was cut a bit too, so now air will flow through the 1″ center piece where it was blocked previously. Maybe I shouldn’t be around tools when I’m bored…
Before:
After: (Kinda done offhand so excuse the alignment variance.
Now the painting stages and mess that is my garage/driveway while the inside is sheeted off.
Prep and Primer. Color in about an hour. Bit of sanding needed around the front fender seam.


Aug 3, 2013
…and…color and clear…
Given that the last time I touched an HVLP gun was close to 15 years ago for painting a bicycle frame, I’m fairly happy with how it turned out. There are 2 minor drips on one of the fenders, and a few dust spec blemishes. Considering that this was painted in a garage, that’s expected. I ended up using 3/4 Quart of Primer, 1 Quart base color, 1 1/4 Quarts of clear. That puts this painting project below $250 bucks with a $150 of extra paint for the next time I need to add something to the jeep.
Hopefully I can get the cooling system back in tomorrow and fenders mounted.
I’d say that matches the level of factory orange peel. This certainly isn’t a show car!

Boat sides.

Hood
Turned out ok. Orange peel a bit heavy. Debating whether to buff it or not.
Busy day today chipping away at putting a box full of screws and bolts BACK on the Jeep for a change.
Boatsides, fenders & hood mounted, radiator and cooler brackets installed. Still lots of odds and ends.
Cooler mounted on bracket.
Door edging covering the inner fenders where it surrounds the shock towers.

Hood not latched yet (sitting on spring) and flares not mounted.

The worst of the panels. Heavy orange peel. I must’ve had the spray gun too far away on the clearcoat. Color matching is very close, however the new panels are bit yellower. Once I clean up the old paint and wax it, it should blend better. If not, a buffer may help.
Looking pretty good Gianni. I’m really impressed at how much work you’ve put into this. That roll cage is amazing!
Thanks N! Hoping to get all the small projects wrapped up where I feel that it is trail ready again. Then you can teach me how to drive!
Excited to see shots of her on the trails when this project wraps :safari-rig: . Got a timeframe set for completion, or is that up in the air?
It runs. It drives. Updates this weekend for the next list of projects!
Looking good ! Your sleeper is coming together nicely. Can’t wait to see finished pics.
Thanks! As you said, the low profile skid is still missing! I hope to tackle the fabrication of the mounts this weekend! There is a pile of 1.5″x.120″ wall tubing and bushings sitting in a pile right now.
")
Minor Update : We took it 4 hours south a few weeks ago on a shake down run for some kayaking and camping. Was running incredibly hot after all my cooling changes and I was able to confirm that the front skid was preventing air from hitting the bottom of the radiator (Transmission inlet) and causing the transmission to heat up the engine. I pulled the skid at the camp site and the trip home was sitting around 205 instead of 235-240. At idle or moving slow it stays around 180. Next up for cooling is making sure my fan is on a thermostat instead of constant on, and putting an additional cooler inline for the AW4.
I have a ton of small stuff to work on this weekend and I’ll post some pictures and updates shortly!


Oct 13, 2013
Quick update :
Still having issues with transmission cooling. Problem solving that over the next few weeks.
A few positive updates:
Wheel Bearings, U-Joints, Ball Joints and steering stabilizer installed. Man, were my old ball joints in bad condition. All of my steering responsiveness is back, and the small vibration on the freeway was due to the U-joint going out. Jeep feels smooth again.


Sold my old Sahara Front and Rear Seat Set and bought some PRP Daily Driver Buckets…
…and a new project entered the garage. My fiance’s 1973 Volvo 1800 ES. Her mother purchased this in 81 with 30k on it, only 80k on it now. Been sitting in her parents garage for the past 10 years, time for a rebuild to restore this classic cruiser…

Well, put 10 hours in the seats over the weekend, and they felt spectacular. I felt very supported and did not get restless or need to shift during either of the drives. I will say I am still getting used to climbing up and over the edge of the seat, even though these are technically low bolsters. I am incredibly glad I didn’t get full race bolsters! One thing I tend to do is slouch while driving, and I actually think that putting harnesses in may help with that on longer trips. Who knows, may be worth it.
Going to have an even longer trip in the jeep this weekend so I’ll check back with current project lists and updates.
Put a few more miles on the Jeep from SF to Big Bear for the So Cal Mountain Rendezvous. Jeep is still running hot, solving the transmission cooling is my big headache for the moment. The PRP Daily Driver seats could be the most comfortable I have ever been on a road trip. Worth every penny.
A few photos from the phone:
Dave and I checking out the water crossing.

I had forgotten to put my TC breather tube back on after the last round of mods so I was forced to take the route around the water.

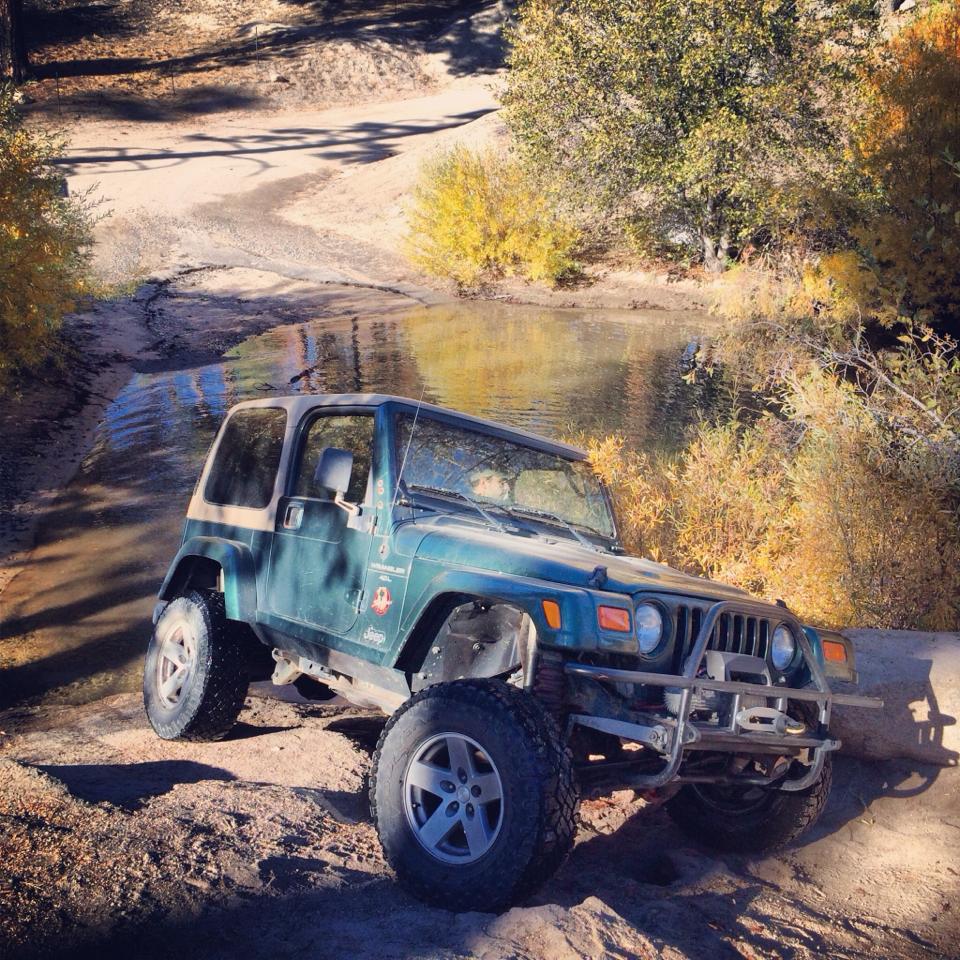

On the way back did some detouring through the desert hitting a portion of Route 66.

Current list of projects in no particular order:
Cup holders
Transmission cooler upgrade. PSC not cutting it on grades.
Axle sleeve and knuckle gussets
Tub grommets at firewall and floorboards
Carpet
Cargo netting for above head storage
Counter sink Max tie downs and paint
Fridge slide – Ordered from Adventure Trailers
Replace radiator relay setup (currently constant on)
Switch custer for accessories
Dennis Stern lighting upgrade
Pre filter
Cabin filter
Under hood heat exhaust
Cross member and skid plate*
Reroute and solve leaky exhaust
Awning
Camelbaks behind driving seats
Solve GPS Mapping hardware
Aux connector
Charging station
Call beams about seatbelt length
New Coils
Rear hard top vent
Vacuum canister replacement
Put carpet in
Harnesses
Well got the 1800 running which means it can come in and out of the garage & driveway when needed and I can start wrapping up the Jeep.
The AT Combo slide showed up today and fits with about 1/4″ to spare under the rear crossbar. PERFECT! I still need to tweak the blocks a bit to make it fit the TJ for final fit, but really happy with how much it is going to help storage in the Jeep.

Big sale at Oscaro right now, was able to get alloy USA chromo shafts (http://www.alloyusa.com/alloy-usa-12148.html) for the Dana 30 at 1/2 off ($325), and one of the two rear 8.8 shafts and rebuild components too. Not kidding, thought I’d pass along the great deal. Search by part number not through vehicle. This deal ends at 8PM tonight, look at the top banner for the deal FRIDAY50.
Tucked the drivetrain the other day. No body lift so I couldn’t go full flat on the bottom. The center mount bushings vs frame bushings have become a controversial discussion both before and after the install, so I’ll see how I can squeeze one in there depending on how I end up doing my skid. Exhaust will get routed next week.
Jan 30, 2014
Few other ‘bolt in’ projects lined up for the near future : Savvy Gas Tank Skid, Savvy Tail Lights, then starting to build the center console and rear storage system.
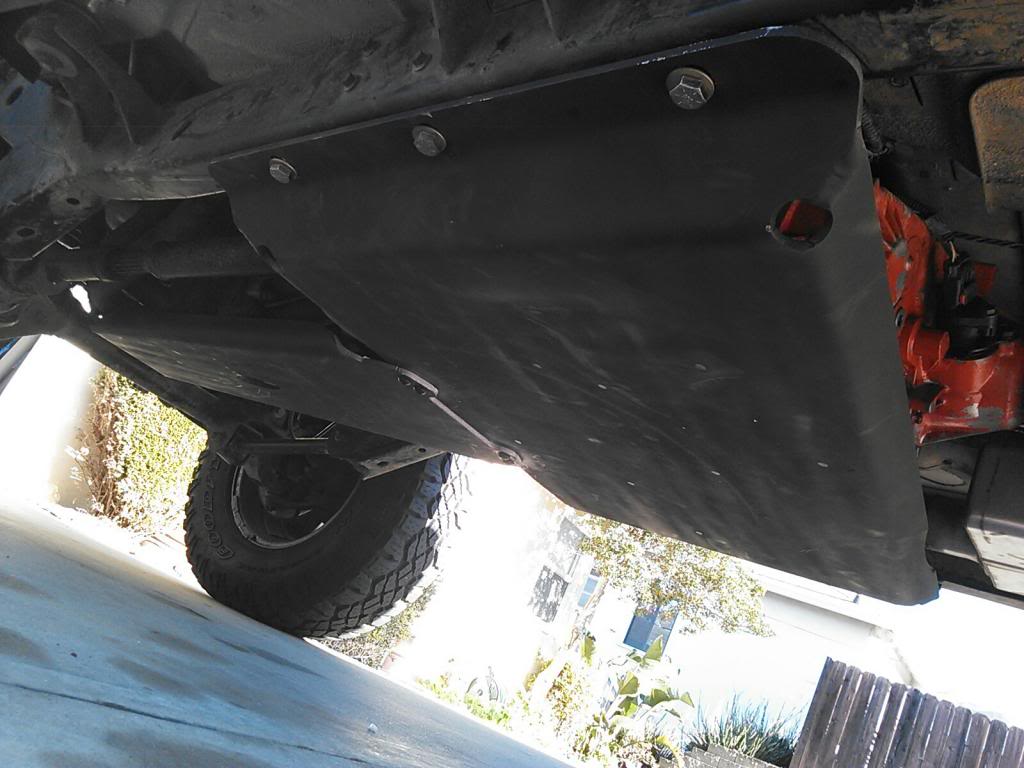
Couple of weekends ago I got the Under Cover Fab 1/4″ Aluminum skid rattle-canned and thrown under.
OK OK Guys. Much more build fun to follow. I will hopefully have a list up here in the next week or so. There isn’t ‘much’ compared to the past few years, but some cool things are still in the works.
To illustrate the next level of garage projects, I feel it is important to introduce the new addition to the garage, Tormach PCNC 1100. Image taken when it was first moved in. Before I start major projects I need to built a coolant enclosure.

Updates :
Spin Tech Muffler/Exhaust – Installed
Savvy Gas Tank Skid – Installed
Savvy LED Taillights – Installed
I may have mentioned this in here before, but I had been dealing with transmission overheating for quite a long time. Being fed up with it I re-routed my entire system to include a Filter and now have dual coolers mounted in the front (run in parallel). I can now run up grades with AC on and never see over 180º on the transmission. Most of the time the trans runs at 100-110 (outflow, not what is inside of transmission). This may be on the side of “too cool” and in retrospect I should’ve done a single fanned cooler, but the system is solid, used russell fittings and now has an inline filter. Without transmission heat issues, I now want a small utility trailer!
Sitting in the garage : Dana 30 – Synergy Knuckle Gussets, Inner Axle Sleeves, Chromoly Shafts, enough materials to make the storage system. PSC Power steering pump, will likely be getting a new steering gear shortly.
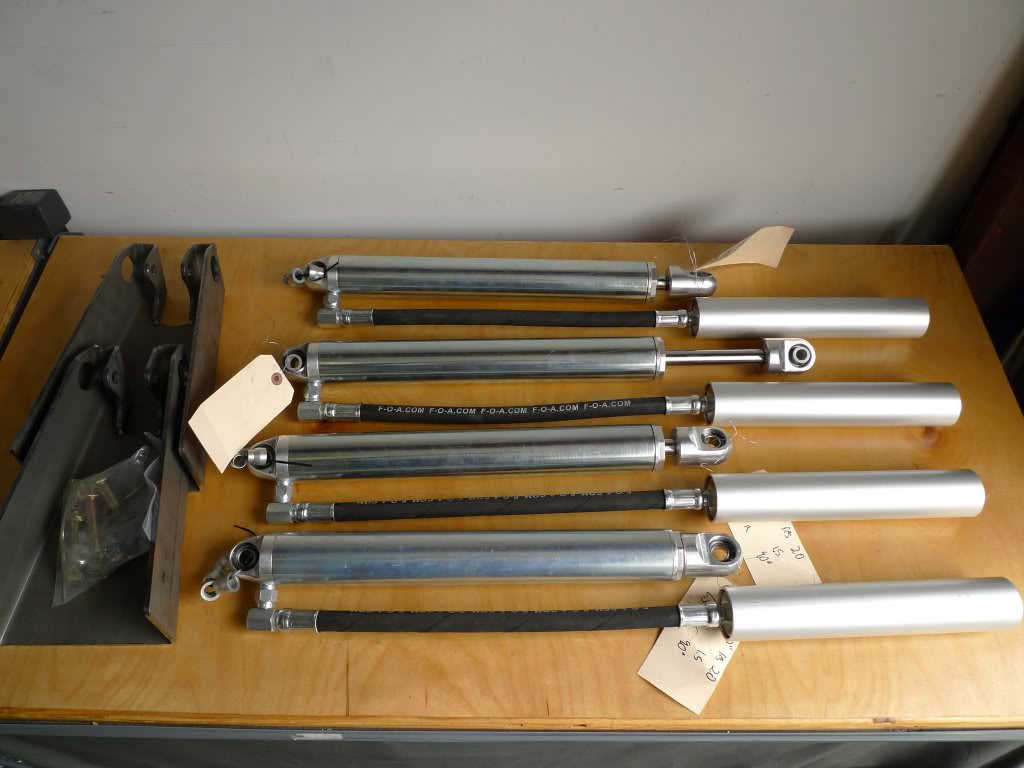
Maintenance : FOA shocks need a major rebuild. I’m debating replacing them as they have leaked nitrogen and oil in far too short of a lifespan for me. This has been going on for a while. I’d hate to buy new shocks and NOT have them threaded (I am set up for coilovers after all) but that may be a bit longer down the road.
Engine keeps throwing misfires at high rpms (engine braking down hills), downshifts to get up grades. Still trying to create a scenario where I can replicate it and start problem solving.
Hoping to keep you guys fed on pictures and information. Trying to find more time to play in the garage.
")
Ok some photos. Excuse the quality, this is all I had on my phone during some of the projects…
Pile of parts to be installed

The oil filter/sensor block with Russell Fittings. Both Temperature and Sensor get picked up here on the Hot Out.
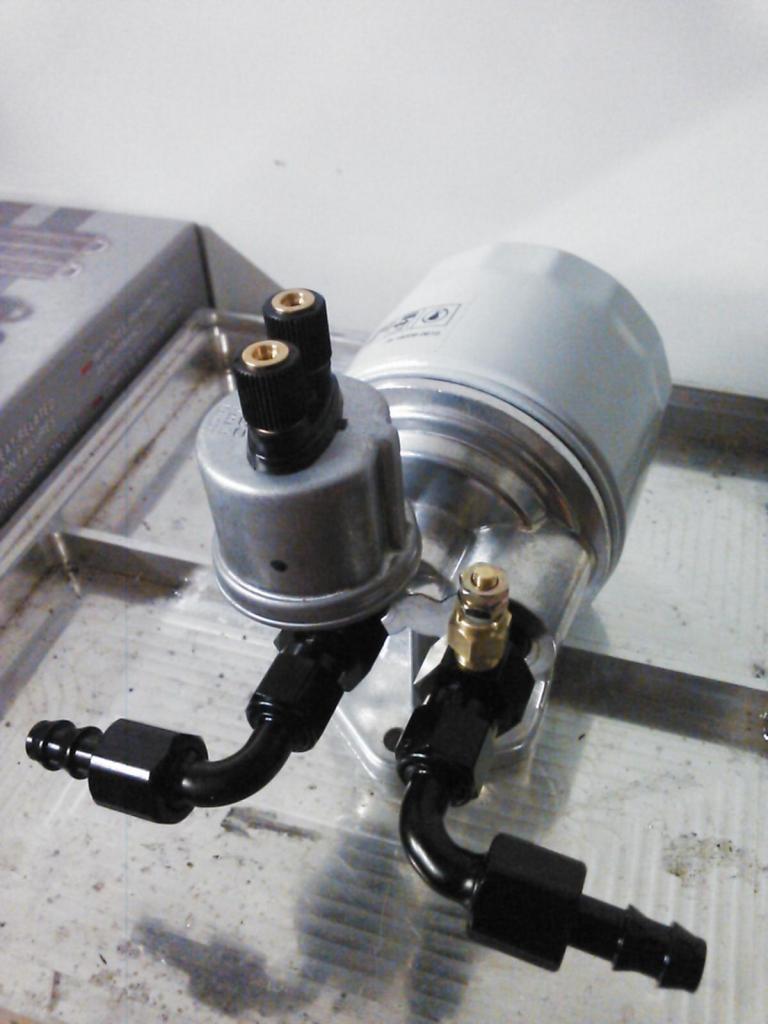
Russell Y fittings to properly run Parallel coolers.

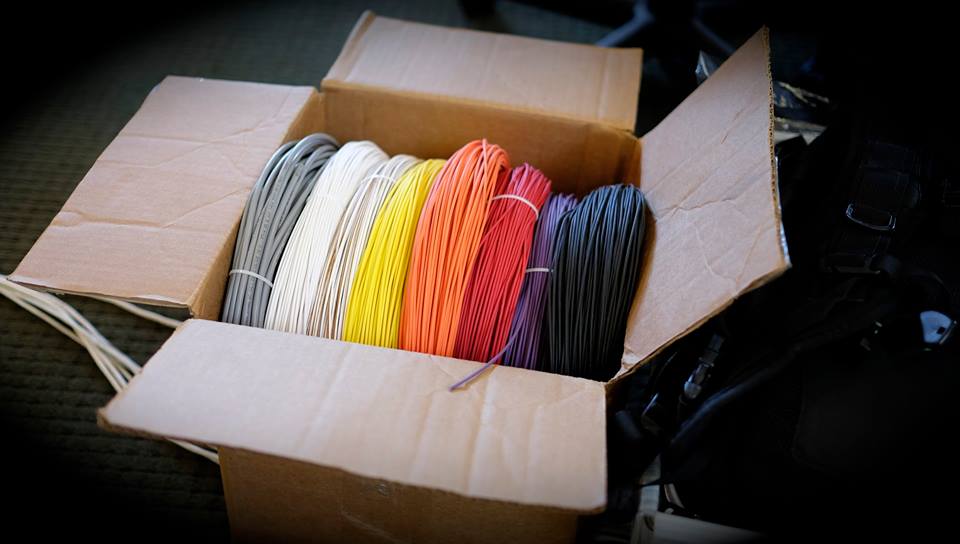
My latest order of wire for the 1800 and Jeep Wiring Projects :
A side stove project I have been working on for the AT Slide :
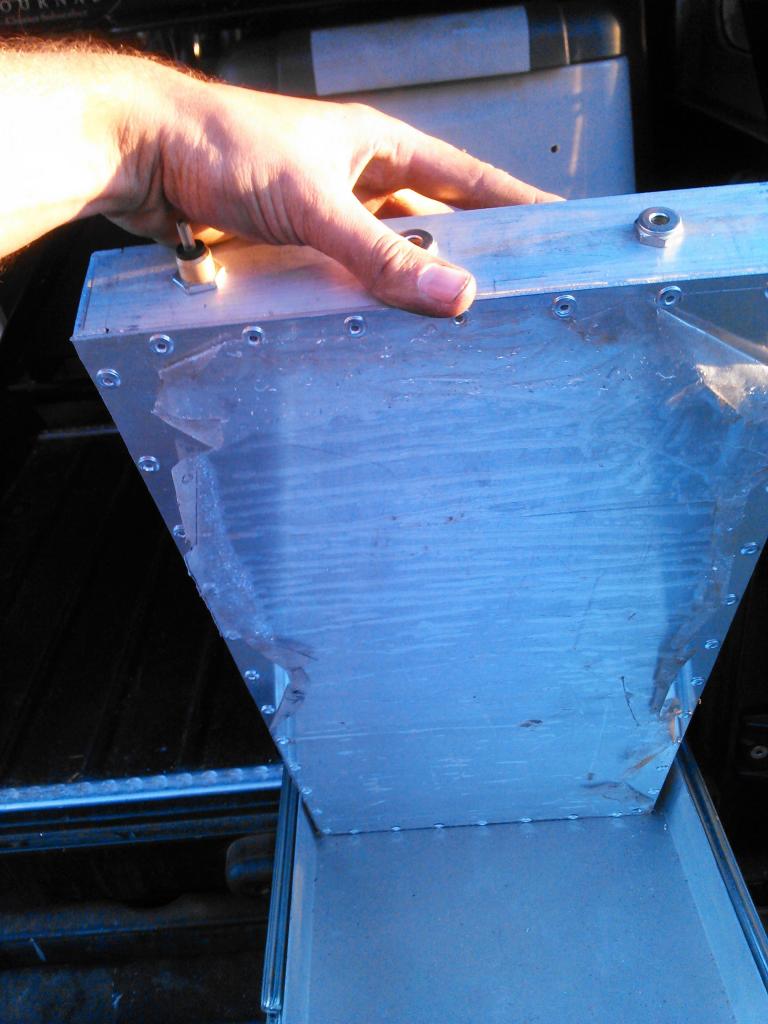

The ‘new’ roof rack. Though I really enjoy not having the Garmin rack on top of the Jeep for noise and MPG reasons, it does suck not being able to carry things. Considering It was generally used for things like kayaks and lighter items, I went to the junkyard and pulled some cargo rack rails off of a Ford cargo van for $5 and applied some spray paint. I used giant fender washers underneath to secure it through the fiberglass. When I go back and sound deaden the fiberglass I’ll probably put aluminum strips in to get a better surface area. For now, it with any standard crossbar system found in a junkyard will fit my roof transportation needs.
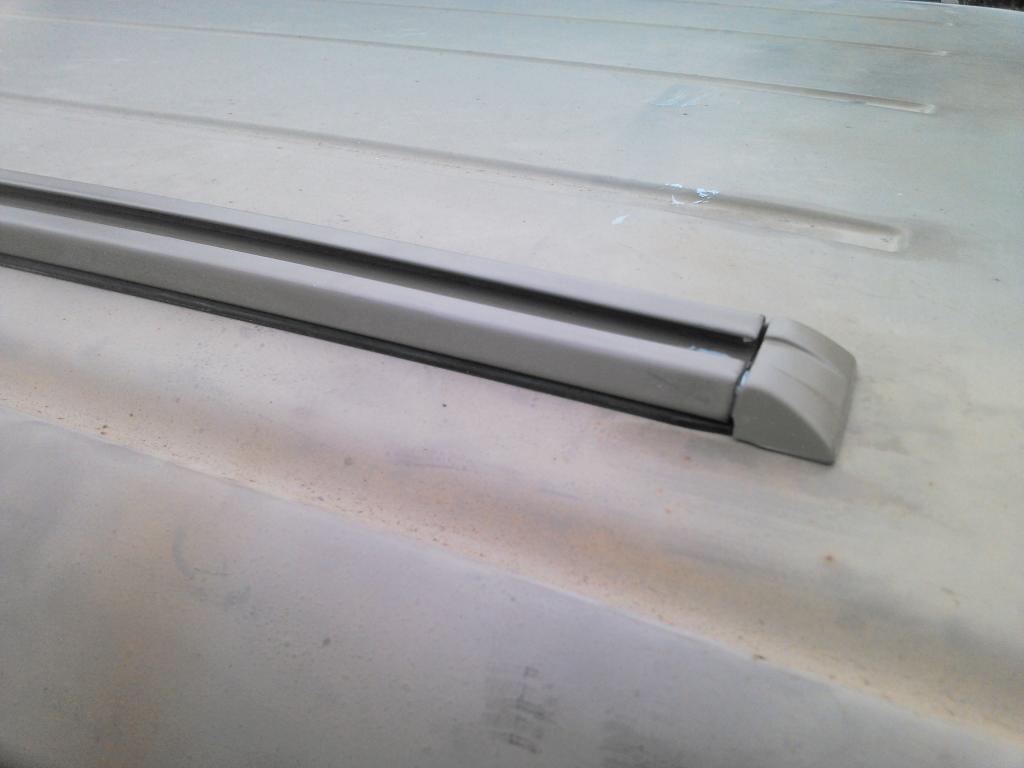

This thread is about to get a whole lot more fun…
Some updates after tinkering and checking everything last weekend in effort to get rid of the float I’ve been getting.
Currie HD Steering Tie Rods – Shot
Factory Steering Gear Sector Shaft Bushing – Shot, though to its credit it managed to survive 160,000 miles of good use. It still isn’t leaking but there is just too much play in the bushing for me not to address it now.
FOA Shocks – Leaking Oil, Nitrogen and their dignity.
So… That leaves me with the next major project list :
Steering System Upgrade – PSC Big Bore Pump, Reservoir and Cooler.
Prototype Steering Set Up – More Details to Follow. This will be a factory steering type replacement but with major upgrades even over my current Currie set up.
Shocks Being Replaced – With what you ask? I’ll give you a clue. My rear is already set up for them.
PSC Pump

PSC Gear
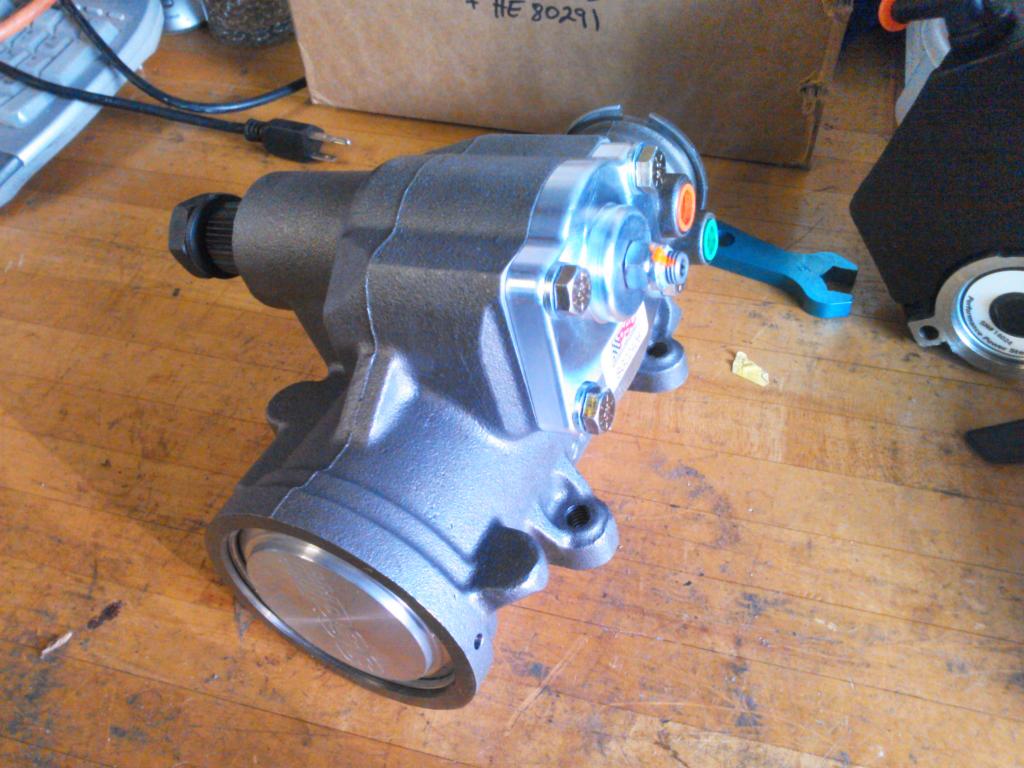
I will also be installing a small tube and fin cooler as well as replacing the factory lines.
Maybe I’ll get to this over the weekend while I wait for the steering components to come in and my new dampening additions…
I was going to do the reman gear box, but with all of the horror stories from friends of having to go through 3 boxes, or being down for a few weeks sending mine off for a reman, the PSC seemed like the buy once, cry once alternative.
No, not a reman. One of the smarter upgrades to the steering pump that I’ve ever seen is to replace it with a pump from the Durango. It’s a direct bolt in replacement, but it’s 50% more beefy in every way, and readily available. It looks exactly like the stock Jeep unit, just on Steriods.
I gotcha. Definitely evaluated that option. When looking at those I was going to end up spending ~400-500 for a NEW US manufactured unit so spending the extra 200 on the PSC seemed like a no brainer. I’m pretty sure this PSC is based off of that Durango Box too, just blueprinted, bored again and replaces the bushings with ball bearings.
Would love to see other links for cheaper US Made new boxes if you have them. I haven’t installed this one yet.

…and…the next phase of stupid… still waiting on a package from King
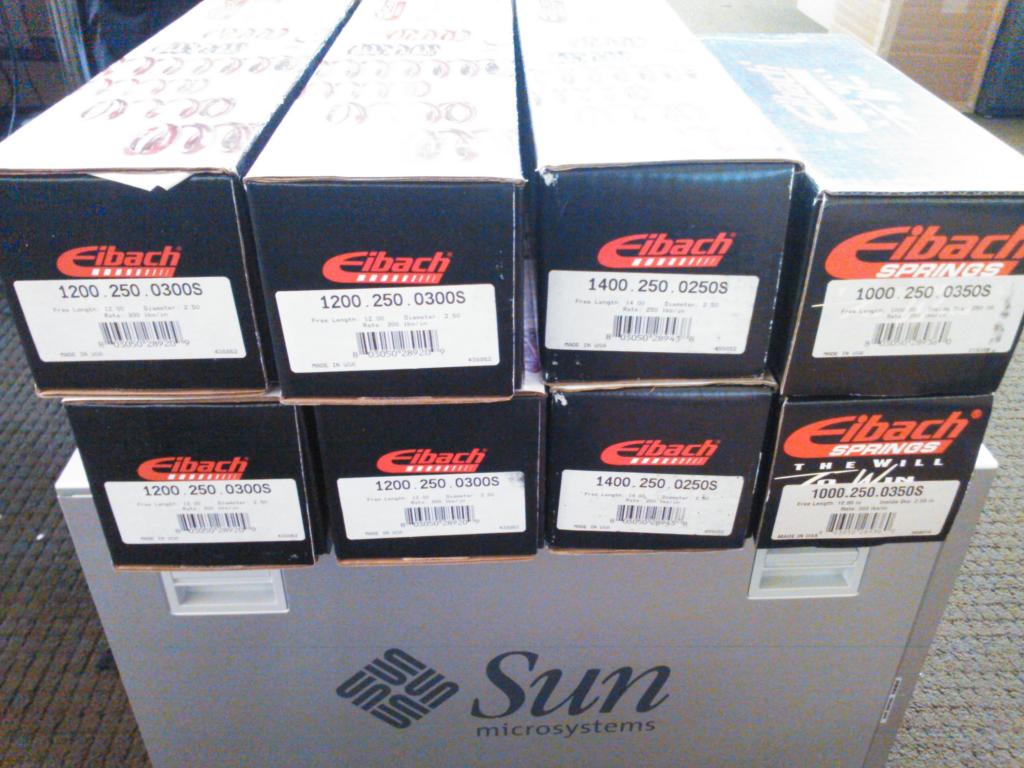
So in researching a way to run coilover hoops and an engine cage, I came across this awesome FJ Build over on Pirate : http://www.pirate4x4.com/forum/toyota-land-cruiser/1035090-rock-40-build.html
What I especially like was how he ran the hoop around the steering shaft :

The issue on the TJ without having to hack my AEV fenders even further is also the position of the steering shaft in relation to the frame rail. I believe if I spread the base of the bars (where it attaches to the frame rail) I just might be able to get away without the secondary bends. On the passenger side a hoop should be without issue. I still have tubing, tube couplers (engine cross bar), and enough tabs and trusses left over from the cage build to likely not need anything else.
Coilovers are still a few weeks out so I have some time to finalize the design and get it welded up.
Tonight and tomorrow I’m probably going to start hooking up the steering gear and pump so that I will have that done before I get my new tie rod/drag link set up delivered. Unfortunately after I re-did all of my transmission cooling a few months ago I really didn’t leave any room in front of the radiator for a power steering pump cooler. I have a small 4 pass in the garage now, but I’m really out of places to put it so I might just hook up the pump and gear in the factory arrangement until I can get more creative on routing the return lines.
Factory PS Pump vs PSC Performance Replacement. Castings were slightly different as was the bottle position. Bolted it in without issue. I called PSC today and they said that their pumps are subject to the new delphi castings. They also said that they only run 2 bolts on their race cars so the 3rd position wasn’t an issue.
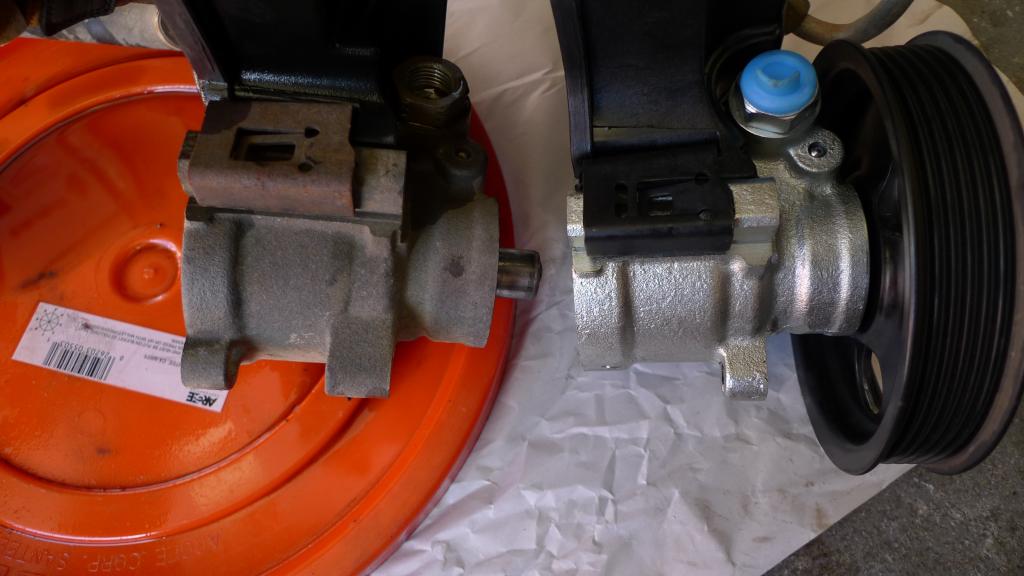
Steering Gear Comparison
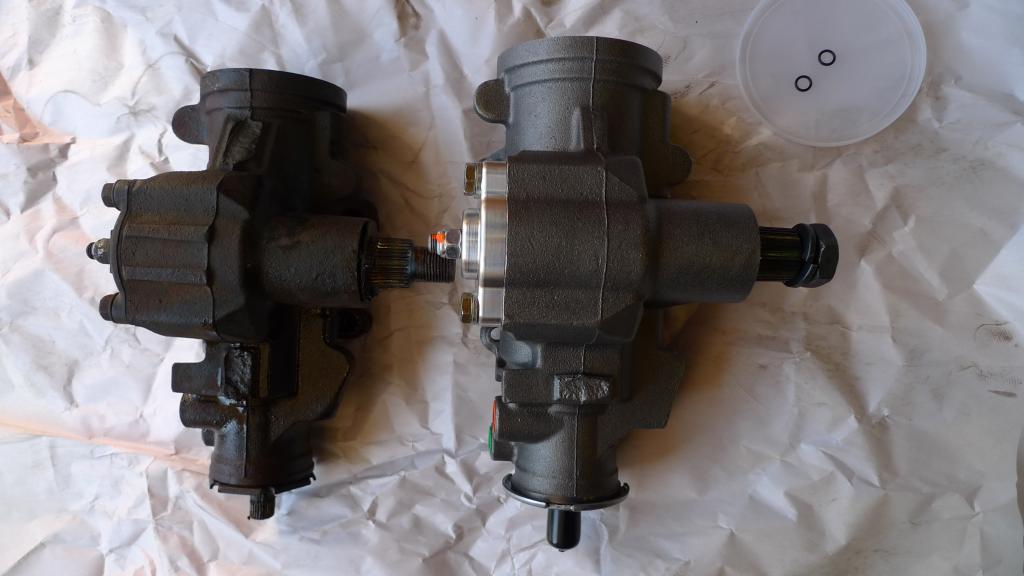

Sometimes you need a bit more leverage. I had soaked the bolts for the past 3 days so it came off slowly but without any crazy pops or dangerous situations.
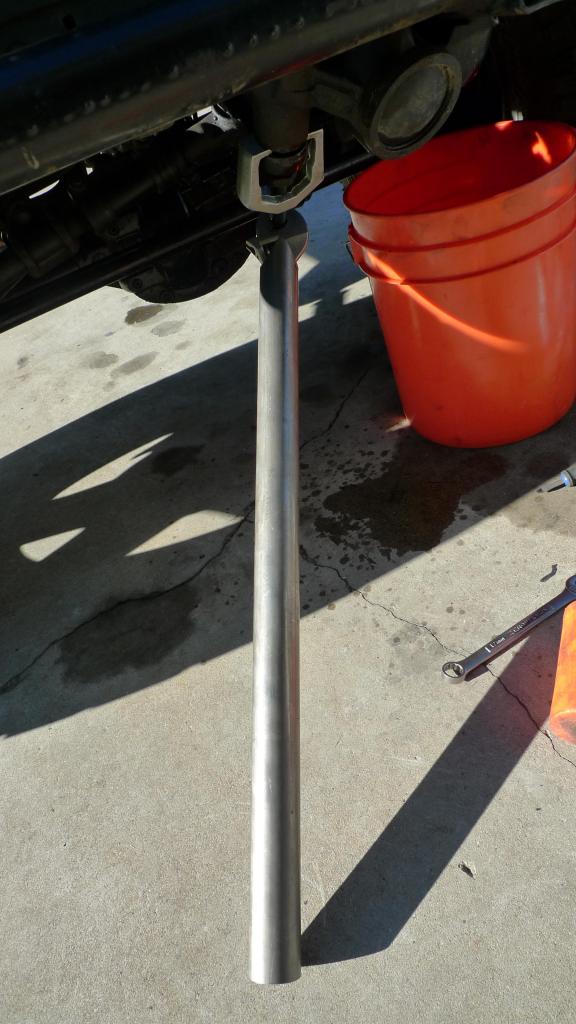
Here is the pump installed. I ended up putting a shorter bolt in the third position for my own sanity. You can also see that I wrapped all of the new metal hose areas with 1/8″ aluminum rod that I had sitting around. Unfortunately with the dual transmission cooler in the front I ran out of great spots to put a cooler. Considering i’m only turning 32-33″ tires I opted to run it in the factory routing configuration and decide on a cooler later. I did a horrible job at spacing on the upper one, but the surface area isn’t going to hurt the cooling at all for taking up no space.
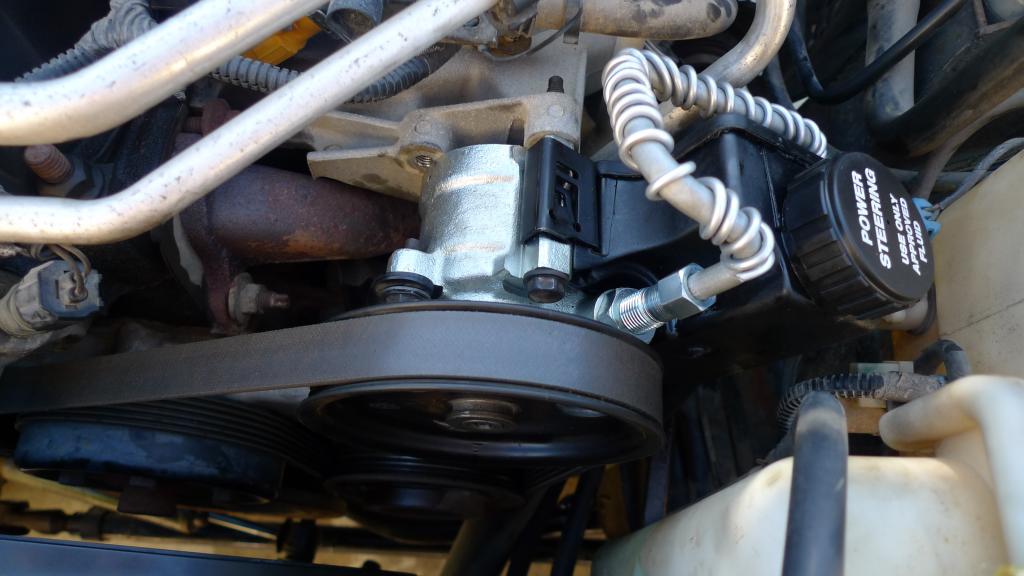
Pump Top – Bumper Removed
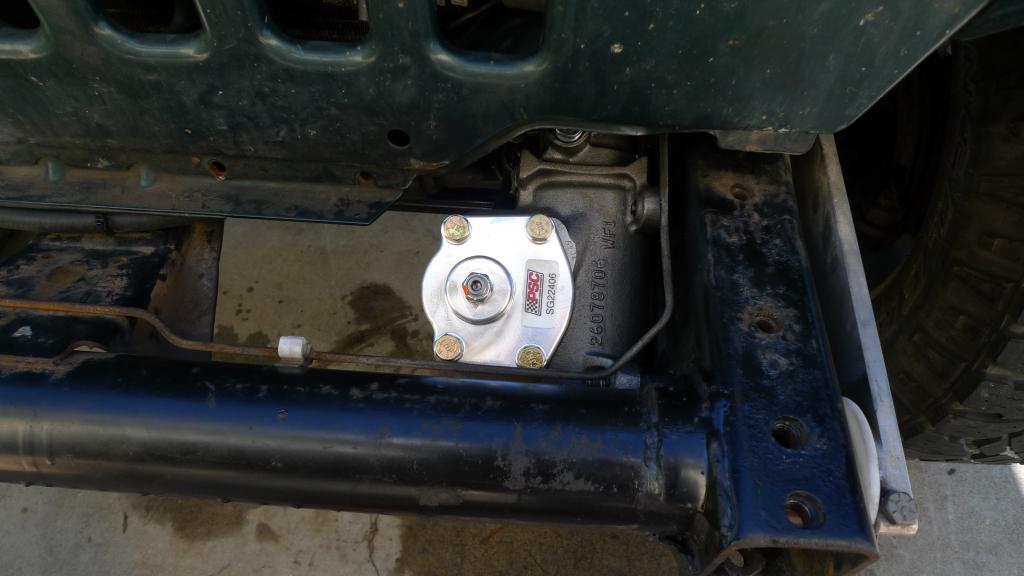
Pump Front – You can see some of the aluminum rod

Filter/Sensor Block – From the transmission cooler re-routing project a month or so ago.

Cooler Spacing – To allow better airflow I put standoffs to mount the coolers further out. This allows about 1.5-1.75″ of air between the transmission cooler sand the radiator. Lots of additional ways for air to flow now.
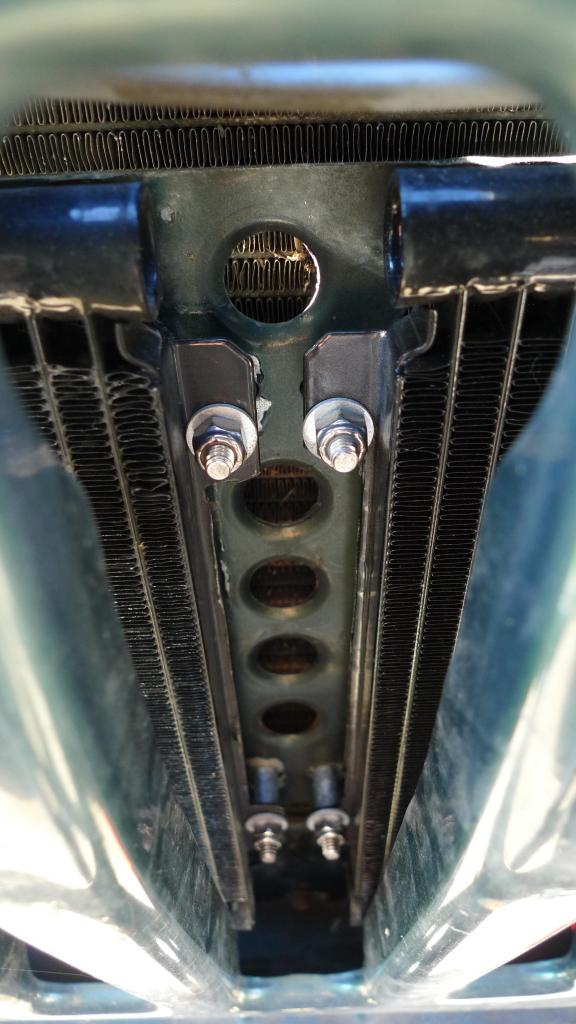
Found a few hours to get the hoops and accessories prepped for the next stage. I have a few more small gussets to prep and dimple die. I’m using the flat tube couplers as frame landing plates.

This weekend just got a lot more fun…
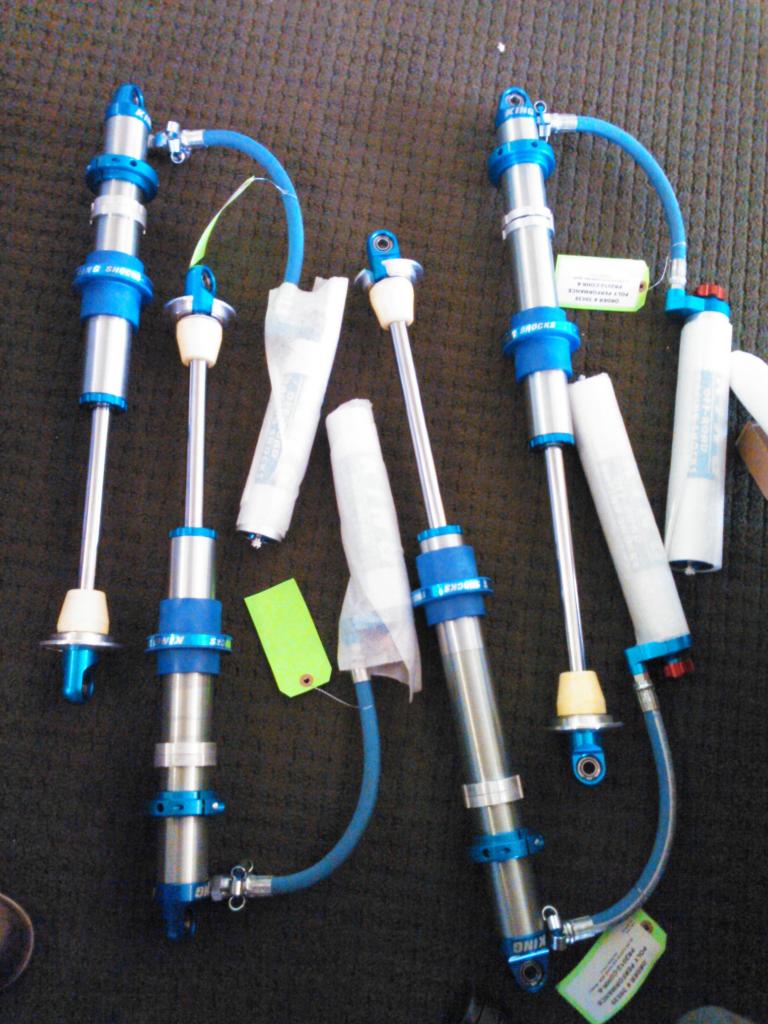
The rear coilovers, new TRE and Fox Steering Stabilizer were installed on Saturday.
Sometimes getting the coils out gets hairy…
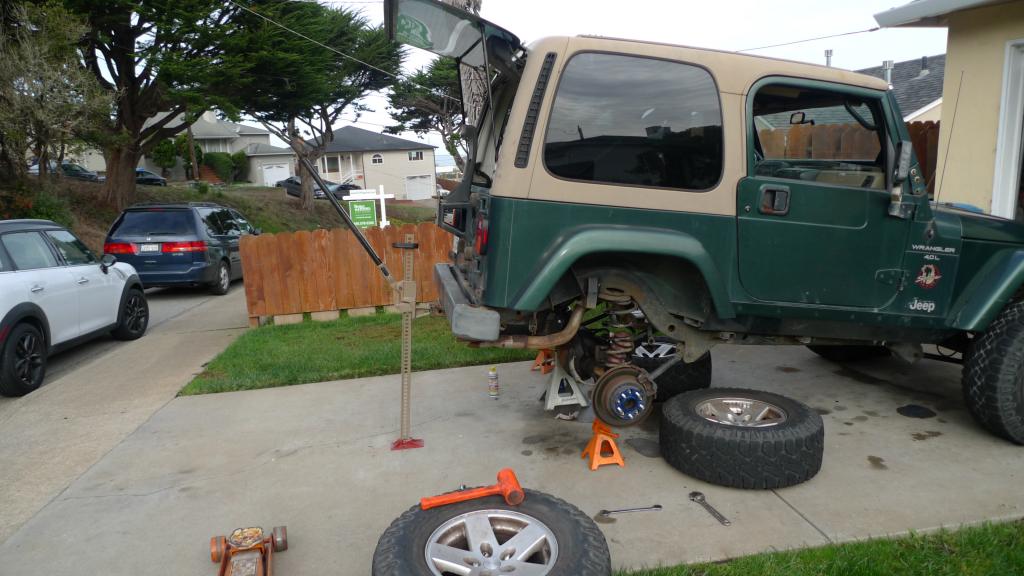
Before… and After… More details on what happened to the FOA’s to come.
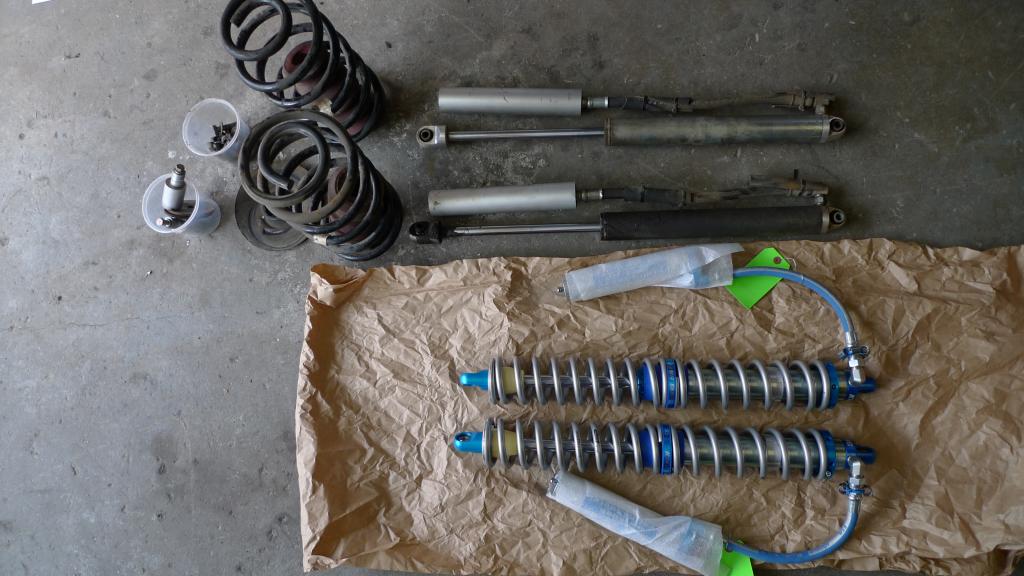
Droop

New TRE’s to install. A bit frustrated that Currie steering requires the entire bar to be replaced for worn out TRE’s

On Sunday I started a bit early…
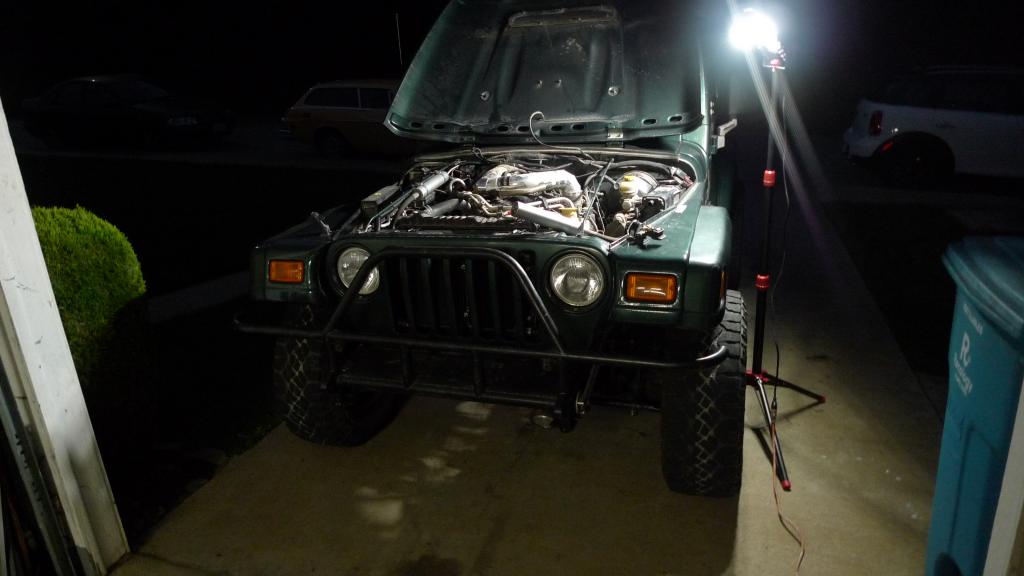
Sunrise was beautiful

Beauty shot of the 1800

Old buckets cut off

I took some flex measurements again

Got the hoops in and put the coilovers in at full droop

Partially tacked up hoops. Excuse the ****ty welding, trying to tig weld outdoors with a slightly windy day = frustrating.

How it is sitting now
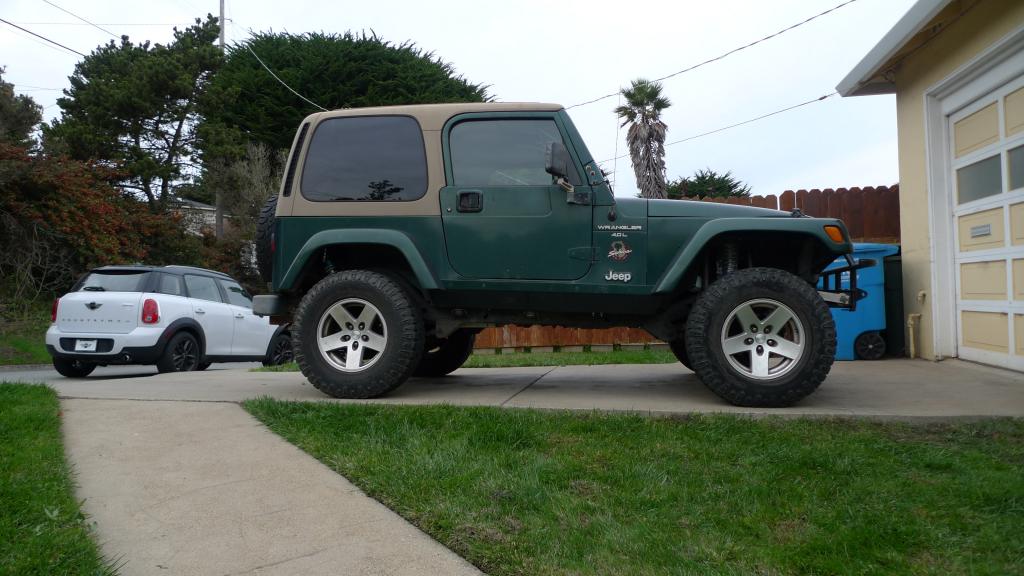
This coming Saturday I hope to get the hoops and bump cans fully welded, cross bar in and finding how to relocate and all the under hood components…
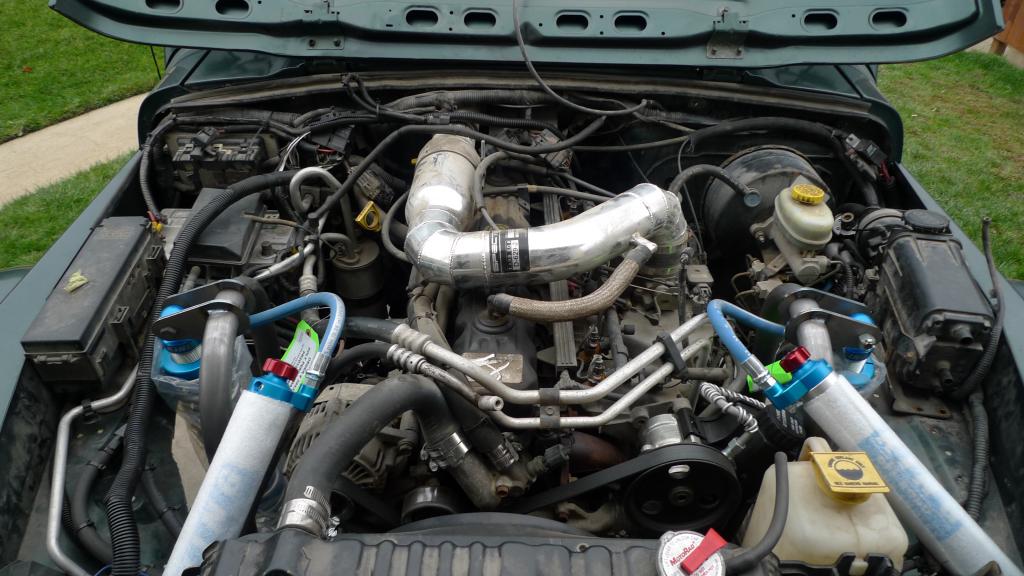
This past weekend I was able to finish the welding from last weekend, and get the crossmember mocked up.


Still routing some of the hoses for smog equipment.

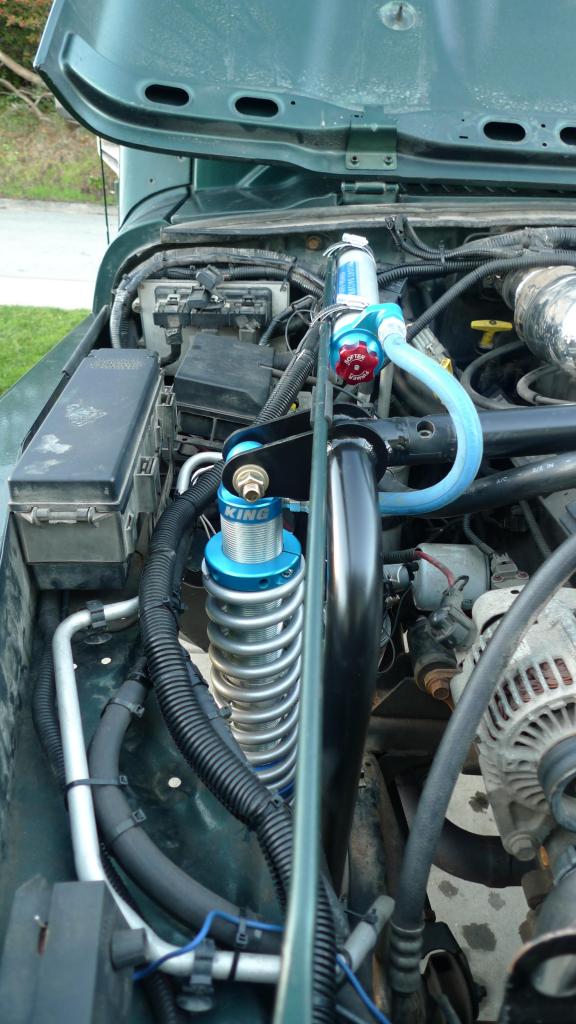


Suspension Starting Points : Jeep Empty (Need to re-calculate weight using springs)
12″ Front 6.75″ Up travel (.75″ Bump stopped) (6.00″ Up / 5.25″ Down) 190 PSI
10″ Rear : 5.00″ Up Travel (Unloaded) (5.00″ Up / 5.00″ Down) 180 PSI
More tuning details and initial impressions to follow when I get a chance to drive it more than 30 minutes around town.
As usual I’m a bit late in responding…
Here is where I started with my tuning and initial coilover set up. By writing down what I need :
Why we are here : In mid 2011 I bought FOA Shocks. In early 2012 they were leaking nitrogen. From 2012-2013 I decided to just keep filling them. In 2013-2014 they started leaking oil in addition to nitrogen. Today nitrogen is in the shock body on 2/4 and 2/4 leak oil badly. I don’t want to spend money or time rebuilding them. I want to invest in shocks that have durability and more reliability and have no interest in buying smoothie shocks when I’m 50% set up for coilovers. My old man emu coils also have a nice Iron Oxide coating that replaced the powder coat, I can’t see them hanging on much longer.
So right now : I need new shocks and I need new coils, the rear is already set up with Synergy Coilover Buckets. Front I kind of copied synergy’s coilover tower, but never executed it to handle the force of a coilover. I plan on cutting this and the factory coil bucket off and going tubular. I do understand that longarms would be a great addition, but it isn’t in the cards right now. Tune-ability with my current setup is what I’m going for and I can’t see a disadvantage other than cost in running coilovers in place of my current coil/spring set up.
In effort to start off as close to what I want future bound for my system, here is my diatribe :
What drives my preference to tune / spring the Jeep for :
Forest Service Roads/Desert Trails = 40% Importance
Washboards/Ruts/Small Rock
Typical FS Trail/Desert Conditions
Think High Mountain Road/Pozo Rd/Elkhorn Rd)
(Think Mojave Road)Winding Paved Mountain Roads = 20% Importance
Stable control of vehicle at speed limit in cornering.Highway Driving = 20% Importance
Rock Crawling = 20% Importance]
Currently this is what I do the least of but plan on changing this.
(Think Rubicon)
My typical trips consist of 2-10 Hours of driving mixed highway and winding roads to get to the trailhead. From there I’m usually Camping/Fishing in the backcountry where I spend a weekend doing 20-50 miles on average driving on Forest Service/Desert Trails.
Rock crawling isn’t exactly something I’ve spent much time doing in the past, but that has changed recently and want it to be considered into the shock tune on the vehicle.
Highway Driving is also important due to the amount of time I spend in the jeep, but I feel that the previous three priorities should cover my needs on the freeway as well.
I am interested in the Compression adjusters as I have found myself doing a variety of trips, some fully loaded in the back some, fairly light. Having the ability to have a smooth(er) ride and still have compression adjustment available sounds like a good idea in theory in these situations, however, in practice I have no experience with King’s adjusters.
Current Stats :
2000 Jeep TJ
PowerTrain:
Engine : 4.0
Transmission : AW4 – Tiptronic Modified Winters Shifter, Modified Valve Body, In-line Filter, Temperature Sensor, Pressure Sensor, Dual Front Coolers on PSC Mount.
Transfer Case : NP231 – SYE
Drivetrain:
Driveshafts : Custom Coast Driveline
Gear Ratio : 4.56
Front Axle : Dana 30. 27 Spline Chromo Shafts. ARB locker. Soon to be sleeved/Knuckle Gusset
Front Tires : 265/75/15 Future bound will be 285/75/16
Front Mount Lengths : Currently running 18.3 Collapsed. Plans to go to a tubular hoop so this is adjustable. Open to input/ideas.
Estimated Axle/Tire Weight : ~460
Driveshafts : Custom Coast Driveline.
Rear Axle : Ford 8.8 w/ Tracloc
Rear Tires : 265/75/15 Future bound will be 285/75/16
Rear Mount Lengths : 18.3″ Collapsed.
Estimated Axle/Tire Weight : ~430
Suspension – Front
Control Arms Front : Currie Johnny Joint. 15.75″ Length
Control Arm to Ground : 10.5º
Coilover to Vertical : 4º
Coilover to Control Arm : 76º
Coilover to Vertical (Camber) :
Sway Bar Front : Currie Anti Rock
Front Spring : OME 933 – 140 in/lb Spring Rate
Bumpstop : Prothane coil insert
Front Shock Showing : 5.5″ / 11.5″ travel = ~48%
Approximate Corner Sprung Weight Front : 1000 / Loaded, 975 / Unloaded(w/passengers)
Control Arms Rear : Currie Johnny Joint. 15.5″ Length
Control Arm to Ground : 10º
Coilover mount to Vertical : 22º
Coilover mount to Control Arm : 82º
Coilover to Vertical (Camber) :
Sway Bar Rear : Factory
Rear Spring : OME 942 – 160 in/lb Spring Rate (too heavy unless heavily geared up)
Bumpstop : Prothane coil insert
Rear Shock Showing : 4.5″ / 10.5″ travel = ~43%
Approximate Corner Sprung Weight Rear : 1184 / Loaded, 905 / Unloaded(w/passengers)
Body :
Daves Custom Boatsides
AEV Highline Fenders
Poly Performance Front Cage then bastardized to a full cage.
UCF Full Aluminum Skid
Savvy Aluminum Gas Tank Skid
Front Bumper – In state of being built
Rear Bumper – In state of being built
PRP Seats
Screen Shot from the “The BillaVista Preliminary Spring Rate Calculator – © 2008 Bill “BillaVista” Ansell, All Rights Reserved.” Check out the website; tons of great information. http://billavista.com/
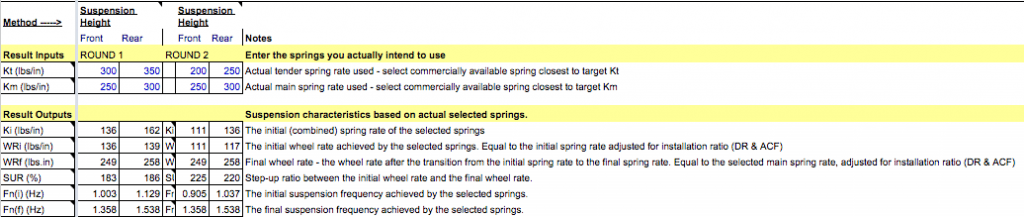
Round One.
Front : 12″ Coilover Length. ~11″ of Travel
Upper Spring : 300 in/lb 12″ Coil
Lower Spring : 14″ 250 in/lb Coil
Pressure : PSI 210
Compression : Adjust 2/22
Sway Bar : Anti Rock Middle Setting
Rear : 10″ Coilover Length. ~9.5″ of Travel
Upper Spring : 350 in/lb 10″ Coil
Lower Spring : 300 in/lb 12″ Coil
Pressure : PSI 210
Compression Adjust : 2/22
Sway Bar : Factory
Initial Impressions almost spot on with the previous suspension. The OME Coils were ~140 in/lbs Front / 160 in/lbs rear. If you look at the resulted inputs ki(lbs/in) the starting numbers were very close. The rear was softer, which is something I wanted, and this softness was a result of the 22º angle of the coilover using the same spring rate. After driving it around for a few weeks and testing the articulation (as best i could) I got the impression while it handled great on the street, the jeep was over-sprung for anything offroad. After calling some buddies and then talking to King and Poly Performance, we decided to drop the upper springs both front and back by 100 in lbs.
Round two.
Front : 12″ Coilover Length. ~11″ of Travel
Upper Spring : 200 in/lb 12″ Coil
Lower Spring : 14″ 250 in/lb Coil
Pre-Load : ~.75″
Droop/Bump : ~50/50%
Pressure : PSI 150
Compression Adjust : 2/22
Valving : Flutter Stack 15/10
Sway Bar : Anti Rock Middle Setting
Rear : 10″ Coilover Length. ~9.5″ of Travel
Upper Spring : 250 in/lb 10″ Coil
Lower Spring : 300 in/lb 12″ Coil
Pre-Load : ~1.25″
Droop/Bump : ~50/50%
Pressure : PSI 150
Compression Adjust : 2/22
Valving : Flutter Stack 15/10
Sway Bar : Factory
Vast Improvement. Though minor number wise, the drop of 100 in/lbs at each corner allowed the suspension to flex more and also better controlled suspension events than the over-sprung suspension from before. The other major change was dropping the PSI in the coilovers from 210 to 150 PSI. I was advised that this would make minor changes, however, the change felt quite drastic to me. While bumps,potholes,etc were much better managed by this spring change, it came with an issue; Body Roll. Round 1 was very stable and sharp on road almost feeling like a car. Round 2 there is noticeably more body roll. While I felt this was an issue initially, I am at the minimum compression adjustment and lowest PSI Setting. Bumping the PSI and dialing up compression return the roll or lack there of very close to where it was before.
So. Where am I going from here?
Finding time for testing. With my ride height where I want it and the suspension dynamics fairly balanced, next is playing with pressures/compression adjust and valving. My initial impression right now is that the Flutter Stack 15/10 is a bit stiff on the compression side. I’m guessing I would be better suited with a Flutter Stack 12/10, but time will tell.
Now that the jeep is riding and handling better than ever, it’s time to focus on some of the Gremlins :
No Reverse Lights
Front Axle Wiggle (Suspect Trac Bar Bushing and Control Arm Bushings)
No Center Console or Cup Holders
Chipped Starting Ring (1/30 starts requires me to roll the car a few inches to get the gear to engage.)
Rear storage system.
Skid Plate Rattle (Need to reverse bolt direction hitting exhaust)
Rear Axle Breather Leak
Rear Tub holes (For reservoir pass through)
Transmission Pressure Gauge (Still not working)
Evap Circuit (not showing available on OBDII)
Cruise Control Turning on but not working.
New Rubber!
285/75/16 BFG AT KO2’s
I decided to go with the bead balancing this time and purchased .36 gram 6mm high quality airsoft pellets from Amazon : http://www.amazon.com/gp/product/B00N1KHKHC/ref=od_aui_detailpages00?ie=UTF8&psc=1
Using the chart Equal has on their website : http://www.imiproducts.com/assets/pdf/equal-quantity-chart.pdf I determined I needed 6 oz Minimum per tire. Cross referencing a few of the other internal tire balancing options (http://www.innovativebalancing.com/BigTirechart.htm) between 6-8oz is the range suggested for the 285/75r/16 tire. One bag of the BB’s above weights about 38.10 split among 5 tires gave me about 7.6 oz / tire.
I’ve only driven for 10 minutes today, but the tires felt flawless from 0 – 70 mph. Looking forward to putting more miles on them.
Now for some crappy cell pics…

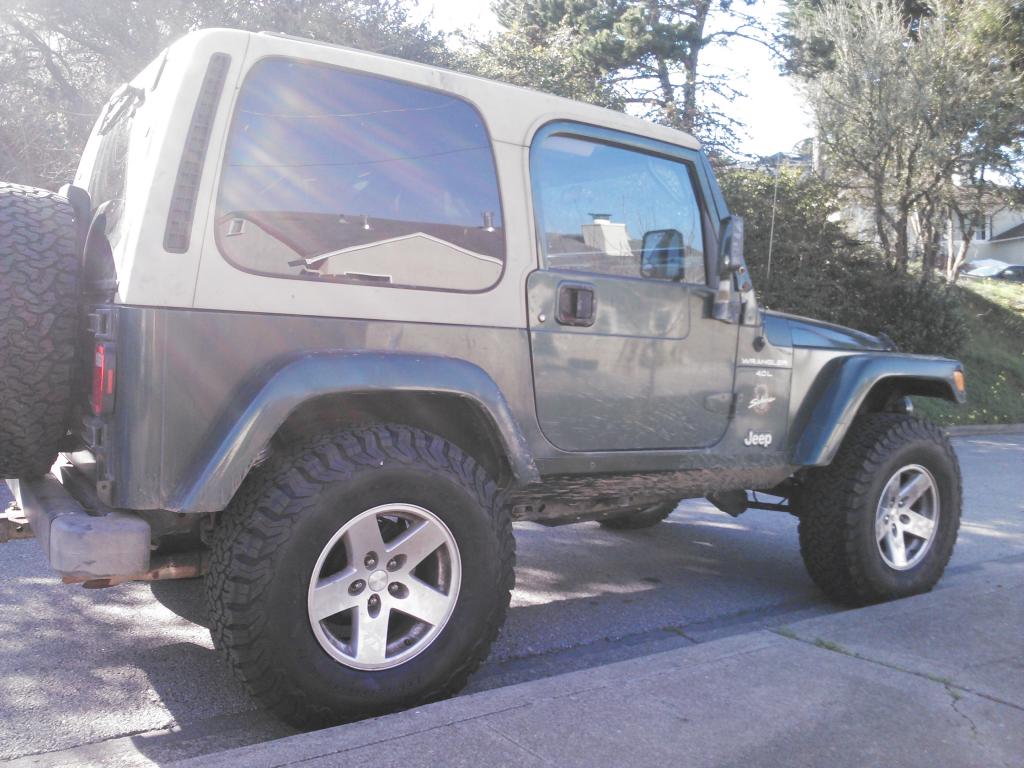

Heading out to King of the Hammers next week with the Jeep for the race. Who’s going?
Few other updates :
Rear fenders will need to be trimmed a bit. After driving 1100 miles with weight in the back the rear springs settled. I think I need to put another inch of preload in. Probably going to play around with the rear a bit this weekend.
Day 2 of new tires.
Smooooothhhh.
My Goodyears were fairly cupped and very difficult to balance. I had minor vibes no matter what pressure or speed I was going with the tires and they were loud as hell!
These new BFG’s are quiet, and balanced perfectly even at 70-75 mph. The BB seem to be doing the job. Upon coming to a stop you can hear them fall and hit the rim, kinda sounds like pouring cereal into a bowl. Hardly noticeable. They fall out of rotation at around 1-2 MPH coming to a stop. At starting again you can occasionally hear them bouncing around until you hit 15-20 and they find their home around the outside of the tire.
Given that they are E rated tires, the shop definitely overinflated them for the weight of the TJ. I’ll be playing around with chalk today to determine the right pressure.
After the two long road trips over the next weekends I’ll report back on mileage changes a bit more road characteristic feedback.
Specs on the tires…Out with the old…

…and in with the new…

Made it out to Stanislaus National Forest this past weekend and constantly fought closed gates for ‘winter’, which right now in California is 65º weather.
Fortunately that didn’t stop us from having some fun with cameras and the cars :
New BFG’s :


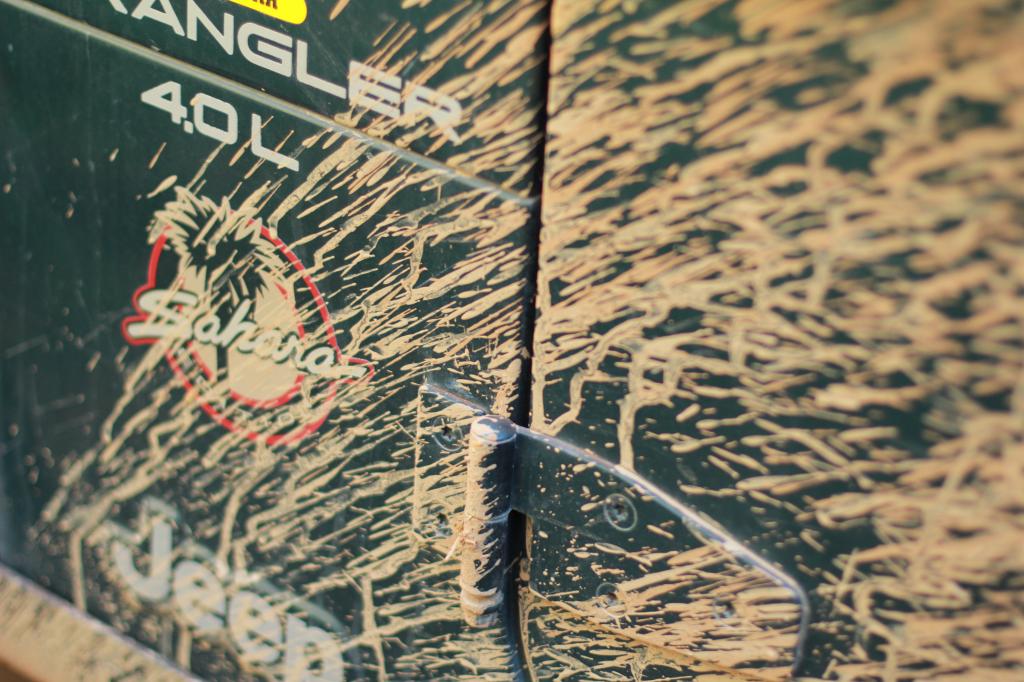


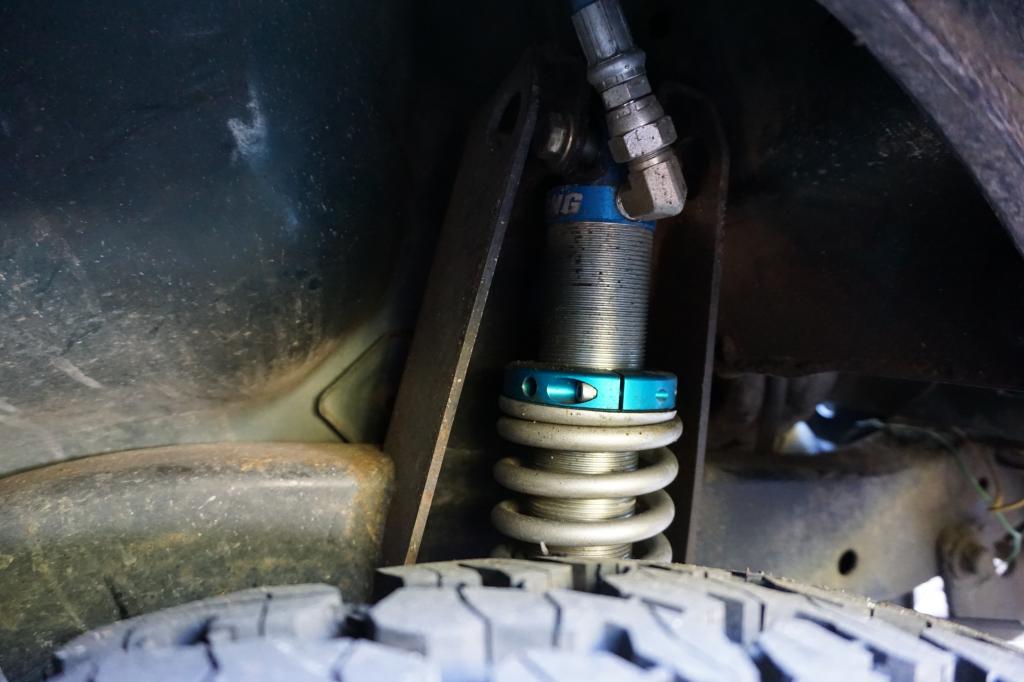
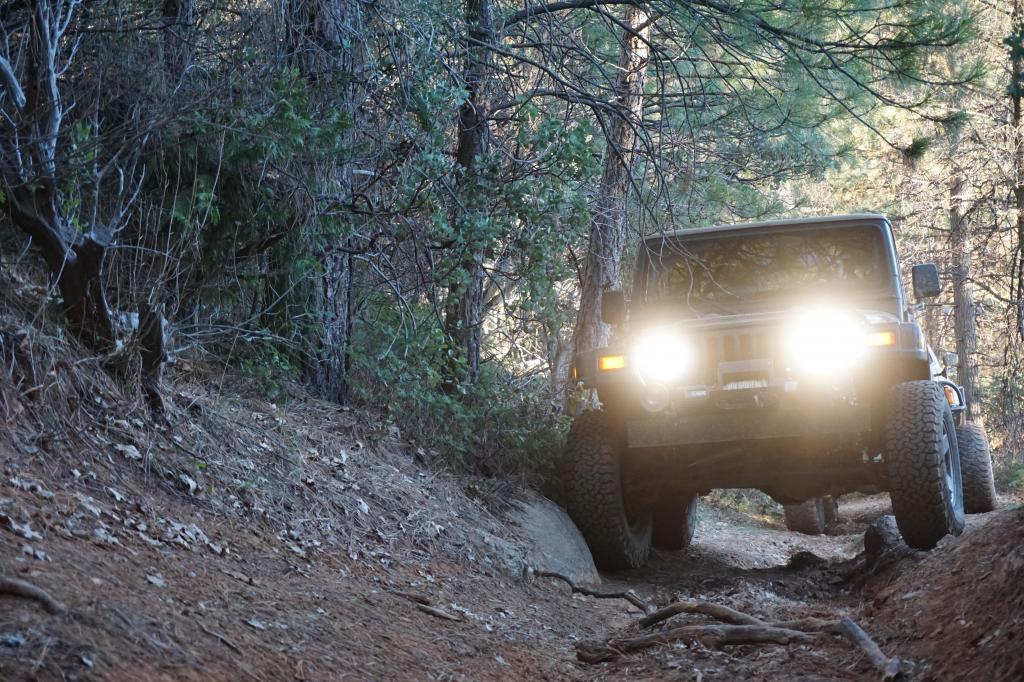
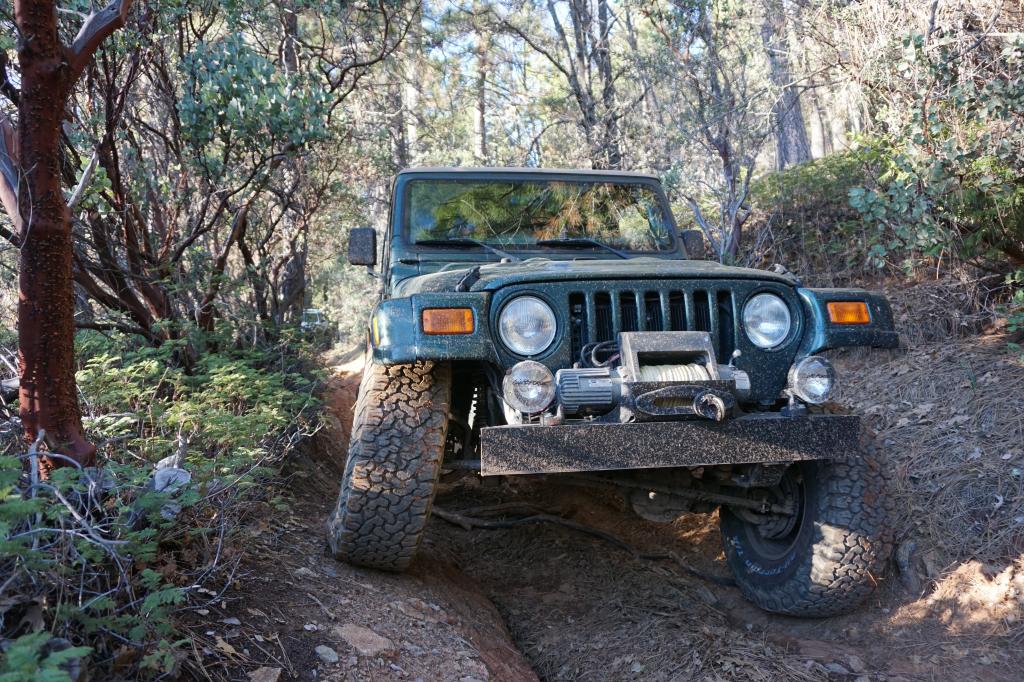
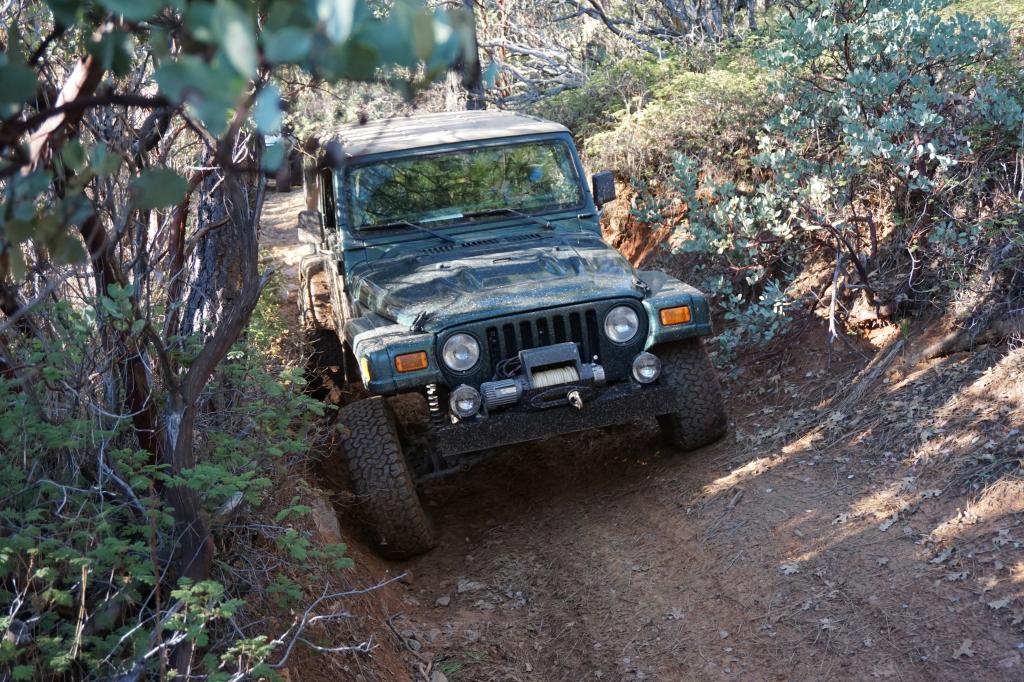
Updated Images from Johnson Valley during KOH.
I was able to spend about 45 minutes when the race died down to test the new coilovers.
On my trip there fully loaded with 2 people in the car I felt I was hitting bumps on driveways etc, so I cranked up the rear coilovers when I got there. Hence the rake…

I think i was sitting at about 2.5″ of preload in the image.
Did a couple of test runs in the small whoops around ~40-45mph. (Let GIF Load or click again to reload)

Obviously my rear was oversprung in these. Jeep stayed straight, however I was pushing my front end to bottom out then bucking back and (bottoming the rear)
After a few passes loose stuff under the car had me worried so I called it quits.
That “bumpstop” in the rear I was feeling apparently wasn’t the bumpstops, but the Riddler Diff Cover VS the new gas tank skid bolts. OOPS. Still need to figure out how to clearance these guys. Angle grinders are kindof my go to solution, but an ARB Diff cover for the 8.8 isn’t sounding bad either.

Of course when I got back and was going to tear into the rear suspension, the weather didn’t cooperate. Haven’t had time to get into the garage since.
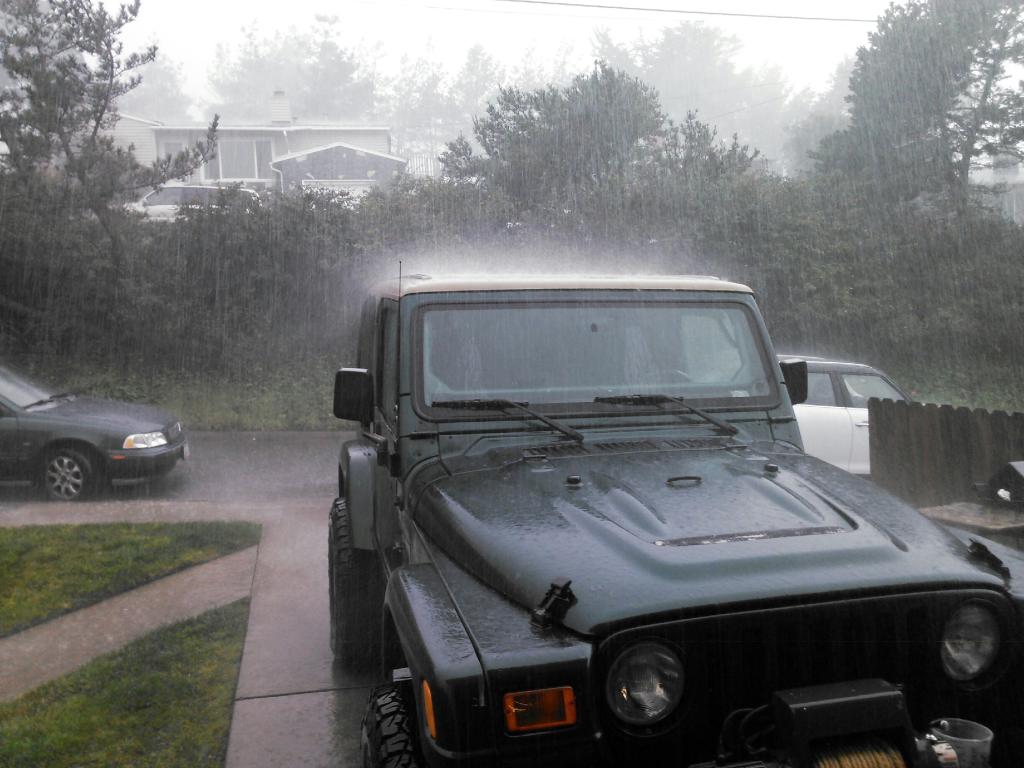
Aug 12, 2015
Been slowly chipping away at the Jeep over the past few months. Lots of tuning/tweaking left, but made some progress in other areas :
Chromo shafts & RuffStuff ‘The Cure’ one weekend and lots of bolt checking under the vehicle. Some days are dirtier than others…

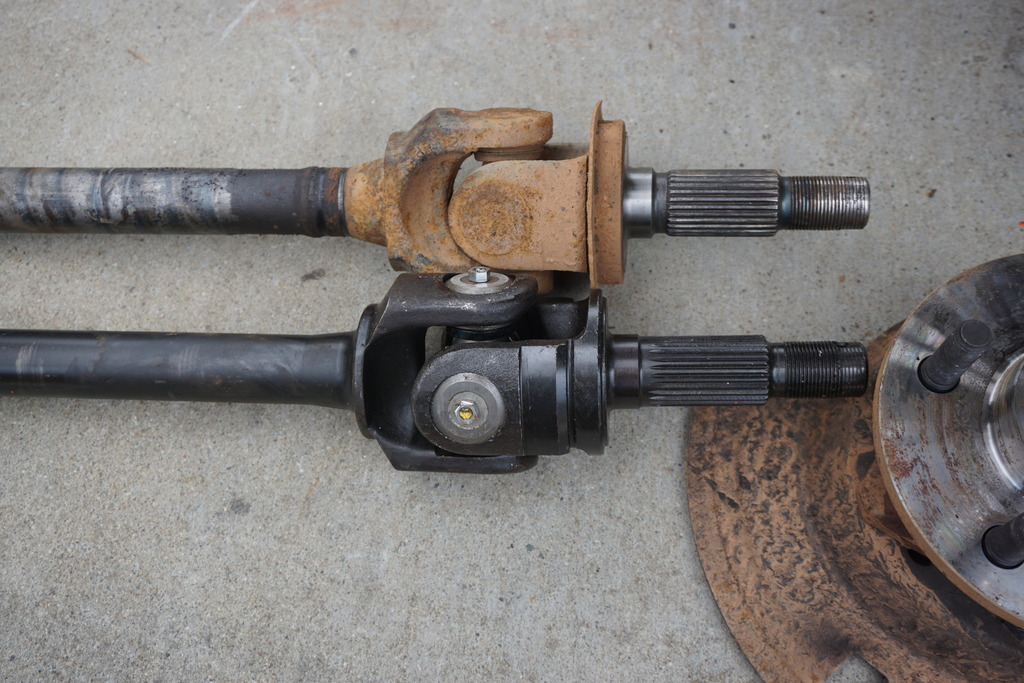
And then, the storage system! Finally. I’m a bit further along that the pictures show. Currently the drawers are built and drilled for locks but need to be carpeted and drawer slides ordered. Anyway, I ended up using a bunch of 2″x2″ aluminum angle paired with 3/8 & 1/2″ ply. The Whole system can unbolts from the car, and integrates into the roll bar area.
Front Divider Panel :
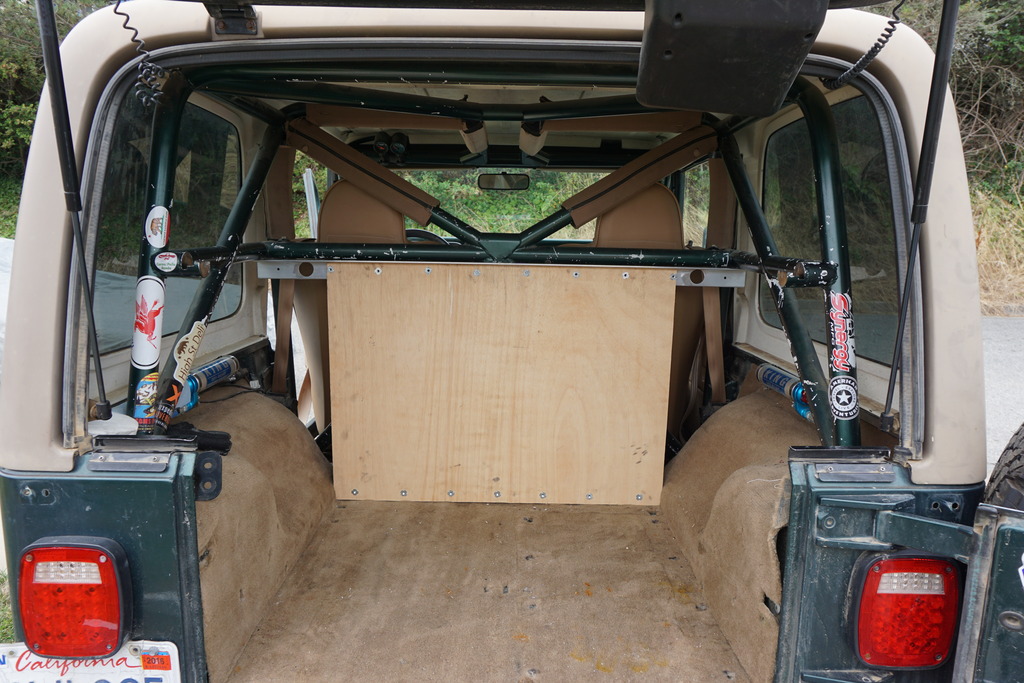
Sides going in :

Stove/Drawer/Stove Combo Slide


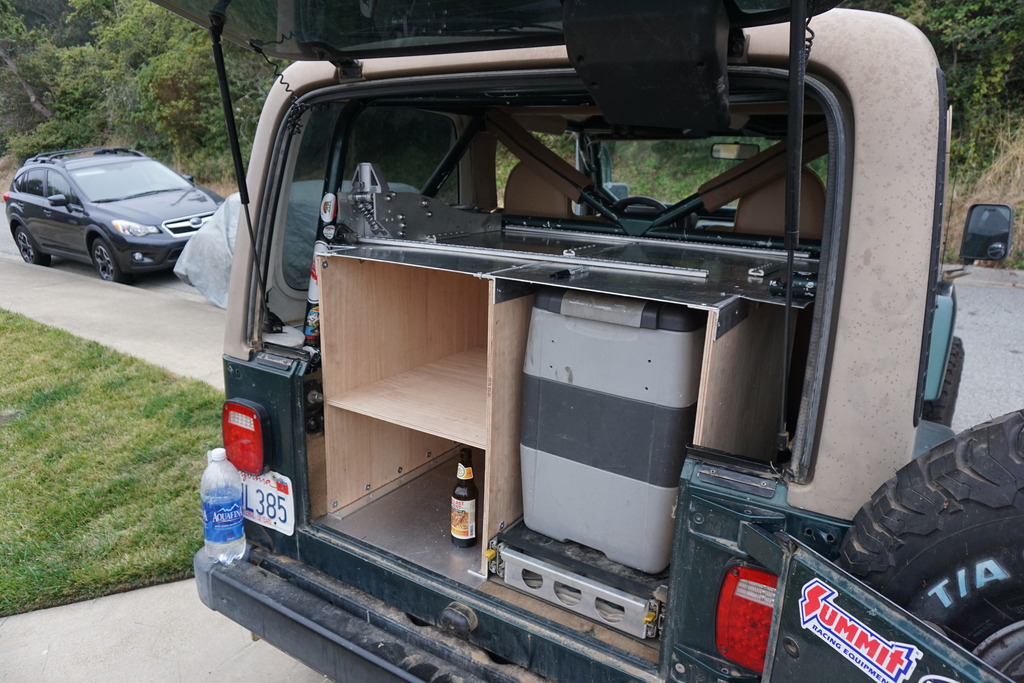
Mocking up upper jack mounts and tie down points

Construction :


Carpeting. Only went partial because the drawers will be on sliders.

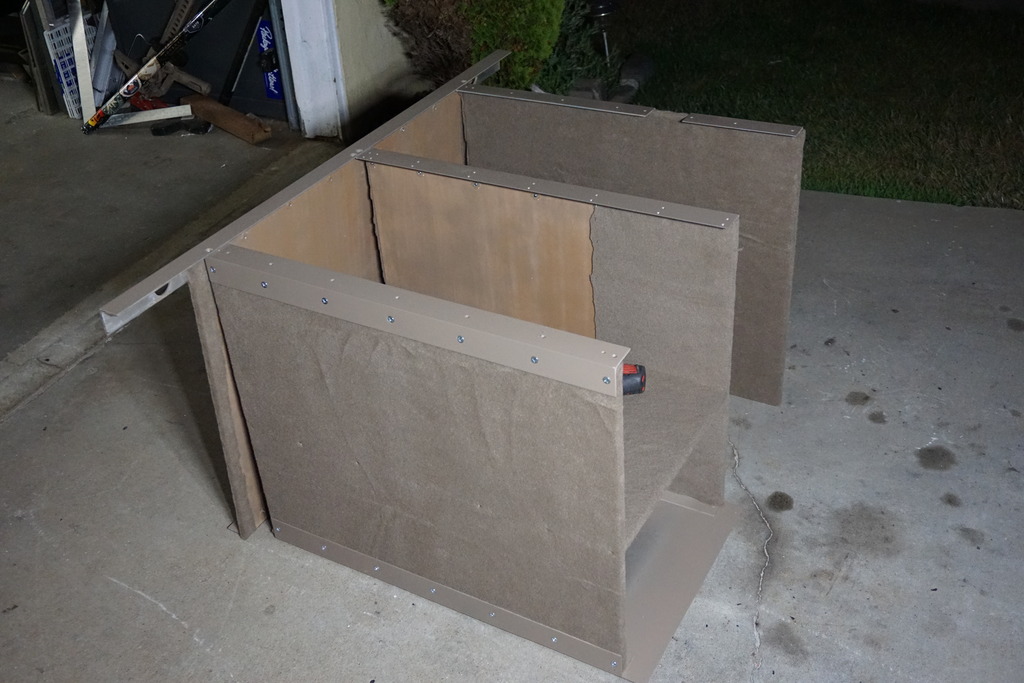
More pics to come once I get the drawers in.
And some from recent outings playing around with cameras :

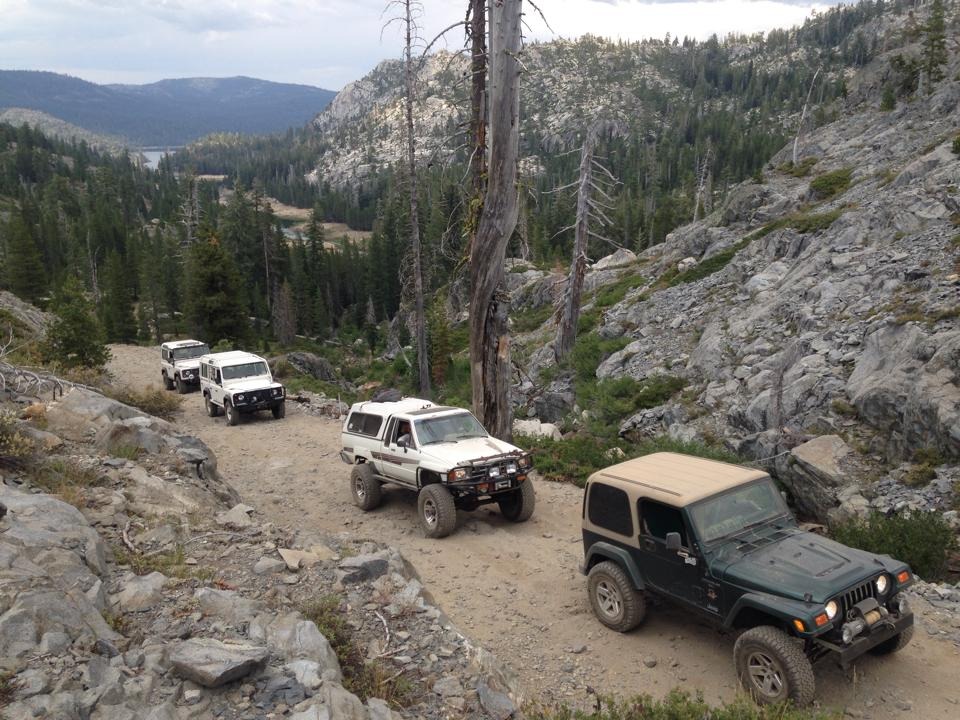
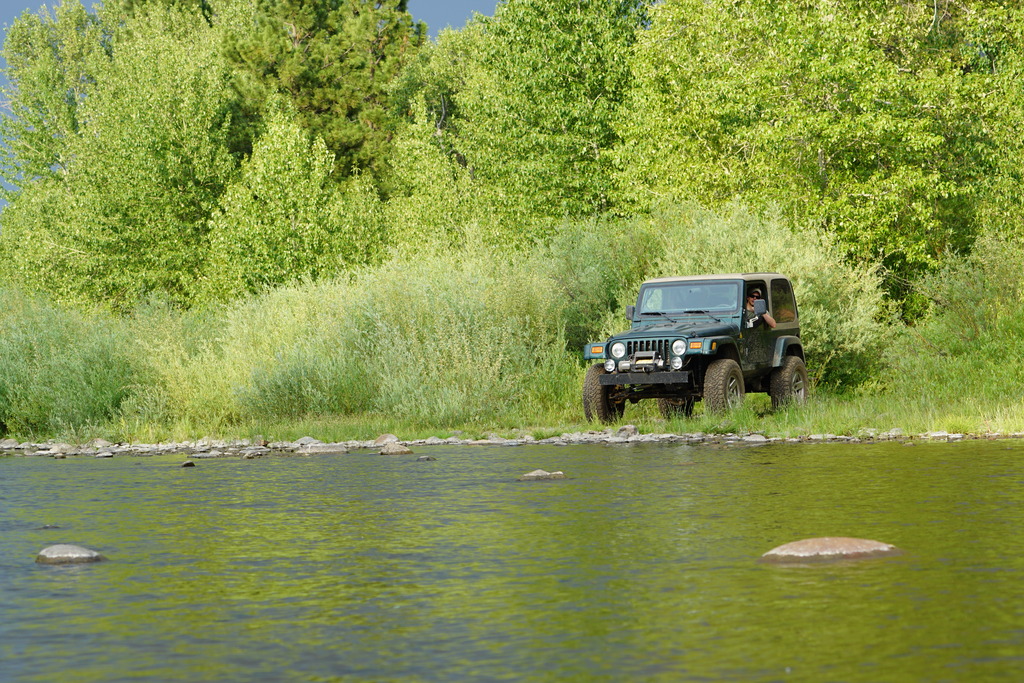
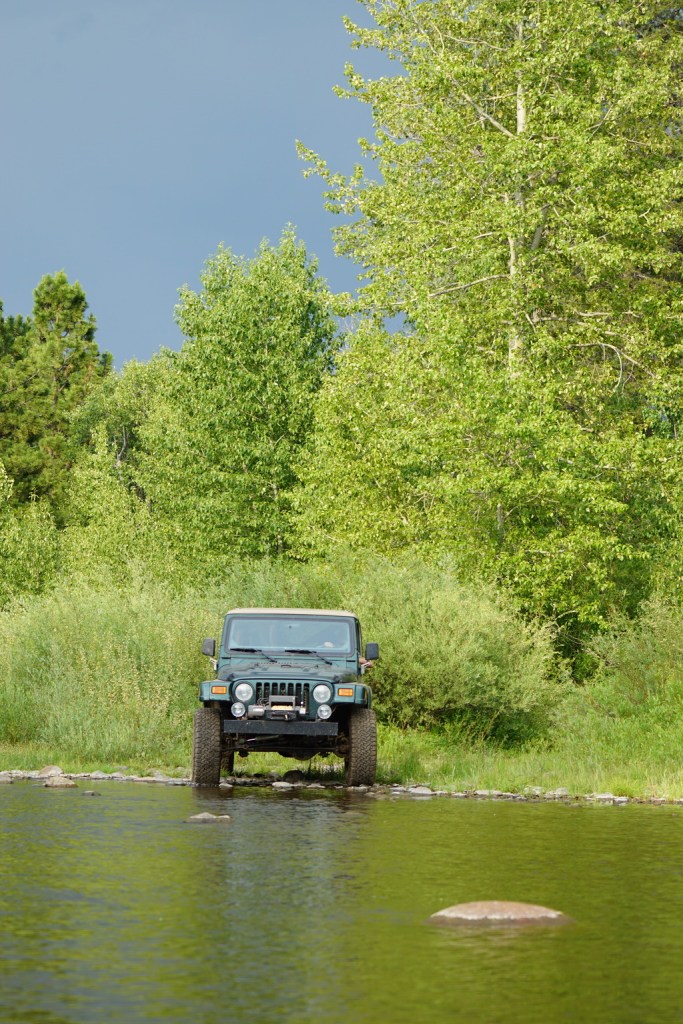


When you get chromoly shafts for 70% off brand new, you don’t ask why! Now I have a set of trail spares for the dana 30. Cargo box is tall but it will hold our entire trail running/camping set up locked always in the jeep. The top shelf allows any additional container storage for purpose specific trips (fly fishing, backpacking, etc). We used it as a cubby system right after I installed it and it was a huge help. Now that the drawers are almost done it is only going to get better.
Well this past weekend I carpeted the drawers and set the locks, but failed to take photos. Saving up for some Accuride drawer slides, but now the way the drawers are made, they are working fairly well without despite the weight in the bottom drawer.
I’m just getting in to this build, very cool. A couple questions: What is that floor type jack on top of your cargo box? Also, have you considered a long arm lift?
Thanks! It is a 1.5 ton harbor frieght race Jack that I made a 7075 skid for. The skid isn’t completely done but works great in the dirt. Whole thing weighs under 30lbs.
I have considered long arms many times, still do. Given the relatively low lift and 8.5-10 degree CA angle I’m not super motivated for the minimal gain. One of the days I’ll run it through the suspension calculator and see where the areas to improve are.
Just stretching the LCA might give me a bit smoother ride but I don’t want to dig into it more than once. If I stretch the bottoms I’d rather go ahead and triangulate the rear to eliminate the trackbar. Front. I’m undecided on.
Nice set up!
I have and have a full set of Jerry cans at the house, unfortunately they will not fit between the outside of the cage (between B-C Pillars) and inside of the hardtop.
These guys LINK will fit perfectly in that space being Dimensions 34″ X 13.5″ X 3.25″ and mount fairly close to the top of the fender well keeping the weight lower. Rotopax was another contender but they do not make the 4 gallon cans for water.
With those mounted in that unused space, I can run a similar spigot set up as you have to easily access water.
Quick phone image of the drawers carpeted and in. Haven’t put handles on them yet, hence the cord wrapped through the lock tumbler area.
Handles this weekend, drawer slides will be installed sometime in the next few months.

The dramatization captured in these past few photo sets are out right AMAZING! This build never fails to spark my mind
Thank you!
Before a recent trip to Mammoth, I finally tore into the rear end to solve the diff hitting the tank skid. I had to pull the coils off to flex out to full bump, adjust the pinion and check clearance a few times to make sure everything cleared.
Tires rub a bit at full articulation, but not enough for me to feel like I needed to trim the fenders.
Full Bump Rear
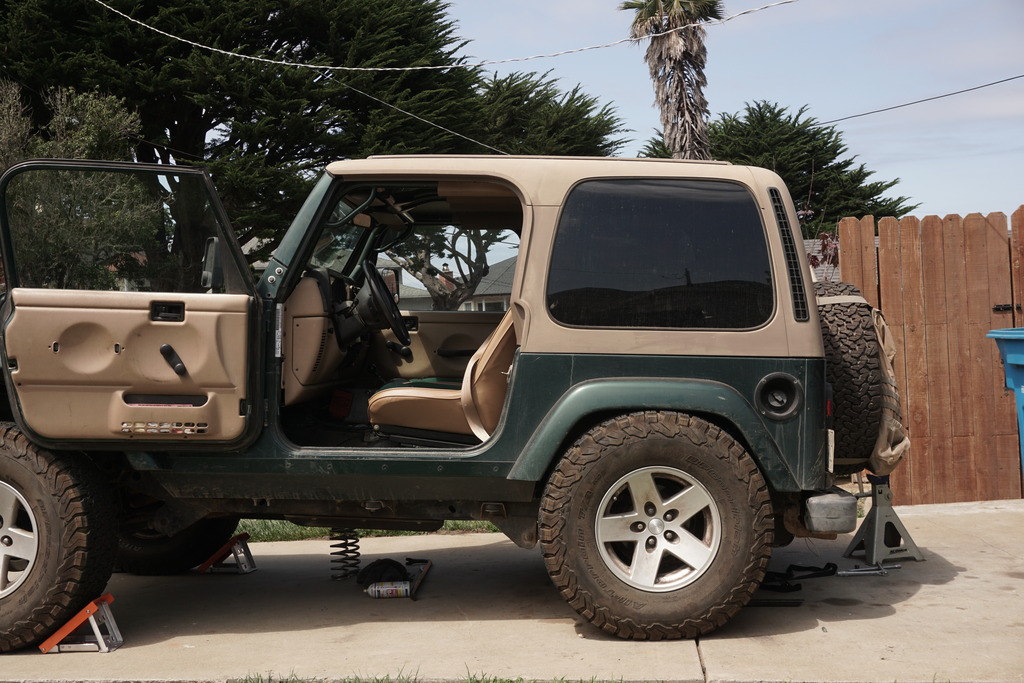
Full Articulation Rear

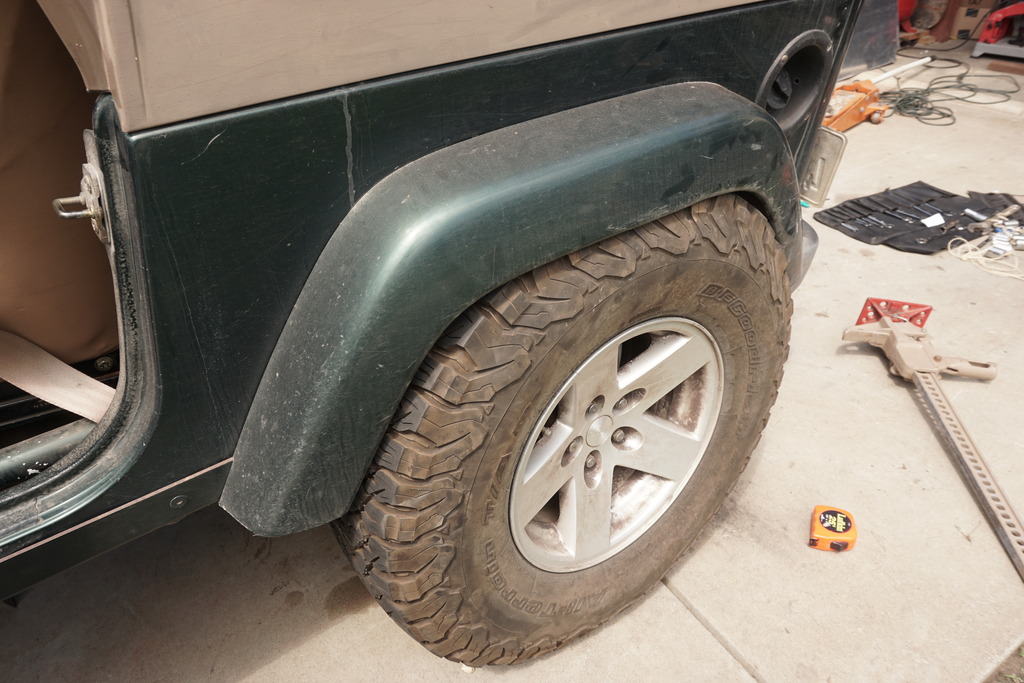
Tank Skid Clearance (You can see where it was hitting before)

must have missed it… I did do a search for custom floor jack – Whats the story on this Floor jack with the custom side alum. plates? Ive been looking for something just like this! Are those side plates a Custom deal, or from a supplier? Looks great, and would meet my needs – Please share info. Thanks. Dan
Something I saw a bunch of the guy’s on the desert forums doing so I made a full one piece skid out of a 5″x5″ .25″ wall Square 7075 Tube I had. Actually the same tube I made the front bumper out of. I was planning on finishing the front and rear skid on the jack but still haven’t gotten around to it. Even without the front roller the jack is light enough to slide around concrete. I use it on my cars all the time in the driveway.
Search around for HF 1.5 Ton Jack Skid and you’ll find some commercial options as well :
http://www.ruffstuffspecialties.com/catalog/HFSKID.html
http://dmzfab.com/product/jack-skid-plate-small/
http://www.c4fabworks.com/Harbor_Freight_Jack_Mount_p/cff-001-001.htm
Well, in an effort to finally wrap up all the small unfinished projects around the jeep, I tore into the dash this weekend and started building a tubular center console.
Goal is to have it hold all of the contura switches, gauges, stereo, ham radio, navigation system and have all the shifters mounted to it.
The easy part is done. Now it is time for all the small detail work! Hopefully I can wrap it up this weekend.

Long time. Long time.
A lot has happened, which I will try to snap some photos of shortly. A quick Re-Cap
February 600 miles of dirt Mexico Border to Death Valley
May Rubicon Trail
Lots of small trips in between.
How did the dash turn out?
Horribly unfinished and an eye sore every time I get in the Jeep. Functional. Yes. Need to find the time to do it right. Really just slapped it together for a trip 6 months ago and never finished it the way I wanted.
The design is really slick, hope to see it finished someday!
Thank you! I do too. Right now I have a lot going on and probably am not going to tackle the console for a few more months.
After hitting the Rubicon last weekend an issue that has slightly plagued my NP231J for the past few years became apparent so I picked up a used 231J w/ SYE yesterday and will be rebuilding it this week to swap into the Jeep. The AW4 & Torque Converter are also starting to show their age. I have an AW4 (OBDII This time) at a buddies shop being separated from a 4.0L early next week. My goal the following weekend is to drop the current Trans/TransferCase, swap in the rebuilt NP231 and put in the newer Torque Convertor and Starter Ring (Mine currently has some teeth missing).
With the spare AW4 I’m going to slowly rebuild the transmission ground up and build an NP242 along side it to swap in the near future. I will likely be doing the high horsepower clutch pack as I want this drivetrain behind a stroker that I am going to either build or buy from Golen. the NP242 will give me a fully locking 2.72:1 Low as well as a full time AWD. While I highly doubt I’ll do this due to the expense of it, Teraflex does convert NP242’s to 4:1 low as well.
Big things, lots of work to do an so little time!
Have you ever thought about just buying a Rubicon and be done with it? LOL
You know that 90% of the work done to my jeep would’ve been done to the Rubicon too. The only the advantage the Rubicon has is the 4:1 and the front Dana 44. Negligible aspects of this build for my use case, just ‘nice to haves’.
So are we talking about building the Jeep that is always in 4 wheel drive even driving on the highway? Sounds pretty awesome but I can imagine some of the wear and tear it’ll put out long term on the drivetrain and tires
The 242 is considered a “FULL TIME” engaged. While I wouldn’t use it often on the street, snowy/wet roads and fast fire road driving would be amazing to have. https://www.novak-adapt.com/knowledge/transfer-cases/np242/
So are we talking about building the Jeep that is always in 4 wheel drive even driving on the highway? Sounds pretty awesome but I can imagine some of the wear and tear it’ll put out long term on the drivetrain and tires
AW4 nice! I swapped out my 32rh for a AW4, I love it and I’m sure a better clutch pack will be sweet. I’m currently looking at putting a shift kit in to make the up shifts more firm.
Did you swap in a trans computer computer? I went with a Baja Shifter, so it shifts manual and have a switch to lock the torque converter. Just curious how hard it would be to wire it up to shift automatically.
Although I do like being able to keep it in first when off-road.
I have the Transgo shift kit, look earlier in the thread and you’ll see my step by step. It’s in the first couple of pages. I did have it wired to the computer for the while but once I went to the RAD Designs Winters Shift Kit I’ve left it in manual the entire time. Some day i’d like to have a selectable switch for both the trans solenoids and the torque converter, but it’s not high on my list. Right now the computer is only hooked up to prevent any CEL from popping up.
Well…the past few days have been parts collecting. I got a great deal on the AW4 w/ rebuild kit. Payed less than even the IPT Performance Shift Kit costs new!
Recently Acquired :
- OBDII AW4 (~90,000 Miles) Complete with Harness and Computer
- IPT Performance Shift Kit w/Raybestos Blue Clutches (LINK)
- NP231J w/ Teraflex SYE already installed
- NP231J Rebuild Kit (LINK)
- Alloy HD Chain (LINK)
While I won’t be rebuilding the transmission in the short term, my plan is to rebuild the transfer case this week and pull both the Transmission and Transfer case out so that I can put in the newer Torque Converter (current one is acting up I think) as well a new starter ring (mine has chipped teeth). Let’s hope I can do all of that in 1 day. It’s going to be a dirty project.
Got the transfer case re-built yesterday and started cleaning up the transmission a bit. Didn’t have the energy to pull everything out of the jeep so I’ll need to find a better time to do that in the coming weeks.
Aug 6, 2017
Hey everyone, due to the photobucket bulls**t, my photos are all obviously unlinked now. Not sure when I’ll have the time to re-upload all the content here, but feel free to PM me and I’ll get you images if there are some specific ones you need.

Leave a comment